Showing posts with label messy crafts. Show all posts

Summer Messy Play Activities for Preschoolers

Fun In The Sun - 6 Tips For Creating A Mud Kitchen For Your Kids


Kids love mud! And as dirty as they may get, it’s time to advocate messy play so they can learn new skills the fun way. The fastest and easiest way to encourage your kids to get outdoors is to build them a mud kitchen.They'll be tripping over each other to get outside

Building your own mud kitchen is a creative, cost-effective way of enabling messy play for your kids while saving money on an expensive play kitchen

You can build your mud kitchen in your own way, and in the end, your kids will have the perfect environment in which to get their hands dirty anytime.


This post contains Amazon affiliate links for your convenience.


Summer Messy Play Activities for Preschoolers

Photo: Jelleke Vanooteghem/Unsplash


Six tips to create your own mud kitchen


  1. Use What You’ve Got

Poke around your garage and see what you can recycle to save money on your mud kitchen. You can use wood, recycled pallets, and old timber for the construction. Old cookware and bakeware, utensils, and decorations can also be used to finish out the kitchen,

Remember, the idea is to ignite your child’s imagination, so your DIY mud kitchen doesn’t need to resemble a brand-new toy kitchen set. 


  1. Stove Tops Add to The Fun

While it’s great to leave some things up to the imagination, it’s a good idea to make your play kitchen resemble a real kitchen by creating a stove top. You can paint the burners on a piece of timber or wood, and you can even add broken or thrifted appliances to your outdoor kitchen to enhance its appearance. You can also use good, old cardboard to create a play stove.


  1. Bake Mud Cakes

The fun part of having a mud kitchen is that your kids get to play with mud and get as dirty as they want. All you need to make mud cakes is some sand or soil and water. You can use old cookware and bake ware to contain them and shape them like cakes and cupcakes.

Parents can get involved by showing kids how to create funky-shaped cookies with cookie cutters and molds or add colored pasta to the mud for added texture. This kind of sensory play is an important part of childhood development, but above all, it’s a whole lot of fun.


Pistachio Pudding Play Dough


  1. Set the Table

A mud kitchen is a fun way to teach your child table manners. Guide your preschoolers through setting a table and laying out the dishes. Show them the way to arrange cutlery and allow your children to bring some garden leaves to create napkins for a rustic table setting.


  1. Add a Sink

Since you’ve introduced messy play to your preschoolers with colored pasta and mud cakes, it’s a good idea to take care of the cleanup. The most logical way to do this is to add a sink to your mud kitchen! To create your sink, use a silver or grey bucket and fill it with water or a big flower put with the bottom plugged works nicely too.

Add a hose in the bucket so that there’s an accessible faucet. This is a great way to teach children how to clean up after themselves. Add some dish washing liquid and a sponge so you can wash all the cookware the kids used before bringing it back into the house!


How to Make your own Dish Washing Soap


  1. Dress For The Occasion

Every chef needs a chef’s hat and apron, so make sure to get these for your child. They will love it! Plus, the apron will offer some protection from mud splatter while playing. Rubber boots are a good idea too. Preschool age kids and toddlers love to wear galoshes!


How to Make your own Chef Hat


Have fun with your kiddos and their mud kitchen. You may want to wear some rubber boots yourself! Encourage your children to enjoy free and imaginative play, and you can bet they’ll learn tons of kitchen tricks in the process. Pretend play is the best way to learn!


Recommended Reading:

Pretend Play and Play Date Ideas from Adventures of Kids Creative Chaos

Fun Books about Galoshes from Amazon


Car Covers for Backseat: Bench Seat Cover with Split

Split Rearseat Cover for Car

Messy Kids? Ready for a big Chaotic Confession? We've got one super messy child dubbed, Mayhem. We needed car covers for the backseat for the past year. So, when Versa Via asked if we'd like to do a review, we jumped at the chance. The Versa Via split rearseat cover for car worked like magic, alas for our car, it was too late. Maybe, it isn't too late for your car? Keep scrolling for our car seat cover giveaway. Enjoy!


This post contains Amazon and other affiliate links.


Car Covers for Backseat: Bench Seat Cover with Split
Easy to install rear seat cover for car.

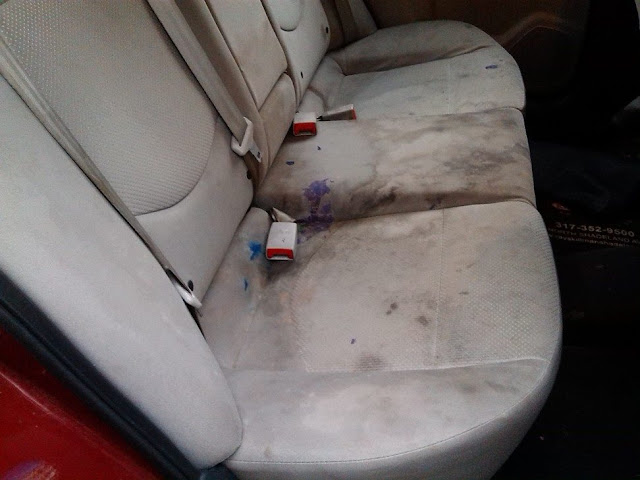
So, the Car Covers for Backseat were a necessity for us. We've had the car for almost 2 years now, so it is practically a new car, right? Not so much. Here goes... You might want to avert your eyes.


Split Rearseat Cover for Car
We desperately needed a Split Rearseat Cover for our Car.

What is that stuff? Well, there's some purple putty, blue candy, maple syrup, ketchup, chocolate milk, Florida sand, and maybe even some duck or chicken poo remnants. Yes, that's a big confession.


One day, after some Nerds (the candy) entered into the backseat, the seatbelt clicker broke. We tried to vacuum them out, but it was too late. RIP seatbelt.

Messy backseats. This fabric is unforgiving.


Another confession, we did attempt to clean the seat before installing the VersaVia Car Cover. We spent $5 sweeping it out and sprayed lots of vinegar and peroxide on it, but it was to no avail.

A bit of good news, we found lots of change and a few Nintendo DS games! Bad news, we even clogged the industrial vac at the carwash.

Mommy refused to sit in the backseat, so did Jake. Daddy would sit on a towel or chair pad. Sigh.

Then, our Split Rearseat Cover for Car arrived. It sat in the front entry for a week. We knew prepping the car was going to take some time. We also worried that the rear seat cover would be difficult to install. Wrong!

This installs in under 5 minutes. Super easy. It adjusts to the size of your seat, and it stays in position even when Mayhem is climbing around back there. If only, we had one BEFORE the mess.

Since we've installed it, The Littlest Pet Shop tiny bits don't fall between the fold or get stuck in the seat belt clicker...


Recommended:


Activities for Toddlers: Sensory Messy Play with Foil, Shaving Cream, and Food Coloring

Toddlers Sight Word Sensory Activity

Whether your toddler loves to get messy or hates it, sensory play activities are essential to learning. When more than one sense is involved in learning, learning becomes easier. This Sight Word Sensory Activity with Shaving Cream and Foil is Messy, noisy, and fun for preschoolers. It also makes a great high chair activity for toddlersEnjoy!

Activities for Toddlers: Sensory Messy Play with Foil, Shaving Cream, and Food Coloring
Shaving cream, aluminum foil, food coloring, and paper confetti for 
Sight Word sensory play.

The little explorers love the sensation of feeling a new substance. They learn hand-eye coordination, fine motor skills, and the ability to deal with being messy through sensory play. This activity is great for young children two to six years old.

So, what senses are used?

  • Hearing: The aluminum foil is noisy. Cream makes a swoosh when it comes out of the can.  Shake the sprinkles to the beat of your favorite song.
  • Sight: Add lots of colors for eye candy or combine different colors of food coloring, and watch as they change into a new color.
  • Taste: Use canned cream and sprinkles (see below).
  • Touch: Aluminum is smooth and crinkly.  Shaving cream is cold and wet.  Dots are difficult to pick up.  Squish a little shaving cream on your fingers to make picking them up easier and more fun. 
  • Smell: Shaving cream comes in lots of scents like spearmint, peppermint, or perfumes. Add scented oils or extract for more scentsations :)
One of my favorite things to use for sensory play is shaving cream. It comes in varying scents, it always feels cold, it is light, fluffy, and super fun!  For our last messy play class, we gave each child a large piece of aluminum foil, wrote the first initial of their name, squirted a few drops of food coloring in a blob of cream, and recycled paper from hole punches. 

Fun activity for toddler shaving cream on aluminum foil.  Messy, sensory play is a great tool to use to aid in sensory processing disorders. Starting a sensory play regimen early gives children the best chance for improvement.

What do you think happened?  It was quite surprising. No one messed up their letter.  They played and mixed the blob with food coloring, they picked up the dots and moved them around, but not one preschooler smooshed their letter!  

I demonstrated by decorating my letter with the pieces of paper and mixing in the colored shaving cream.  After this, they were still reluctant to ruin their letters, but eventually one or two began to decorate their letters.  Finally, everyone joined in making faces with the paper and swirling the cold cream around.


This is a great way to teach your toddler the alphabet.  Gently, take their finger and trace the letters.  Focus on a new letter each day.  Add an alphabet coloring sheet.


Tip:  For an EDIBLE option, use refrigerated, canned whip cream, food coloring, and candy sprinkles or colored sugar


Recommended Reading:


Learning Sight Words with Scrabble Tiles

Letter B Printable Coloring Page 

100 Write-and-Learn Sight Word Practice Pages: Reproducible Activity Pages*

Sign up for our free newsletter! 


ADS DISCLOSURE: We've partnered with some wonderful advertisers who may sponsor blog posts or send us samples to test. Some companies pay us to review their products.

*We also use affiliate links, if you make a purchase we get a tiny commission. Kids Creative Chaos participates in the Amazon LLC Associates Program*, an affiliate advertising program designed to provide a mean for blogs to earn advertising fees by linking to Amazon properties, including, but not limited to, amazon.com, endless.com, myhabit.com, smallparts.com, or amazonwireless.com. We also offer Tapinfluence, Google Adsense, SoFab, and Izea ads here. Thanks so much for helping us keep the lights on! :)


JAWS?

Just Add Water System


With all the messy crafts and kid's cooking projects we do on a regular basis, I could start my own landfill with empty bottles of cleaning supplies. So, when the opportunity arose to review a greener alternative landed in my inbox, I jumped on it. I'm so glad I did!

JAWS is awesome. You get an empty bottle, an insert-able cartridge, and a refill pack. Jaws doesn't have an offensive odor and it hasn't irritated my allergies like other products do.  When you've cleaned all those messes and need more cleaner just head to your local Marsh for a new cartridge to insert into your old bottle.  Just add water...


I'm giving away a full-size bottle of all the products with refill cartridges!

Comment below for 1 entry.
For 2 entries Like Kids Creative Chaos on Facebook.
For 3 entries Like Jaws on Facebook.
For 4 Entries Like Playconnection on Twitter.

Creative Pumpkin Activities

Get Creative and Make a Pumpkin Mummy

This pumpkin mummy is an adorable and less messy way to decorate a pumpkin for Halloween! We found these cute little pumpkins over at Hands on as we Grow.  Enjoy!

Mummy pumpkins from Hands on as we grow.

We made these for a preschool Halloween Hoopla class and the kids loved them! Just wrap your pumpkin in cheesecloth.

Recommended Reading:

Why do We Carve Pumpkins?


The Runaway Pumpkin *ad


The Night Before Halloween *ad