Showing posts with label spongebob. Show all posts

Need Cat Food Portion Control?

How do you Control Cat Food Portions?


This shop has been compensated by Collective Bias, Inc. and its advertiser. All opinions are mine alone. #MeowMixatMeijer #CollectiveBias

If you have a cat (or several like we do) you probably have a  time controlling portions. We have one fat cat who likes to hog all of the cat food. What is the right serving per cat? Do you base it on age, weight, or both? How do you control the mess? Meow Mix® Simple Servings™ at Meijer has solved your problem! It comes in a simple portion control package, so that part is easy.

How do you keep your fat cat from nudging the other cats out and stealing their portion? Keep reading to find out how we keep every cat eating their own cat food portion. Turns out, the bully isn't who we thought it was.


Tigger chilling after his meal of Simple Servings.


Tigger and Buddi love Meow Mix® Simple Servings™ cat food. Their favorite cat food flavor is chicken and turkey. When you shop at Meijer you can use their mPerks offer  and get 30% off from 10/08/17 - 11/04/17. Awesome!


First things first, when we walk into the kitchen fat cat follows. He's always looking for an opportunity to eat. There's always dry food in the dish in case he gets hungry between meals, but he's too finicky for that. If the food has been out for more than an hour, he starts slapping the bowl to to get our attention. When we ignore him, he tips the bowl over and spills the 'stale' food out onto the floor. Grr. We sweep the cat food off the floor several times every day. So, of course, he is first to arrive for Simple Servings. The plastic cups are ideal for portion control.


Now, Buddi smells the cat food, hears the the purring, and comes running. Next comes a paw duel and some growling. Then, one of the cats bows down to the other. To our surprise, the bigger cat stood back. She's that blur running in for the food.


With Simple Servings we can fix this mess! Each cat gets their own serving. You can serve it on a plate or leave it in the cup. So no bullying, right? Wrong.


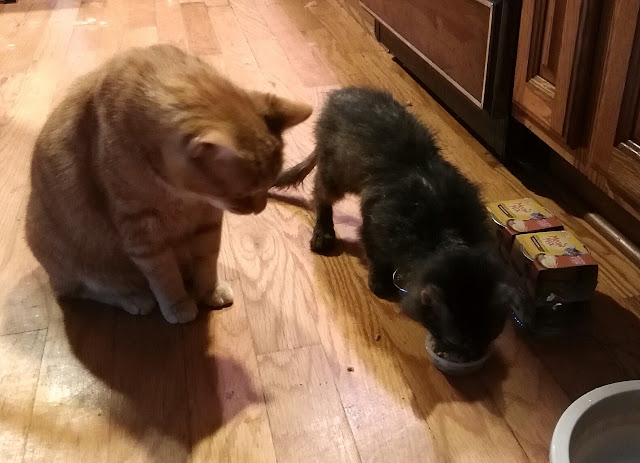
Aww... What a gentleman. He steps back and lets the lady eat. How sweet. We tried to give him his own plate of Simple Servings, but she kept running back and forth to each plate and crowding him out of the way.


So, what's a poor gentleman kitty to do? With the mess-free, new Meow Mix Simple Servings cat food from your local Meijer store, you can serve him on the counter or at the table... Well, if you're a cat person. If you don't like the idea of your cat on the counter just stick a cup on a chair.


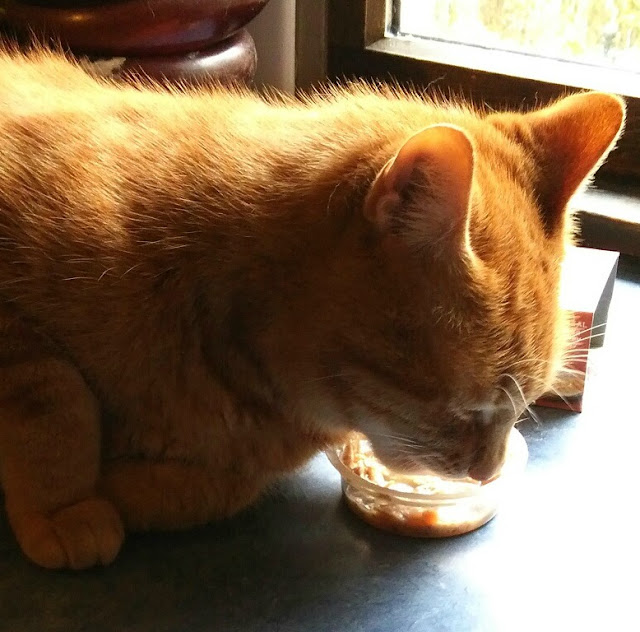
Tigger enjoying Simple Servings on the kitchen counter- no mess!

Meow Mix® Simple Servings™ is a new, single serving of delicious wet cat food in a convenient, mess-free cup. It comes in single-serve portions so there are no leftovers, you can serve right from the cup and pop it in the trash when your cats are finished eating. The cup is easy-to-open and easy-to-serve without forks or spoons.

Tigger loves the pieces of real seafood or poultry in a savory sauce or gravy. His favorite flavor is Chicken And Turkey, but there are plenty of flavors for your picky eaters.

Tuna and Salmon
Seafood Variety
Seafood Variety
Whitefish
Chicken and Turkey
Tuna and Whitefish

Each Simple Servings cup is a single serving so you can feed your cat the wet food they crave, without the hassle of worrying about portioning or what to do with the leftovers. All you have to do is open and serve—it’s that simple.


Yum! Licking his lips and yawning after filling his belly with his fair share.

Join the fun and follow Meow Mix on FacebookInstagramPinterest, and Twitter. #MeowMixatMeijer #CollectiveBias


Problem solved, bellies full, a peaceful ending to the cat food bully situation.


You can find these in the Wet Cat Food aisle at Meijer.


Recommended: Gifts for Pets


Jake's Art - Homeschool Weaving Lesson - Make your own Loom - DIY Arts and Crafts

How to make a loom for weaving scrap fiber: A Homeschool Art Lesson

Jake's Journey in Art goes under the sea in this DIY weaving Homeschool Art Lesson we learned to Renew. Enjoy!


How to weave for elementary make your own loom
Our loom has both warp and weft framework to better illustrate 
the concept to young children.

To weave a textile, threads (or scrap fabric) are woven on a frame called a loom. The first vertical threads on the loom are called warp threads. Threads that are woven horizontally in and out of the warp threads are called weft threads.


Cut notches in the cardboard frame to keep yarn in place.

Recycle a piece of cardboard from a cereal box or a foam tray to make your loom. You might also like Native American Paper Bag Dress

Cut small notches into the top and bottom of your cardboard(ours are about 1/2", but 1" works well). Make them about 1/2" inch apart. Alex Toys has a great PDF on weaving here.


Spongebob Fabric for Toddler bed tent.

Warp your loom with yarn or string by taking the thread and taping one end to the back middle of your board.  Now, starting with your first notch on the left, begin wrapping through each top and bottom notch without skipping a notch until you get to the right side of the board.  Only the warp frame is required.

Now your are ready to weave your weft. Cut or tear scraps of fabric into strips. Your strips of fabric should be about 1" thick and at least 12"  long. You will need about 20 strips. 


The cat enjoyed the tearing of fabric strips so much 
he needed a nap after playing with them.

For extra ease for smaller children, we added a weft frame as well. Now the scraps of fabric can be pulled through the little squares for guidance. Pull your scrap fabric under the first warp, over the next, and so on. The yarn guide will help younger children see any mistakes made.

When you have completed your weaving tie off all scraps in groups of two at the edges of your cardboard loom, then you can cut your your thread/yarn framework.


How to make a loom - Elementary Weaving Lesson Scrap Fibers Make your own
Spongebob has his eye on you.

This is an easy way to get littles started in weaving. It is also helpful to cut a piece of cardboard about 1" by 3" with a notch in the end. Attach your scrap fabric by inserting it in the notch and use as a tool to weave the fabric through the loom, this is called a shuttle.


Alex Toys Native American Bead Loom Kit for weaving bracelets.

Once you advance your skills, you can weave many beautiful projects. Alex Toys has a Native American Loom for weaving bracelets.  It is a professional quality loom that makes incredibly authentic bracelets.  We are working on our patterns and will share them soon.


Kid's room cartoon character theme (that way we don't have to worry about matching or new fads).Check out the automobile sun visor we used as a headboard. 
It is simply nailed to the wall.

Jake loved the idea of using his toddler tent cover as scrap fabric for this project. We renewed an item that was dear to his heart. It had been ripped from rowdy play and was no good as a tent, but we saved it anyway in hopes to repair it or transform it into a pillow or some other creative endeavor. The SpongeBob fabric was the perfect accent for his room. 


Yep, we need a hanging stick, but the kids love it.  
Use favorite t-shirts, pillow cases, or doll clothes for your scrap fiber.

To display your beautiful work of art weave a "weft" stick horizontally through the top row and hang on a wall.  Jake loved his creation and couldn't wait for the stick. He wanted to see how it looked right away, so we hung it by a nail. A little droopy, yes, but he loves it.

Did he love the process?  Not so much.  Much patience is a necessary requirement of weaving. So, Mommy made the loom, got it started and Jake weaved the inner pieces to gain an understanding of the process.  Mommy tied and cut it off making sure Jake watched and understood. This is somewhat time consuming, but the end results are worth it.


Mayhem saw the weaving on his wall and wanted it for her room. Score! This project journey ended on a very happy note.   


Recommended Reading:


Learning How to Weave*

Party Time: SpongeBob SquarePants*


ADS DISCLOSURE: We've partnered with some wonderful advertisers who may sponsor blog posts or send us samples to test. Some companies pay us to review their products.

*We also use affiliate links, if you make a purchase we get a tiny commission. Kids Creative Chaos participates in the Amazon LLC Associates Program*, an affiliate advertising program designed to provide a mean for blogs to earn advertising fees by linking to Amazon properties, including, but not limited to, amazon.com, endless.com, myhabit.com, smallparts.com, or amazonwireless.com. We also offer Tapinfluence, Google Adsense, SoFab, and Izea ads here. Thanks so much for helping us keep the lights on! :)


Pineapple Valentine Day Craft Idea for Kids Classroom Box

Make this Easy, Valentine Day Classroom Craft Idea for Kids from a 2-Liter Plastic Bottle: Recycle!

For this, classroom Valentine Box, we transformed a 2-Liter plastic bottle. Use this Pineapple Under the Sea for a Spongebob Theme Party or Valentine's Day classroom craft. Enjoy!


Valentine Day Craft Idea for Kids: It's a Pineapple under the sea
2- Liter Plastic Bottle Pineapple Classroom Valentine.
 Valentine Day Craft Idea for Kids Classroom
 Valentine Day Craft Idea for Kids Classroom.

The requirements for his classroom Valentine mailbox called for a shoebox.  Mommy's idea of using a 2-Liter bottle was extremely unsettling for Jake, but he thought the end result was A-W-E-S-O-M-E!


Sure, there was a little crying and a lot of pouting as he made his point. Apparently, the teacher's flyer had made it clear the project was to be no smaller than a shoebox.  And, "Mommy a shoebox is the perfect size; you just cut a slot in the top and glue on some hearts!" (Said in deplorable frustration.)  


Got a stickler for the rules? You might like Jake's Journey in Art.

Mommy did not have a shoebox to spare nor the extra cash to buy a new pair of shoes just for the coveted box. The cereal box, briefcase-looking mailboxes on Pinterest were tantalizing, but I wanted something different.


"Why can't we cut a slot out of a bottle and glue hearts on it or make it a rocket or something?" 


Stomp. Stomp. Stomp. Do you hear that? It is the sound of Jake jumping up and down on the kitchen floor in desperate refusal. "We'll talk about it later, Jake." And with that, we were off to purchase Classroom Valentines.


One box of Spongebob exchange cards later, and Jake decided said detested bottle would make an awesome Pineapple. Genius.


How to Make a Pineapple Valentine Box

We cut a slit in the middle of the bottle to represent a window, cut wavy, one-inch strips from brown paper lunch sacks, and covered it with glitter. Then, Jake took a toilet tube, cut green leaves from construction paper, glued them to the tube, and stuck it on top of the bottle. Foamy stickers spell his name just above the window and a construction paper heart glued to the end of a straw decorates Spongebob's house for the Valentine holiday.


Recommended Reading:

Easy Classy Valentine 


SpongeBob's Secret Valentine *


Pig Valentine Idea


ADS DISCLOSURE: We've partnered with some wonderful advertisers who may sponsor blog posts or send us samples to test. Some companies pay us to review their products.

*We also use affiliate links, if you make a purchase we get a tiny commission. Kids Creative Chaos participates in the Amazon LLC Associates Program*, an affiliate advertising program designed to provide a mean for blogs to earn advertising fees by linking to Amazon properties, including, but not limited to, amazon.com, endless.com, myhabit.com, smallparts.com, or amazonwireless.com. We also offer Tapinfluence, Google Adsense, SoFab, and Izea ads here. Thanks so much for helping us keep the lights on! :)