Showing posts sorted by date for query finger paint. Sort by relevance Show all posts

Child Development Psychology: Sensory Play Aids in the Learning Process

Early Childhood Development: Learn with Sensory Play


The psychology behind a child's ability to focus academically or follow rules can be positively influenced by the environment. Parents and caregivers can help children with sensory processing disorders or developmental issues ease into everyday activities with simple games and activities.


Child Development Psychology: Sensory Play Aids in the Learning Process

Jake's Journey in Art: Homeschool Printmaking Lesson with Foam Trays and Pencils

Homeschool Art Lesson in Printmaking

Jake's journey in art focuses on REUSE. Make your own prints with foam trays in this fun Printmaking lesson. This homeschool art lesson requires only a few supplies making it perfect for homeschool. Enjoy!


Reuse Foam Trays for Printmaking
Animal Prints with Foam Trays Piggy Art.

What fun! This is an incredibly easy way to teach the art of printmaking to young children. The assignment required choosing an animal to draw and first drawing it on paper by looking at the image upside down. If you draw an image upside down, you tend to focus less on the end product and more on each individual line. 

The idea is to make drawing perfectly less overwhelming, when turned right side up, it magically becomes a great drawing!


Homeschool Art Project How to make your own Prints with foam veggie trays
Printmaking Lesson: Messy Craft with Paint and Prints.

Hmm... Great theory. Jake drew his pig by copying the image with the right-side up, then he proceeded to complain profusely about how everyone's drawings were better than his. It took a great deal of coaxing to get him to draw the picture upside down. He felt it was a waste of time and "stupid". 

The battle ensued, he tried it, and the results were similar. That's good news and good news, I think. The good news is he tried it, saw it worked, and wasn't stupid, and the good news is he draws pretty good either way.

You will need: 
Foam Trays, Pencil, White Paper, and Acrylic Paint.

First, draw a picture of an animal on a piece of paper. Remember, if you are looking at an image, turn it upside down and draw it upside down first. Now, turn your image around, and check out your handi-work. This is practice.

The next step is to "draw" the image onto a foam tray. Make sure to press down hard to make a deep indentation into the foam. Now, cut the edges off your foam tray so it is a flat surface. It needs to be completely flat to make the print.


Lightly paint your foam image. You can use one color or several. Make a practice print on paper to remove some of the excess paint.

Then, carefully place your foam tray paint side down onto a clean sheet of paper. Press firmly, but do not move the tray or the image will smear. With a finger or hand on each end of the tray, carefully lift it from the paper to reveal your beautiful print. Wipe the tray clean, and experiment with new colors. 


Once they started making prints they didn't want to stop!

Tip:  The best prints are the ones made as the paint is starting to wear off the tray. This is a great way to make holiday or birthday cards. You can also cut them out and frame them as Christmas gifts.


Recommended Reading:


Kids Creative Chaos Cooks: Kitchen Kids Series: Holiday Recipes*


ADS DISCLOSURE: We've partnered with some wonderful advertisers who may sponsor blog posts or send us samples to test. Some companies pay us to review their products.

*We also use affiliate links, if you make a purchase we get a tiny commission. Kids Creative Chaos participates in the Amazon LLC Associates Program*, an affiliate advertising program designed to provide a mean for blogs to earn advertising fees by linking to Amazon properties, including, but not limited to, amazon.com, endless.com, myhabit.com, smallparts.com, or amazonwireless.com. We also offer Tapinfluence, Google Adsense, SoFab, and Izea ads here. Thanks so much for helping us keep the lights on! :)


Sand Art Bottle Craft No Sand Colored Rice

How to Make Sand Art in a Bottle without Sand

We wanted to make sand art in a bottle, but we didn't have any colored sand. Also, we like to make our crafts edible whenever possible so that toddlers and preschoolers can participate without getting sick. Isn't this lovely? Just what does one do with such a beautiful piece of art? We put it in our kitchen window.

Make Sand art with edible colored rice in a bottle.
Colored rice in a bottle in place of sand.


How to make sand art in a bottle with colored rice

To get started you will need:

White Rice, Salt, Baggies, and Food Coloring

How to color rice.
Coloring Rice.
To make sand art with rice:

Place dry rice in a Ziploc bag.
Squeeze in 3-4 drops of food coloring. 
We used NEON colors.
Add some rice and a little salt to brighten the color.
Shake, then use hands to mix any rice that doesn't take color right away.


Purple colored rice.
Knead the rice to mix in the color.
Now you are ready to create beautiful sand-art designs with rice. Grab a funnel and have fun. Want to make an intricate pattern? Use the end of a paint brush to tap rice down. You can make flowers easily. Give it a try and show us your skill in the comment section, "Tell us your two cents" below.


Making rice art with a funnel.


We used Play-doh as a cork. Make a little ball and tap it in with a finger.
Leftover, colored salt crystals.
"Hey, Mommy is food coloring edible?  Wait, I know it is because it says food.  Can I have some?"


"I love salt!  Rice, not so much."


Recommended Reading:


Sensory Activities: Edible Straw Painting for Toddlers ~ Yum!

Edible Painting with Straws is Fun, Sensory Activity for Toddlers

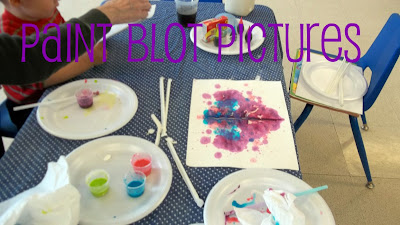
Toddlers love to play with straws. One of the first milestones is learning to drink out of a straw. Blowing through a straw if also a fun, sensory experience for toddlers. This activity uses both. It is fun to watch them practice. Grab a cottonball to teach them to blow through the straw and then mix up some edible paint to make these cool, colorful blot pictures.

Edible Painting with Straws is Fun, Sensory Activity for Toddlers
Our paint isn't just edible; it is yummy too!
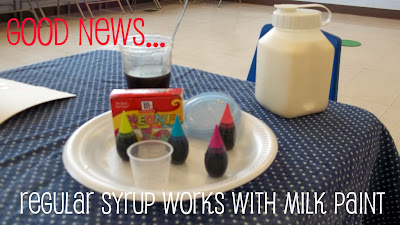
Yummy edible milk paint recipe
Neon food color, maple syrup, milk, and cornstarch. Mix in three equal parts syrup, milk, and starch. Add one or two drops of color.
Little ones learn to blow thru the straw vs. sucking ~ not as easy as it seems.
It makes great finger-paint too.

Recommended Reading:


Crafty Kids: Fun Projects for You and Your Toddler

Edible Paint Craft: Kissing Hand Preschooler Sensory Art

The Kissing Hand by Audrey Penn is the perfect Story for the First Day of School

This story is so sweet, a little tale about Mama and Baby Raccoon. Mama kisses her baby's hand before he heads for his first day of school. We've made a companion craft for preschoolers with a Sensory Play appeal that uses our special recipe for edible paint.
The Kissing Hand with Craft for Preschool & Kindergarten with edible paint.
The Kissing Hand with Craft for Preschool and Kindergarten.
Chester Raccoon's Mom reassures him he will enjoy school. She takes his hand, gives it a kiss and tells him to touch his cheek when he needs a kiss. He gives his Mommy a kissing hand too. And, we've made one for you to share with your little ones.

How to Make an Edible Handprint for The Kissing Hand Book

Vanilla Jell-O Pudding Cups
Gel Food Coloring
Strawberry Gel Pie Filling
Sugar Sprinkles
And lotsa love...


The Kissing Hand book.

Look, it's a craft. It's a dessert!  It's crafty, edible art!

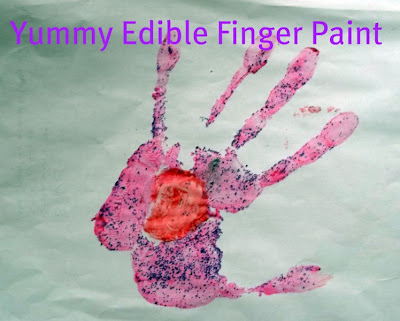
This hand-print is 100% Edible and Yummy too.  Jell-O Pudding Cups make the perfect finger paint, just add a little gel food coloring. We let the kiddos mix in red and blue for a fun color mixing experiment, then we got some gooey, strawberry pie gel, plopped it in the middle to show where to kiss, and then added purple sugar sprinkles on top.  

It smells and tastes great and after six weeks this one still looks the same (no nasty rotting) so pin it on your fridge or better yet, frame it!


Recommended Reading:

The Kissing Hand

One Tricky Monkey