Showing posts sorted by relevance for query art. Sort by date Show all posts

How to Make a Basic Color Wheel and Primary Art Lesson Homeschool

THE PRIMARY COLORS: ROYGBIV 

How to Make a Color Wheel Homeschool Art Lesson.

If you're following Jake's Journey in Art this homeschool art lesson isn't from 3rd grade art. We've been combining lessons and working on everything together to make it more like a classroom and easier for the teacher (me). This is the 1st grade Primary Color Lessons for homeschoolers, but we added a science component and more to make it more interesting for the older elementary kids too. Enjoy!

This post contains Amazon and other affiliate links for your convenience.


Sesame Street teaches Primary Colors.

Henri Matisse loves primary colors.


cute primary color wheel for preschooler or early elementary
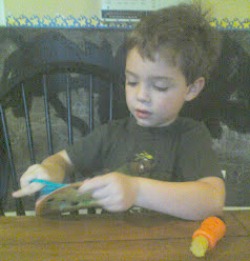
Mayhem's second attempt (First Grade).
Preschool Color Wheel Ideas
Mayhem's first attempt: a color wheel cat.
He has all the colors just not in the right position.
He got the letters but not the wheel.  The smudges are  two
primary marker colors blended to create the secondary  colors.

So, what is a technically correct color wheel?


Colorwheel Art Lesson


The colors of the RAINBOW or those that appear in a prism. Here is a fun scientific lesson in PDF form from Stargazers and NASA.

We studied the use of primary colors by the Masters like the Matisse pictured above, and then we chose a farm animal to trace with pencil and paint with only the primary and secondary colors.

Jake's bunny with primary and secondary color complements.

Jake was a champ when it came to the technical aspect of art. He reminded me of the cheat to remember the primary and secondary colors. Red, Yellow, Blue, Orange, Green, Indigo, and Violet better known as ROY G. BIV.  He also knew prisms reflect the light from the sun and radiate these colors. Although, he knew about the color wheel he didn't have a good grasp of the concept of contrasting or complementary colors.

We're going to explore this concept. Math and Science are everywhere in ART. So, my little genius, art critic is going to learn about the golden rule sooner than later. Funny how people tend to be one or the other, left or right brained. I'm taking on the challenge to prove it doesn't have to be either or.

Paint a Primary and Complementary Color Bunny Elementary Art
Mayhem's bunny. They both traced the bunny from an original drawn by me. Yep, she's 6, loves art and hates math.


Click the thumbnails below to catch up on our 
Homeschool Art Journey
 or start here with LESSON ONE.
From Wikipedia:
Complementary colors are pairs of colors that are of “opposite” hue in some color model. The exact hue “complementary” to a given hue depends on the model in question, and perceptually uniformadditive, and subtractive color models, for example, have differing complements for any given color.


The complement of each primary color (red, blue, or yellow) is roughly the color made by mixing the other two in a subtractive system:
  • red complements (blue + yellow) = green
  • blue complements (red + yellow) = orange
  • yellow complements (red + blue) = violet


Recommended Reading:


Lesson 2 How to Make a Tunnel Book: Elementary Homeschool

Ideas for your next Homeschool ART Lesson: Summer Tunnel Book from Jake's Journey in Art

Working from crayons to Picasso. The art of the tunnel book. Learn how to make a tunnel book, it isn't as easy as it looks!

So, if you are following the story, you may remember we had a bad experience with an elementary art teacher. Might I just add- this occured at a 4 Star school.  I'm pretty sure she has tenure. Oddly, outside of the classroom (at least with adults) she was very personable. If you haven't read it click here for Lesson One - Art Expression.

The infamous Tunnel Art Book. Oh my!  Even with my art and architecture background, I had difficulty following the instructions for this one. We watched a video, we looked at samples, and still it just wasn't clicking for me.  Perhaps, I over complicated it.

Well, my struggling Art-hater truly hated this one. If I couldn't explain it- why should he bother trying, right?  So, we sat it aside for a day, and then a week, and then a little bit longer. I tried to make my own by cutting out a frame and gluing the sides together, but it was so much trouble. I refused to make another one, so we used it as the tunnel for Jake's book.

Cut and pasted the important pieces so we can keep it in a scrapbook.

Turns out, I had NO IDEA what I was doing, but Jake drew some nice trees for the background even though he complained the entire time.  When he finished, he complained some more, "Mine isn't as good as yours.  Amanda's trees look better than mine. I cannot do this; I hate art!"


So... apparently somewhere along the way, I missed am important step.  The next day, the little one and I tried one last time. The sides are sheets of paper folded in half, and at the half way mark we glued (and taped) the frames for the tunnel effect.  I scribbled some pictures, and she drew some beautiful creatures and a background, and we attached some to each interior frame. These did not stand on their own; and they are extremely flimsy, or our construction paper is just way too thin. 

elementary homeschool art tunnel books

Anyway, we tried our best, and that is what really counts- right?  Hopefully, our failures will help you have a successful Tunnel Art Book.  In two years, when the little one gets the same lesson; we'll refer back to this post and try with thicker paper.  I'm thinking CARDBOARD sides.

The Little's background and other fun items.

Here is a link to an entire site about tunnel books.  Hope this helps spark your creativity!

And... here is their closest example to the way our assignment was described.

How to make a tunnel book
Too cool ~ It is a construction site!  Photo from Popular Kinetics Press


Recommended:


Green Light at the End of the Tunnel: Learning the Art of Living Well Without Causing Harm to Our Planet or Ourselves*


Bridges and Tunnels: Investigate Feats of Engineering with 25 Projects (Build It Yourself)

COBRA KAI LEGEND TEE INSPIRED LETTER COLOR SCHEME ART PROJECT

COLOR THEORY COLOR SCHEME CUT PAPER LETTERS ART PROJECT


If you watch the popular NETFLIX series, Cobra Kai, you've probably noticed the t-shirts worn by the Anthony LaRusso character, played by Griffin Santopietro. In the series, Anthony is the son of Daniel and Amanda LaRusso, and the younger brother of Samantha LaRusso. He often wears cool printed tees, below the word LEGEND is printed in two tone letters across his shirt. The colorful block print letters inspired this letter color scheme art project perfect for a quick lesson on color theory.

This post contains Amazon and other affiliate links for your convenience.


Anthony LaRusso LEGEND T-shirt Tee Cobra Kai Color Theory Art Project
Letter Art Project:  Anthony LaRusso Legend Tee in Cobra Kai

In my high school art class, we've been working on several hand lettering projects with a letter theme. We started creating tag letters for a graffiti art project and then we moved on to a lesson color theory and how to blend with colored pencils from That Art Teacher. To review the basics of color theory or to achieve a better understanding of the color wheel, watch this video, Color Theory Basics or scroll down to read our simple definitions.

The video below is an awesome companion video to use when teaching the history of graffiti art.


LEGEND Color Theory Letter Project


This letter color scheme project can be be simple or more complicated and adapted for all grade levels. For a simple project for elementary students, simply cut and paste the letters onto a 6" x 12" white, gray, or black poster board using contrasting colors from the basic color wheel. For our homeschool friends that means: Red/Green, Blue/Orange, and Purple/Yellow. Remind your students to eyeball the letters and center the word on the page before the final glue down.

You might also like: How to Paint like Eric Carle

For high school students in a basic art class, remind the students that contrasting colors are simply colors that are opposite each other on the color wheel. This will give more color options. For more advanced classes, have art students design their letters based on a color scheme: monochromatic, complementary, double complementary, split complementary, triadic, tetradic, analagous, intermediate primary, secondary, or tertiary. We used cut, brightly colored paper in anticipation of a color paper unit on Matisse, but you can also use acrylic paints.


COBRA KAI LEGEND TEE INSPIRED LETTER COLOR SCHEME ART PROJECT


What are the Color Schemes?

Monochromatic  -  One color. A monochromatic color scheme ranges between lighter (tints) and darker (shades) versions of the base color or hue.

Primary - The basic colors. Red, Yellow, and Blue. With crayons, pencils, and paint, these colors can be combined to create the secondary colors. (Don't let Google and Digital Art confuse you.)

Secondary - Green, Orange, and Purple. 
(Red + Blue) = Purple, (Red + Yellow) = Orange, (Yellow + Blue) = Green.

Triadic - Primary and secondary color schemes are also triadic colors schemes. A triadic color scheme is made up of three colors evenly spaced on the color wheel. These colors form a triangle across the color wheel.

Tertiary - A primary color + a secondary color. Tertiary colors combine primary and secondary colors to create compound colors: blue-green, blue-violet, red-orange, red-violet, yellow-orange, and yellow-green. 

Complementary -  Two colors that are on opposite sides of the color wheel. The basics are Red/Green, Blue/Orange, and Purple/Yellow. However, you can pull-out a color wheel to find more variations such as, Yellow-Orange/Blue Violet.

Double Complementary or Tetradic - Using two sets of Complementary colors together. For example, red/green paired with yellow/purple. A double complementary color scheme forms a rectangle across the color wheel.


Color Wheel Color Schemes Tetradic


Split Complementary -  A split complementary scheme uses three colors. Start with one color, find its complement and then use the two colors on either side of it. If you look at the color wheel above, blue,  violet (purple,) and yellow-orange form a split complementary triangle. Yellow-Orange/Blue-Violet being the contrasting colors and blue and violet are the splits. If using Blue-Violet, the split complementary colors are Orange and Yellow. Get it? Got it. Good!

Analogous - Analogous colors are next to each other on the color wheel. Only use three to five colors for this color scheme. Analogous schemes can use warm colors, cool colors, or a combination of both depending on where you start. For art that pops stick to three analogous colors.

Intermediate - The tertiary colors are every other color on the color wheel. Tertiary colors combine primary and secondary colors to create compound colors: blue-green, blue-violet, red-orange, red-violet, yellow-orange, and yellow-green. This is also known as an intermediate color scheme.


How to Make Block Color Scheme LEGEND Letters with Bright Colored Paper


Supplies:

Black, White, or Gray Poster Board (6" x 12")
Ruler
Pencil 
Scissors or Xacto Knife
Brightly Colored Copy Paper or Construction Paper

Beginners will want to measure to choose letter size and then eyeball the position on the poster board before gluing it down. Divide 12" by the number of letters you choose to use. The answer will provide enough space for your letter and the space between each letter. For example, 12/6 = 2". Allow 1 1/2" for each letter and use the extra space to form a border and proper letter spacing.

More advanced students should use the ruler to lay out a grid on the poster board. Draw separate grid lines for the block letter, space between the letters, and a border around them. Showing the students how to layout and plan for the block letter spacing will prepare them for future work in sign painting, drafting, technical theatre, and architecture.


Draw a horizon line halfway down the middle of the paper at 3". This line serves as the dividing line for the color of the letters. Each letter will be two colors based on one of the color schemes listed above. for younger students, choose contrasting colors. Measure for at least a 1/4" border from the edges of the paper. The width of letters is determined by the number of letters used as mentioned above. If you cut the letters out from a block of paper, with an Xacto knife, you can use the paper as a template to paint letters for a future project.


Recommended:


Anime Art Lessons and Curriculum for Homeschool Elementary Cartoon Animation Keroro

Homeschool Elementary Art: How to draw Cartoon Animation

Allow your kids to watch cartoons on tv with sketch book. Here is our favorite anime character Keroro. The kids study the drawing style and copy it. Try different cartoons for different techniques.

Keroro Anime Cartoon Characters How to draw lesson
Homeschool Art Lesson with Anime Cartoon Drawing and Keroro.

If your kids are like mine they love to watch cartoons. My kids love the obscure cartoons found on Netflix. One of their favorites (which is questionable if you pay close attention) is the Japanese Anime cartoon, Sergeant Frog or Keroro. For Wikipedia Description Click Here


He says lots of wacky stuff. Luckily, most of it is difficult to understand, and it rarely makes sense. I'm not advocating watching the program, but I am advocating allowing them to watch cartoons while working on an ART LESSON.


Keroro or Sgt. Frog
Sgt. Frog a.k.a Keroro

When I was a kid, I wanted to become a SPECIAL EFFECTS ARTIST.  My younger cousin wanted to become a VIDEO GAME DESIGNER both of us were shot down by parents, teachers, and principals. Who said things like, "Do you know how many people want to be that and how many people actually are?" or my favorite from my high school principal, "Well.. they told Johnny Cougar he'd never make it and he did, but still I don't think you should drop Band for more Art classes." Say what?

Grands!® Halloween Recipe Easy Edible Art Bento

Grands!® Biscuits Easy Recipes for Halloween

Halloween is our favorite time of year! We love carving pumpkins and creating fun, edible art or Bento lunches with a Halloween, holiday theme. So, when Pillsbury Grands!® asked us to come up with a Halloween recipe, we were happy to oblige. Enjoy!


Hooty owl biscuits for Halloween.


The Hooty Owls are our favorite Halloween biscuits. Before baking, we made a slice in each side of the biscuit and pulled them out to look like wings. Then, we cut a sausage triangle for a nose. Snack pepperoni makes perfect owl eyes. Bake according to package directions.

Grands!® Halloween Recipe Easy Edible Art Bento
Grands!® Halloween Recipe Easy Edible Art Bento.
This easy Grands!® Bisuit Halloween recipe is fun for toddlers or preschoolers to make, and it makes a great after school snack for elementary age students. They can choose their favorite Halloween character. We made Jack-o-lanterns, Jack the Pumpkin King, creepy monsters, and little hooty owls!

Easy Recipe for Halloween
Creepy monster Halloween biscuit with pepperoni and sausage.
For this creepy monster, we sliced the pepperonis in half. Then, we sliced the sausage lengthwise cutting out pieces for a long nose and two eyes. Just push into the raw dough. They will bake in place.

Below, we made Jack the Pumpkin King with just sliced sausages. As you can see, these are easy for little ones to make. Just pre-cut the meats for them, and let them stick into the biscuit for some sensory, fine motor skill practice.

Make a Skeleton Biscuit for Halloween with Sausage.
Skeleton biscuit is easy edible art for Halloween.
Easy Jack-o-lantern, pumpkin biscuit is fun to make for Halloween.
Easy Jack-o-lantern pumpkin biscuit is fun to make for Halloween.
Owl edible art Craft for Preschool or Toddlers.
Owl edible art craft for preschoolers or toddlers.
Cute, baby owl edible craft for Halloween.

Grands!® Halloween Recipe Easy Edible Art Bento ideas.
You can share our photos with the kids to inspire them, but let them make their own edible creations.
  • Set out several small cups, each with a different ingredient.
  • Remember, pepperoni, sausage, hotdogs, Zucchinni, Summer Squash, and peppers work best.
  • Give each child a paper plate with a raw biscuit.
  • Let them create!
  • Bake according to package directions.
  • Enjoy with milk or apple juice for a fun snack.

Grands!® Halloween Recipe Easy Edible Art Bento
Grands!® Biscuits Easy Recipe for Halloween.

Be sure to share your creations with us! We love to see your creative ideas.


Recommended:

Cool Lunchbox Ideas

Owl Paper Crafts for Halloween

Halloween Cupcake Pans*

Plan a Make Believe Bakery Companion Activity


*This is a sponsored conversation written by me on behalf of Pillsbury. The opinions and text are all mine.


ADS DISCLOSURE: We've partnered with some wonderful advertisers who may sponsor blog posts or send us samples to test. Some companies pay us to review their products. *We also use affiliate links, if you make a purchase we get a tiny commission. Kids Creative Chaos participates in the Amazon LLC Associates Program*, an affiliate advertising program designed to provide a mean for blogs to earn advertising fees by linking to Amazon properties, including, but not limited to, amazon.com, endless.com, myhabit.com, smallparts.com, or amazonwireless.com. We also offer Chitika, Google Adsense, and Social Spark ads here. Thanks so much for helping us keep the lights on! :)


How to Make Salt Dough Recipe: Self-Portrait Ornaments

How to make Salt Dough Self-portraits as Ornaments

Did you ever wonder how to make salt dough? We made self portraits for a homeschool art project. I included how to make homemade clay and a few salt dough recipes. These mini-mes are a great companion project for a preschool or kindergarten learning body parts lesson. You can also make Christmas Tree Ornaments from Salt Dough. We played around with a variety of themes during our homeschool art lesson. Enjoy!


This post contains affiliate links for your convenience.*


How to Make Salt Dough Recipe Christmas Ornaments Decorations
Salt Dough Holiday Ornament Recipe.


Make a Halloween Tree with Homemade Dough Ornaments.


How to make salt dough self portraits Christmas Decorations
Self portraits from homemade clay and salt dough.


How to make dough Christmas ornaments
Make Christmas and Holiday ornaments by inserting straw to form a hole.

This recipe is for  how to make clay without cream of tar tar.


Salt Dough Recipe:


1 C. flour

1 C. salt


1/2 C. water


Mix together and knead.


When ready to cook, put on a baking sheet in 


oven at 100 degrees C/ 200 F for 2-3 hours.


Cooking is not necessary, leave your creations 


in a safe place to dry. We left these in a table drawer


and forgot about them.


When cool, paint or decorate with beads or candy.


Salt dough cookie faces.

You might also like how to make Homemade Clay with cream of tar tar.


We made these self-portraits about four years ago and forgot about them. They've sat in the end drawer of our dining room table ever since. They were never cooked nor painted.

Jake was about four years old and he hadn't met his elementary art teacher yet, but he still had an aversion to art. It was a sensory issue. He didn't like getting his hands dirty. He also worried about getting things on his clothes. If either of these happened, he would get very upset. I suppose this is where my love  of messy crafts was born.


I liked to be tidy as a small child too. I didn't play like the other kids on the playground, because I didn't want to ruin my leotards (today we call them tights) or get grass stains on my clothes. These things troubled me a great deal. So, I'd walk around the perimeter of the playground until the teacher blew the whistle. Little did I know, it was OCD. I've recovered, but some people don't appreciate it. The only way for me to stay sane is to embrace messy things. 


Yep, I didn't want Jake to struggle with the same wacky demons, so I encouraged sensory play.


Even now, he wants to hurry and complete the project so he can wash his hands. If we are mixing dough, he can't let it dry. You know, that crumbly, crackly feeling  on your hands? Mayhem and I like it. It's fun to let the dough dry and then scrape it off similar to letting school glue dry on your hands. I like seeing the fingerprints in the glue peelings. 


Jake? No way. I think this has a lot to do with his hatred of art, and then the teacher came along and made art a boring chore. 


He strives for self-inflicted perfection. He doesn't like the learning curve. He knows a lot. He is a gifted child. When he has to learn something new he is disappointed he didn't already know it. You can see the shame and the disappointment in his face. 


Recently, he had to take a Scantron test online, the test was smart. The more correct answers, the harder the questions. We told him to guess, but he refused. He labored over each question and made a very educated guess. In the end, he scored above average, but the test was torture. He cried with each question  for the first time aware he didn't have all the answers. 


Jake beginning his journey in art.


If only he could realize art works the same way, but it's better because there are no real answers in art. Beauty is in the eye of the beholder. I am the beholder here. I like his salt dough self-portrait the wavy hair and round face remind me so much of my happy, bouncy, little four year old.

Next week's journey, Animal Printmaking, proved very difficult for a neat freak. Smudges are a perfectionist's nemesis. Start here for Jake's Journey in Art 


Recommended Reading:

Air Dry Clay Projects

Minecraft Creeper Wood Carving Project

Christmas Dough Crafts

Salt Dough: More than 100 Projects! (American Girl Library)


Sand Art Bottle Craft No Sand Colored Rice

How to Make Sand Art in a Bottle without Sand

We wanted to make sand art in a bottle, but we didn't have any colored sand. Also, we like to make our crafts edible whenever possible so that toddlers and preschoolers can participate without getting sick. Isn't this lovely? Just what does one do with such a beautiful piece of art? We put it in our kitchen window.

Make Sand art with edible colored rice in a bottle.
Colored rice in a bottle in place of sand.


How to make sand art in a bottle with colored rice

To get started you will need:

White Rice, Salt, Baggies, and Food Coloring

How to color rice.
Coloring Rice.
To make sand art with rice:

Place dry rice in a Ziploc bag.
Squeeze in 3-4 drops of food coloring. 
We used NEON colors.
Add some rice and a little salt to brighten the color.
Shake, then use hands to mix any rice that doesn't take color right away.


Purple colored rice.
Knead the rice to mix in the color.
Now you are ready to create beautiful sand-art designs with rice. Grab a funnel and have fun. Want to make an intricate pattern? Use the end of a paint brush to tap rice down. You can make flowers easily. Give it a try and show us your skill in the comment section, "Tell us your two cents" below.


Making rice art with a funnel.


We used Play-doh as a cork. Make a little ball and tap it in with a finger.
Leftover, colored salt crystals.
"Hey, Mommy is food coloring edible?  Wait, I know it is because it says food.  Can I have some?"


"I love salt!  Rice, not so much."


Recommended Reading:


Crafting Builds Confidence and Self Esteem in Children

 Essential Crafting Skills That Every Child Should Learn


Art and crafting activities have positive mental and physical benefits. Studies show that when children work together on craft projects, they build language skills as they create together, and more easily understand the perspective of others. Crafting also helps cultivate a child’s sense of achievement, building confidence and self-esteem through creation and experimentation.


In addition to learning important skills, supporting your child with creative outlets for free expression is good for their overall well being and health. Crafting is a wonderful way to relieve stress and offer space to learn to experiment and create. With a few simple supplies and an open mind, children will have a lot of fun while learning to enjoy crafting, all while developing a wide range of important skills. Here are some recommendations for teaching essential crafting skills to your children.


Junk Modeling

Open-ended art projects encourage the development of critical thinking skills. As a child makes a mental plan for what they want to make, they are building visual-spatial skills and exercising both right and left brain function. Designing models and sculpture helps children learn to evaluate shapes. An assortment of containers, wires, plastic, and random bits of household junk can be transformed into robots, toys, or mobiles. Provide glue and tape to help secure the pieces together, and paint and decorations for embellishing the model.


Help them turn a box into a pretend stove.


Sewing

Hand sewing tasks, like threading a needle or tying a knot, help improve hand-eye coordination and fine motor skills. As noted by the Philly Art Center, the small muscles in a child’s fingers, wrists, and hands are strengthened through arts and crafts activities, which helps to make learning to write easier. Older children may enjoy designing costumes or simple bags. Providing a sewing machine for children is a creative and fulfilling way to encourage artistic expression. Math skills, including spatial reasoning, measurement taking, and shapes are skills that can be learned through pattern making and design. Offer to host a fashion show for children to share and reflect on their creations.


What are the Cognitive Benefits of Crafts?


Making A Collage

Teaching crafting skills like cutting with scissors and drawing encourages the development of fine motor muscles. Suggest a collage theme and set a table with an assortment of papers, magazines, fabrics, leftover crafting supplies, and glue. Children will also learn about dimension and composition, gaining concentration skills as they assemble materials to create their art. Encourage children as they create unstructured work, focusing on the process and exploring the creation of art rather than the end product.


String Art

Children who engage with creative activities exercise and develop a creative mindset, learning there can be many ways to complete a task. With yarn, flat top nails or pins, and a bit of scrap wood or cardboard, kids will build skills like measuring and the steps involved in creating geometric and linear art. Patience and imagination will be stretched as they figure out how to transfer their ideas to the surface. Older children can be challenged to make elaborate templates or intricate designs with parabolic curves and repeating patterns. Dr. Kerry Freeman (Head of Art & Design Education, Northern Illinois University) adds that when kids engage in crafting and art for expression and are given the ability to take risks, they are developing lifelong innovation skills that will contribute to their success academically and as adults.


Learning essential crafting skills has so many benefits for your child, contributing to both their physical and emotional development as they grow. Plan to engage your child with age-appropriate creative activities every week. Enjoy spending family time together to teach these essential crafting skills to your child, it’s a wonderful opportunity to bond and create memories.


Recommended:

Pick a Collage Project from this list

Benefits of Extra Curriculars for Kids with Disabilities ad Special Needs


Edible Art: Make Syrup and Milk Paint Heart Toast Valentine Recipe for Artsy Kids

Toddler Valentine Craft: How to Make Milk Paint

Give your little ones a happy start with this He'ART toast, the perfect edible Valentine Recipe for toddlers and kids in a highchair. Make syrup and milk paint heart toast. Artsy kids love it! The recipe for how to make milk paint is below. Enjoy!


Post contains affiliate links.


Valentine Recipe for toddler kids in a highchair How to make Milk Paint Craft Edible Art
Paint a heart on toast for Valentine's Day.

So easy, even a baby can paint some in a high chair (perfect toddler activity). It's all edible! Wear an apron or bib to protect your clothes from food the coloring! 

To Make Milk Paint Recipe:

2 Tbsp. of Milk per color
Food Coloring
Light Karo Syrup
Paint Brushes
Toast

Get creative make chocolate paint, strawberry syrup paint, Nutella paint, the possibilities are endless. Check out the video at the end of this post for amazing art with toast. How to make edible paint.

Valentine Edible Art Milk Paint Recipe for preschoolers.
Valentine Edible Art Milk Paint Recipe for preschoolers and toddlers.
Edible Art: Make Syrup and Milk Paint Heart Toast Valentine Recipe for Arty Kids
Edible Art: Make Syrup and Milk Paint Heart Toast Valentine Recipe for Arty Kids.

Mix the "Paint". Add 1-2 drops of food coloring and a splash of syrup. The syrup gives it flavor and adds a nice shine when toasted. Mix well. Let your little ones paint to their heart's desire.


Milk Paint Edible Recipe

Set your toaster to the lightest setting and insert toast. If it comes out soggy just toast it again. Congrats! You've just made beautiful, edible art. Make some on Valentine's Day to show them how much you care or leave a special message for Santa on Christmas Eve.

Mayhem, age 2.
Milk Paint Toddler Activity for Highchair


Jake's, age 4.
How to make milk paint.


Recommended Reading:


Pete the Cat: Valentine's Day Is Cool


Happy Valentine's Day, Mouse! (If You Give...)


Valentine Pretzels

Valentine Classroom Candy Holder

5 Fab Valentine Crafts for Kids


Toddler Valentine Craft: How to Make Milk Paint