The prospect of becoming a first-time parent is an equally daunting and exciting journey. There are many things that need to be done in preparation for your baby’s arrival, and for first-time parents, the list can often seem never-ending and overwhelming. Wondering how do you plan a nursery? A key task within that list is decorating the nursery, and organizing a space for the newest member of the family. Although it’s a joyous project, there are various factors and small details that are required to create the perfect nursery for your baby. Here at We Buy Any Home we’ve composed a guide on how to renovate a nursery for first time parents, along with things to include and some helpful tips. This article is written by Holly Herbert.
This post contains Amazon affiliate links.
Planning a Nursery Step-by-Step Guide
Step 1- Make A Plan:
It’s no question that preparing for the arrival of the baby takes planning, and planning the nursery is no exception. Your nursery will serve as a multi-functional room, not only will it be the place where your baby will eventually sleep, but it's where you will dress them, change, teach and feed them. Ensuring you have an in-depth plan is a great way to make sure you have everything you need and no little detail is missing.
It’s vital that you ensure your future nursery is pristine before you begin to think about decorating. Babies are incredibly susceptible to germs that arise through dust, pet hair and mold, so it's important that you spend a good amount of time cleaning all surface areas. However, try to refrain from using harsh chemicals when cleaning as the fumes can linger in the air and be toxic if inhaled by your baby.
It’s important to consider the smaller factors about the room. Are there drafty windows? Is the main light overbearing? Do the door hinges creak? All these small maintenance checks need to be fixed prior to the arrival of your baby, as you want them to have the most comfortable time in their nursery.
Once you have decided where you are going to put the nursery, then it's time to get creative. If you're thinking about painting then your options are limitless. Traditional colors are usually pink and blue, however neutral color palettes are becoming increasingly popular for a minimalist feel to the room. If you're thinking of being extra creative then you may want to consider going with a theme or perhaps a mural wall. A side note- if you opt to paint the nursery, make sure you buy a non-toxic paint that won't flake.
Don’t forget to decorate the ceiling too. Babies spend a lot of time on their backs, so why not give them a feature to look at. Consider adding a ceiling mural or a soothing color to enhance your nursery.
Most nurseries are centered around a focal piece of furniture such as a crib, but there are other options to choose from. A painted dresser can work well, or a large window or alcove. A small checklist of essential nursery items includes:
A helpful tip is to ensure that everything is in reach of the changing table- including wipes, changing table covers, diaper disposal system, laundry hamper and a pacifier. This will allow you to reach for things with ease, avoid stress but more most importantly, keep your eye on your baby at all times.
As your baby grows, you will notice that they will begin to spend more time on the floor- therefore it's an important factor to consider before they get to that stage. If you’re opting to lay down a carpet, ensure it’s a shade that won't highlight stains and spills. Wooden floors are a popular choice, and you can put down a rug to add a pop of color and cushion any tumbles.
This is your baby’s first room, so don’t forget to make it feel like home. Including items of sentiment for example, family photos, generational gifts such as soft toys and blankets are a neat touch to completing your nursery.
First, I'll share my process in making the balloon birthday cupcake decoration. You know, the giant balloon that's all over YouTube and Facebook? You'll need to pack a party load of patience to make that balloon cupcake decoration. If you're a mom who drinks wine, maybe step one should be a few sips of a nice Riesling. If you want to make a giant balloon birthday cupcake for baby's first birthday party, even with my simplified method, you're going to need a few hours and at least one faithful friend. Ready? Read on for my Balloon Birthday Cupcake Tutorial!
This post contains Amazon and other affiliate links.
If you click and make a purchase, I may get a commission.
How to Make Balloon Cupcake for Birthday Party YouTube
This was my process, it's real. If you want to cut to the chase, scroll down for detailed instructions on how to make a giant balloon cupcake.
Step One
Refuse to take money from your friend. She offered $75 and dinner. Plan in your head how they must've created the giant balloon cupcake. Draw it out on paper. Watch the videos below. Realize you got it all wrong. Decide you can't do it. Give up.
Balloon Birthday Cupcake Seen on Pinterest YouTube Tutorial
Step Two
Think about it some more. Try it your way. Realize it is going to be tedious. Give up, but remember your blog's motto is, "You can do it!" He's a professional, he must know the easiest way to do it, right?
Maybe this one is easier? (It's not,)
Step Three
Watch videos again. Decide to really pay attention. Have a glass of wine Use the easiest steps from each video. Realize this is completely ridiculous and only a professional balloon designer can make these. This is why the florist said they'd make one for you for $300.
Think about it some more. You're no quitter! You can do it! After all, that's what this blog is all about. Try it your way again. This time with more confidence. Start with a tiny prototype. Watch one more YouTube tutorial on how to make a giant balloon cupcake like the ones on Pinterest. Decide you deserve a nap.
Wow, she seems fun and nice. This isn't a cupcake, bur realize the concept is the same. The skill level is still difficult. It doesn't look easy when they do it. Think about that. They are trying to make it look easy! It's not...
Step Five
Share your tiny prototype with friend who hopes to have the best one year old's first birthday party ever! She's so patient. She trusts you. She has complete faith in you. You find this rattling. But, you're determined. Go back to STEP ONE. Create the balloon cupcake, the way you imagined it was constructed. Listen to friend cheering you on, "See, I knew you could do it." Think friend is nuts. This looks nothing like those giant balloon cupcakes. She's tired, she's over it, she just wants something after all of this effort. You know she's thinking, $300 would've been a lot easier.
Realize it's not perfect, but it will do. Just show it's good side. Reconsider making these for a living. Realize $75 is a great price, understand why the florist wanted to charge $300. THEY ARE SMARTER THAN YOU ARE, THEY DON'T WANT TO DO IT!
Refuse to ever make another one, even though you know full well, that the next one will be better. You learned from your mistakes. You know how to make it straight. You know the ins and the outs. Baby, there isn't enough wine in the world...
What you say? Where are the tiny balloon sprinkles? Well, I ought a.... We bought tiny balloons, we taped them on with duct tape. They looked dumb. I'm sure you need the tiny, long balloons used for balloon animals. I didn't feel like another trip to the store! Sharpies, worked just fine. Pink and purple Sharpies would've been nice though.
Step Six
Take it to the giant balloon cupcake to the party. (That seems like a simple step doesn't it? Well, it's not!) Disassemble the giant balloon cupcake in as few pieces as possible. Place it in the trunk of your hatchback, crossover SUV. Ha, ha. ha. Jokes on you. Panic. You're going to be late to the party. Read text from very patient friend, "Where are you?" Panic some more, don't answer text. Notice your Dad's Trailblazer in the driveway (he left it there so you could get some giant rolls of carpet for the house.) Open the hatch, say a little prayer. It fits! Thank goodness the party is less than five minutes away.
It's three pieces!
Step Seven
Pull up at the church. Rush to get the balloon inside the door. The door, yet another obstacle. See everyone ooh and ahh as you enter. If you've ever been on stage, you know how applause feels. This feels like that. Think, maybe you could make these for a living. After all, this was the first attempt. Surely, it would get easier each time? And, you certainly know what NOT to do.
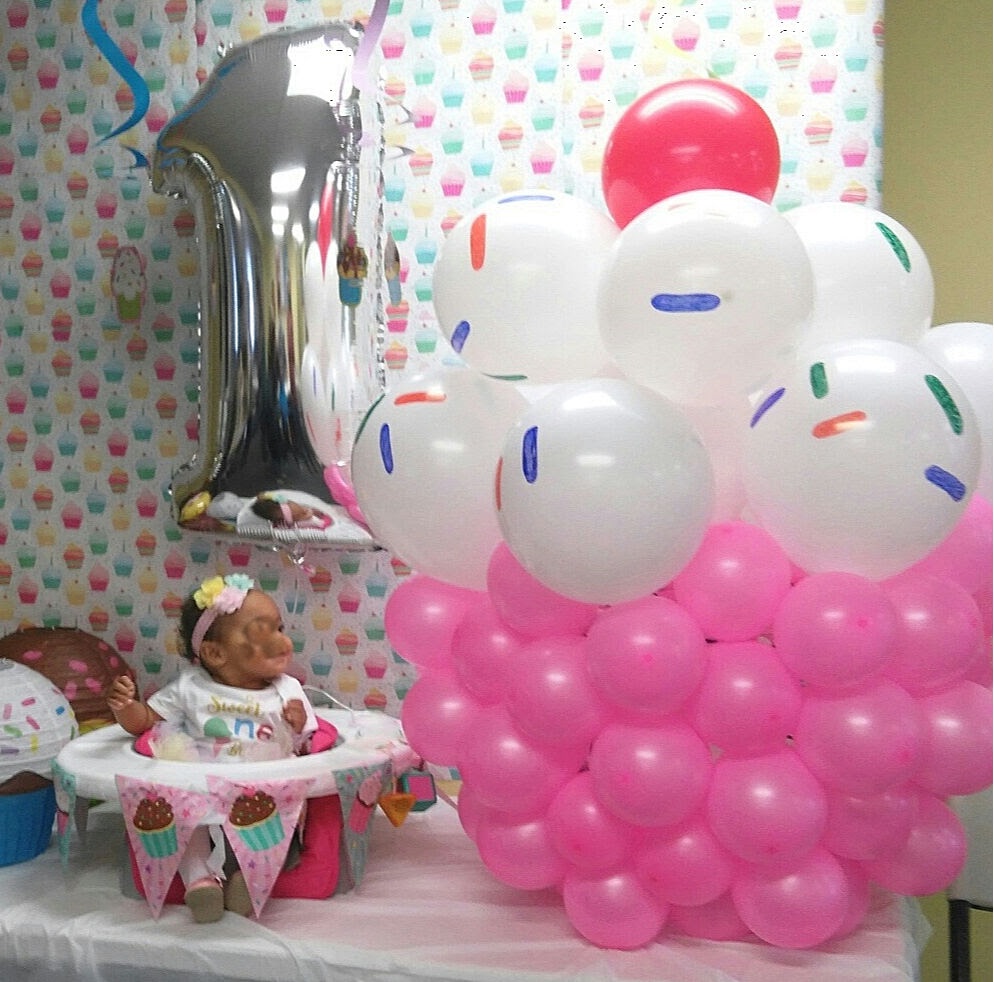
Don't worry, I had to blur baby's face, she's a beautiful baby in the process of adoption.
So, now you've seen the videos, you've read my process leading up to it, here's the UNCONVENTIONAL giant balloon birthday cupcake tutorial. May the force be with you!
Sit down with the laundry basket in your lap. Starting with the second column of holes, tie a PINK balloon to the vertical weave in the basket (between the holes.) Skip every other hole. Do this all the way around the basket. Our basket had vertical line holes, some have circular holes.
Balloons will move, don't worry about this now. Depending on the spacing of your basket's holes, you may need to skip the next row. If you see the basket between the balloons, use every row. If not, use every other row. Got it? You will after a few rows.
Note there are only two rows of holes, I tied two balloons to each vertical strip to get a line of four balloons tall.
The balloons want to escape, the don't stay orderly. Don't worry about this until you've got them all tied down.
Once all pink balloons are tied down, you can then gently push them to arrange them in a straight (ish) line. For the balloon's white cupcake frosting top, I used the process in the ice cream cone video from above. I connected six white balloons together to create somewhat of a circle. I made a separate grouping of four white balloons for the topper and then tied the red balloon in the center with fishing line.
Balloons are willy-nilly, but can be arranged at the final stage.
Here you can see, that the cupcake is 3 separate pieces.
So, how do you attach the balloon sections together? I was going to tie them with fishing line as demonstrated in the first Balloon Cupcake YouTube Tutorial, but that proved too complicated for me. Also, I kept popping the balloons. I tried duct tape, but you could see it. In the end, I didn't connect the pieces at all and was thankful for this when it was time to load the balloon for delivery.
Get the Cupcake lanterns and Pinata from Oriental Trading. Baby's face is blurred to protect identity.
The cupcake's purpose was for a photo shoot for a very special baby's first birthday party. The cupcake wasn't perfect, it had a bad side, but we just turned it to the good side! Photo shoot was amazing! Baby is beautiful, but we aren't permitted to share her face here. Just know, she was tickled to death with her giant cupcake!
Whether you homeschool, teach in a brick and mortar school, or operate an after school or day care program, you should decorate the environment to make it inviting and soothing for your students. Back to school decorations are abundant. What fall classroom theme you choose likely depends on the age of your students. We've found nine fun owl ideas and themes to decorate your classroom like a pro. Enjoy!
This post contains affiliate links.
A popular fall theme for school is always the wise old owl. If you are planning an owl themed classroom to welcome the kids back to school, here are some great options to decorate your learning spaces and then start learning with owl curriculum.
Owl Theme Classroom Decor from Oriental Trading. This "Owl About Me" poster makes a nice icebreaker for those early getting to know you days at the beginning of the school year. At 20" x 17," it is poster size and is great for back to school night display for parents or a fun writing lesson for homeschoolers.
Another way to decorate with an owl theme, is to create your own owl classroom banner. Have each child make a cute paper owl in several color combinations and then string them up on the walls! Get details here: How to Make Owl Garland Banner.
Paper Owl Banner Craft for Classroom.
Birthdays at school can be fun, be sure to let everyone know who's birthday is coming up next with this owl theme birthday bulletin board set from Amazon.
Pair it with these 6" X 7.88" Owl cut outs buddies from Target.
While you're at it, you can open with owl them curriculum. Below, we found owl coloring pages, owl unit studies, and more from TeacherSherpa. Check it out!
This unit about Owls tells about the two owl families and various species of owls. Learn about common features, where they live, and their habitats. Mentioned owls are; elf, great gray, screech, great horned, burrowing, and snowy. Activity worksheets include; word find, word unscramble, criss-cross, spelling. Ideal for second through fifth grade science.
If you run an after school program or daycare or just want to do something extra fun with the class, try some edible art with an owl theme. This edible owl craft is easy to make and the biscuits are cute and yummy too!
One of our all time most popular posts is this torn paper owl craft for preschoolers and early elementary. Do it with older school age kids as an owl art mosaic lesson. Older kids will enjoy this cupcake liner owl craft.
This HomemadeReese Cup DessertCupcake Recipe combines chocolate and peanut butter in a fun new way. A chocolate cake cupcake contains a hidden surprise of a mini Reese's cup. In this Reese Cup Recipe, peanut butter buttercream and chopped Reese cups top the cupcakes. You can make them from scratch or use a box cake mix. Enjoy!
This post contains affiliate links for you convenience.*
If you're planning a trip to Disney World in Orlando, Florida, you want tips and tricks to make your trip less hectic and less expensive. We've got some simple Disney tips and tricks that will help you plan an unforgettable trip to Disney World! Enjoy!
As a member of the media, I received two media passes from Walt Disney World.*
Disney Tips and Tricks.
I wanted to take pictures of, It's a Small World, Space Mountain, and the Pirates of the Caribbean, but I forgot. Thank goodness! Instead, I got to enjoy the rides! Good news, YouTube is here for you! I'm sharing some of the best Disney World and Epcot rides through the eyes of popular YouTubers.
Important Notes:
Everyone gets FastPasses with their regular admission ticket.
Disney Dining Passes are only for guests staying in the hotels.
Tip #1
First tip... go to Epcot first. In the morning, everyone is rushing to the Magic Kingdom. Rush to Epcot. The lines will be shorter in the morning. The longest line we waited in was the security line to get into the park. We drove the car and parked it in the front lot, near the bus stop, just a short hop to the restrooms and then to Spaceship Earth!
Tip #2 This way, you can take the monorail to the Magic Kingdom and make a grand entrance while enjoying the view.
Tip #3 If you have a complaint, be sure to let guest services know asap. They'll solve it- they want to make sure everyone is smiling, because it is the happiest place on Earth! My youngest was over waiting in the security line when we headed to guest services to pick up some passes. She was frowning! The rep asked her name, and then gave her a pass to go to the front of any line of her choice. That made her smile. Happy, happy, happy!
Tip #4
Split, then split it! If you have picky eaters, maybe don't plan on eating at Epcot. There's tons of food choices - too many. But, the kids were starving and we couldn't agree on one. We finally decided to splurge on French Food- the priciest food in the park. I was running out of money fast, and with my food allergies, and the picky eaters, I wasn't sure what to order. We split a chicken dinner. It was more than enough for the two of us. Chicken, veggies, bread, and dessert. The littlest one had a kid's meal.
What's great about this? Everyone is French! The chef came to assure me, I'd be okay. He was obviously very busy. It makes me uncomfortable when they do this... You can tell you are interrupting their work. I wasn't assured that I'd be okay, however, because he didn't stick around long enough to talk -- make sure you know your food allergies and steer clear. Mine are impossible to avoid, so I chuckled when he said, "You'll be fine." We could only hope.
We didn't visit the dome this time. I've been there before. There was a very long line, and I knew we'd visit Space Mountain which is a similar dome-y experience. If you want to do it, use your FastPass here. FastPass Tips from Mousehints.
Tip #5 While you are in Epcot, don't miss the Sum of All Thrills in Innoventions. From the outside, it looks like a boring building, but it is a great place to cool off and relax. There is a lot for young children to do. My tweens loved designing their own ride in 4D. They wanted to immediately do it again, but it was our first ride and there was so much more to experience.
You'll get a card to visit Raytheon online.
Tip #6 When I visited Epcot as a teenager, Figment was my favorite part. Mostly, I think it was because he was a purple dinosaur with a rainbow. I don't know. It was an interesting experience.
I say, if you are short on time, skip this one. Unless, you love smell-o-vision. There are skunk and other smells pumped into the air for your enjoyment. When the ride is over, there is a fun, interactive, hands-on section for kids. We also liked that it was an air-conditioned wait in line.
Lots of Disney Movie "professors" and their experiments here.
Weebo.
While in Epcot, we also visted The Seas area and the Finding Nemo ride. If you have plenty of time, do it. The Seas have a nice ocean exhibit that includes rescued Manatees. If you are short on time, skip it. The line was long, and the ride was less than spectacular.
Tip #7
Remember that happy pass my daughter got for frowning? We used it at the Chevrolet Test Track. This was our favorite ride in Epcot. There's a little surprise at the end. We all wanted this ride to keep going. So much fun! Use your FASTPASS here!!!
When the ride ended, we spent an hour enjoying the interactive exhibit areas.
There is so much to see and do in Epcot! It was pouring down the rain, and a terrible storm was on the way, so we hurried through Epcot to have more time in the Magic Kingdom. You really do need a day or more to see everything in each park.
Since a storm was brewing, we didn't take the monorail to the Magic Kingdom. Instead, we drove the car back to the hotel to take cover. Don't worry, Disney doesn't let a silly little storm spoil the fun. Everything keeps going... rain and all!
We rested longer than we'd planned. Because beds. Because Disney Television. Because free wifi. Because vacation!
Then, we walked out to the main entry of Disney's Pop Century Resort and took a WDW bus to the Magic Kingdom.
Tip #8 Don't take a bus in the rain. People aren't happy on the bus. There are long lines. You might end up standing the twenty minute drive to whatever park you choose to visit next. The bus drives a little faster than you might expect. Park in one of the parks and leave the car for the day. Take the monorail between Magic Kingdom and Epcot. Parking was $20. You decide if that is too pricey. I think it was worth it.
I couldn't help worrying that everyone with a backpack was a terrorist. I've seen too many CSI's and Criminal Minds. There is no security check to get on the buses. Bus was my least favorite. So much so, that while riding the bus, I remembered I had ridden before and hated it then too. Apparently, I had blocked it.
Also, I just have to mention this, but I am hyperprotective. When we left the Magic Kingdom it was late. Some teenage girls were chatting up the bus attendants. I caught the older bus attendants (old men) making inappropriate remarks and letting their eyes wander.
Then, they caught my eye. Oops! Yep, remind your kids that, though it is WDW, you still have to remember about stranger danger. Seems like they just wanted to look and not touch...
Oh, that's not very happy. Just remember, we have to be aware of our surroundings and if we see something, say something.
On to the happiest place on Earth. There is nothing like the Magic Kingdom, even in the rain. Some things are better in the rain, because lots of people melt in the rain and go home.
What will you do first? It is so hard to decide!
Tip #9 Head to the furthest point in the park first and work your way back. Review the FastPass Tips above for the best rides to use with your FastPass. We planned to use it on It's a Small World, but we didn't need to and then somehow we lost our last FastPass option when we tried to delete it at the last minute.
Use it for Peter Pan! The lines are always long. Waiting until the last minute didn't help.
Sure, some things are outdated but still have charm. Other things are so cool, you don't want to miss out!
Laugh Floor
Are youa Monster's Inc. fan? Don't miss the Laugh Floor! The line wasn't too unbearable. Once inside, you'll sit in a comfy seat and enjoy an innovative show. The technology is super cool.
Stitch's Great Escape
More Smell-o-Vision here. Cute. Shorter lines and it is a very unexpected experience.
People Mover
I love the People Mover. No stairs, no escalators- just moving ramps to a sit down ride. This is a low key ride that gives you a great view of Tomorrowland. You even get a sneak peek at Space Mountain.
Tip #10
Here's a BIG TIP! While everyone else is watching the fireworks, catch as many rides as you can! We rode Pirates, Flying Carpets, and Jungle Cruise with no waiting!
Cinderella's Castle in the rain, just before the fireworks.
I'm not a big fan of Splash Mountain. It is similar to water roller coasters at other parks. To me, the line isn't worth it. If you want to ride it, be sure to use your FastPass. I think it is a glorified log ride.
Tip #12
Don't miss Space Mountain. I'm certain, if this were an outdoor roller coaster, seen in the light of day, that I would NEVER ride it! Thank goodness everything is in the dark. It feels rickety. That's part of the charm.
The first time I rode it at sixteen years old, I held my breath and kept my eyes shut. The next time I rode it, I kept my eyes shut for just a second. This time, my nine-year-old kept her eyes shut the whole time. I think she held her breath too. She says she will never ride it again. I said that too.
It is pretty terrifying and pretty awesome. I didn't want my eleven-year-old son to miss out. I didn't want him to ride by himself... Confession, I really didn't want to ride it again. Ever. Funny, how much better it is when you keep your eyes open and breathe!
You can do it! It only lasts a few seconds, and you will never forget it! They've changed the line experience too. Though it is long, there is a lot to do along the way. There's not a better way to end your Disney experience.
So long, Magic Kingdom. We only had one day to explore. Don't worry, we'll be back for more.
Tip #13
It is expensive, but heed all warnings that you need more time. Four days should do it. Take advanatage of those multiple day passes. This year, we didn't make it to Animal Kingdom or Hollywood Studios. There are awesome things to see at both places. Toy Story, Cars, and now, Star Wars, await you at the Studios.
On the way out, don't miss the Mickey Mouse confections at the Main Street Bakery. If you've spent all your money, at least pop in to take a gander.
We stopped on Mainstreet to watch the parade. Again, more than enough to share at Casey's Corner. We spent about $9 on a combo meal that was more than enough food for two. They even shared with me!
Everywhere you go, there are friendly ducks! They want food. Don't feed them. How will they fly? Bread is bad for ducks.
Resting in the rain, sharing mini corndogs and fries from Casey's Corner.
The Parade
Last photo op on Mainstreet.
Tip #14
Single parent with kids of the opposite sex? Send the kid's into the restrooms while you wait outside and listen or pop in as needed. Then, when they return, have them sit together near the entrance. There's safety in numbers.
The Pop Century Hotel is just as fun as the park... almost.
Yes, you can have a cupcake for breakfast!
The food is really good. Whenever they can, they make Mickey ears. It was expensive, but get a kid's meal with fruit and some ala carte items. There are lots of ways to be frugal.
Fun aracade inside the hotel lobby.
Cool interactive games.
Get your rock star on.
So, you saw the awesome pool pics above. We were too tired to swim. The rooms were small, but nice. The Mickey details are awesome! There is even a safe inside the room. We had a fridge but no microwave, that seemed weird. Read more about the room here: Universal vs. Disney.
Have a Happy Disney Trip!
ADS DISCLOSURE: We've partnered with some wonderful advertisers who may sponsor blog posts or send us samples to test. Some companies pay us to review their products. *We also use affiliate links, if you make a purchase we get a tiny commission. Kids Creative Chaos participates in the Amazon LLC Associates Program*, an affiliate advertising program designed to provide a mean for blogs to earn advertising fees by linking to Amazon properties, including, but not limited to, amazon.com, endless.com, myhabit.com, smallparts.com, or amazonwireless.com. We also offer Tapinfluence, Google Adsense, SoFab, and Izea ads here. Thanks so much for helping us keep the lights on! :)
Cardboard Toilet Tubes turned Holiday Hats How many rolls of toilet paper do you go though each month? We've got to recycle that ca...
Follow us on Instagram
Get Circle Time Handbook
Can't remember all of the words to your favorite group game? Get the handbook with reproducible pages to copy and add to your clipboard. All of your favorite games right at your fingertips!