Turn Heirloom Baking Items into Ornaments with these Christmas Tree Decorating Ideas
Remember making Christmas cookies with Grandma? Those sugar cookies were covered in colored candy sugar, icing piped from a tube, and chocolate coated candies. It is a favorite memory I try to recreate every year with my kiddos minus those old-fashioned plastic cookie cutters. Remember? The cutters were floured, but it was still nearly impossible to remove the reindeer antlers or any other tiny details in the cookie cutter. So, we turned ours into heirloom Christmas Tree Ornaments.Enjoy!
This post contains affiliate links for your convenience.*
So, to honor the memory, I tied a Christmas ribbon* through the top of our heirloom ornaments and hung them on our tree. The light reflects behind them with a beautiful red glow making the perfect heirloom decoration for the tree.
Heirloom Decorated Christmas Tree with Lights.
Red, plastic angel cookie cutter ornament.
Red Cookie Cutter holly and "Merry Christmas" gift ornaments for tree decorations.
Handmade Paper Heart Ornament, Metal Cookie Cutters, and Handmade Wooden Decorations.
ADS DISCLOSURE: We've partnered with some wonderful advertisers who may sponsor blog posts or send us samples to test. Some companies pay us to review their products. *We also use affiliate links, if you make a purchase we get a tiny commission. Kids Creative Chaos participates in the Amazon LLC Associates Program*, an affiliate advertising program designed to provide a mean for blogs to earn advertising fees by linking to Amazon properties, including, but not limited to, amazon.com, endless.com, myhabit.com, smallparts.com, or amazonwireless.com. We also offer Tapinfluence, Google Adsense, SoFab, and Izea ads here. Thanks so much for helping us keep the lights on! :)
First, I'll share my process in making the balloon birthday cupcake decoration. You know, the giant balloon that's all over YouTube and Facebook? You'll need to pack a party load of patience to make that balloon cupcake decoration. If you're a mom who drinks wine, maybe step one should be a few sips of a nice Riesling. If you want to make a giant balloon birthday cupcake for baby's first birthday party, even with my simplified method, you're going to need a few hours and at least one faithful friend. Ready? Read on for my Balloon Birthday Cupcake Tutorial!
This post contains Amazon and other affiliate links.
If you click and make a purchase, I may get a commission.
How to Make Balloon Cupcake for Birthday Party YouTube
This was my process, it's real. If you want to cut to the chase, scroll down for detailed instructions on how to make a giant balloon cupcake.
Step One
Refuse to take money from your friend. She offered $75 and dinner. Plan in your head how they must've created the giant balloon cupcake. Draw it out on paper. Watch the videos below. Realize you got it all wrong. Decide you can't do it. Give up.
Balloon Birthday Cupcake Seen on Pinterest YouTube Tutorial
Step Two
Think about it some more. Try it your way. Realize it is going to be tedious. Give up, but remember your blog's motto is, "You can do it!" He's a professional, he must know the easiest way to do it, right?
Maybe this one is easier? (It's not,)
Step Three
Watch videos again. Decide to really pay attention. Have a glass of wine Use the easiest steps from each video. Realize this is completely ridiculous and only a professional balloon designer can make these. This is why the florist said they'd make one for you for $300.
Think about it some more. You're no quitter! You can do it! After all, that's what this blog is all about. Try it your way again. This time with more confidence. Start with a tiny prototype. Watch one more YouTube tutorial on how to make a giant balloon cupcake like the ones on Pinterest. Decide you deserve a nap.
Wow, she seems fun and nice. This isn't a cupcake, bur realize the concept is the same. The skill level is still difficult. It doesn't look easy when they do it. Think about that. They are trying to make it look easy! It's not...
Step Five
Share your tiny prototype with friend who hopes to have the best one year old's first birthday party ever! She's so patient. She trusts you. She has complete faith in you. You find this rattling. But, you're determined. Go back to STEP ONE. Create the balloon cupcake, the way you imagined it was constructed. Listen to friend cheering you on, "See, I knew you could do it." Think friend is nuts. This looks nothing like those giant balloon cupcakes. She's tired, she's over it, she just wants something after all of this effort. You know she's thinking, $300 would've been a lot easier.
Realize it's not perfect, but it will do. Just show it's good side. Reconsider making these for a living. Realize $75 is a great price, understand why the florist wanted to charge $300. THEY ARE SMARTER THAN YOU ARE, THEY DON'T WANT TO DO IT!
Refuse to ever make another one, even though you know full well, that the next one will be better. You learned from your mistakes. You know how to make it straight. You know the ins and the outs. Baby, there isn't enough wine in the world...
What you say? Where are the tiny balloon sprinkles? Well, I ought a.... We bought tiny balloons, we taped them on with duct tape. They looked dumb. I'm sure you need the tiny, long balloons used for balloon animals. I didn't feel like another trip to the store! Sharpies, worked just fine. Pink and purple Sharpies would've been nice though.
Step Six
Take it to the giant balloon cupcake to the party. (That seems like a simple step doesn't it? Well, it's not!) Disassemble the giant balloon cupcake in as few pieces as possible. Place it in the trunk of your hatchback, crossover SUV. Ha, ha. ha. Jokes on you. Panic. You're going to be late to the party. Read text from very patient friend, "Where are you?" Panic some more, don't answer text. Notice your Dad's Trailblazer in the driveway (he left it there so you could get some giant rolls of carpet for the house.) Open the hatch, say a little prayer. It fits! Thank goodness the party is less than five minutes away.
It's three pieces!
Step Seven
Pull up at the church. Rush to get the balloon inside the door. The door, yet another obstacle. See everyone ooh and ahh as you enter. If you've ever been on stage, you know how applause feels. This feels like that. Think, maybe you could make these for a living. After all, this was the first attempt. Surely, it would get easier each time? And, you certainly know what NOT to do.
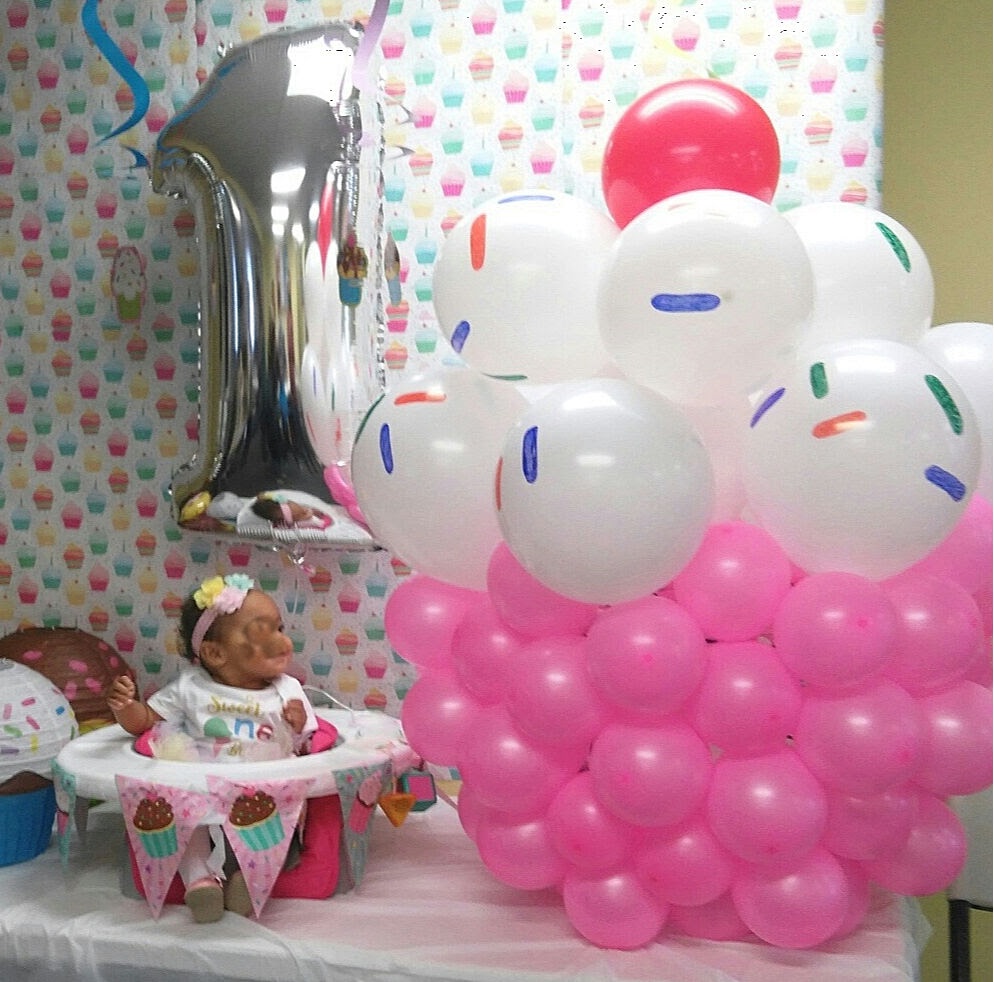
Don't worry, I had to blur baby's face, she's a beautiful baby in the process of adoption.
So, now you've seen the videos, you've read my process leading up to it, here's the UNCONVENTIONAL giant balloon birthday cupcake tutorial. May the force be with you!
Sit down with the laundry basket in your lap. Starting with the second column of holes, tie a PINK balloon to the vertical weave in the basket (between the holes.) Skip every other hole. Do this all the way around the basket. Our basket had vertical line holes, some have circular holes.
Balloons will move, don't worry about this now. Depending on the spacing of your basket's holes, you may need to skip the next row. If you see the basket between the balloons, use every row. If not, use every other row. Got it? You will after a few rows.
Note there are only two rows of holes, I tied two balloons to each vertical strip to get a line of four balloons tall.
The balloons want to escape, the don't stay orderly. Don't worry about this until you've got them all tied down.
Once all pink balloons are tied down, you can then gently push them to arrange them in a straight (ish) line. For the balloon's white cupcake frosting top, I used the process in the ice cream cone video from above. I connected six white balloons together to create somewhat of a circle. I made a separate grouping of four white balloons for the topper and then tied the red balloon in the center with fishing line.
Balloons are willy-nilly, but can be arranged at the final stage.
Here you can see, that the cupcake is 3 separate pieces.
So, how do you attach the balloon sections together? I was going to tie them with fishing line as demonstrated in the first Balloon Cupcake YouTube Tutorial, but that proved too complicated for me. Also, I kept popping the balloons. I tried duct tape, but you could see it. In the end, I didn't connect the pieces at all and was thankful for this when it was time to load the balloon for delivery.
Get the Cupcake lanterns and Pinata from Oriental Trading. Baby's face is blurred to protect identity.
The cupcake's purpose was for a photo shoot for a very special baby's first birthday party. The cupcake wasn't perfect, it had a bad side, but we just turned it to the good side! Photo shoot was amazing! Baby is beautiful, but we aren't permitted to share her face here. Just know, she was tickled to death with her giant cupcake!
50 Saint Patrick's Day Activities for Kids and Seniors
Are you in charge of the Saint Patrick's Day festivities? Maybe you plan group activities for a church group, after-school program, nursing home, or a retirement home. If you are planning things to do for a St. Patrick's Day event, you've come to the right place. Whether you need nifty refreshments or fun food to make with the group, we've got a recipe. Play Leprechaun games, make a rainbow craft, or decorate with shamrocks- no matter what you choose be sure to make it fun with these 50 fun things to do. Enjoy!
This post contains affiliate links for your convenience.
What does it take to have the best new year eve party ever with kids? It depends on your expectations, of course. If you want to throw a memorable party with glitz and polish, planning is a necessity. However, a spur of the moment party with family and close friends can become a favorite memory. We're sharing some tips on how to have the best New Year's party with kids. The key is to have fun foods and simple games that everyone can play together. Scroll down for games and activities for your party. Enjoy!
This post contains affiliate links for your convenience.
Decorating a Creative Nursery on a Budget: A Guide
Having a baby is an exciting time, and as a result, many parents go all out to create the perfect, creative space for their new bundle of joy. However, due to restrictions such as maternity leave or working only part-time, parents are often looking for inexpensive ways to transform their spare room into a creative nursery space for their infant. If you're looking for ways to design your nursery on a budget, here is a guide with some top tips for saving money while decorating the new baby's room.
This post contains Amazon affiliate links.
Portable crib doubles as a playpen. Get one here: budget friendly crib by Baby Delight.
Use Furniture Store Coupons
If you want to buy new furniture for your baby’s room, but struggle to save up the necessary funds to give your child the nursery that you've dreamed about, consider finding coupons for furniture stores in your local area.
For instance, a Bed Bath and Beyond coupon can cut the cost of a range of vital items that you'll need for the renovation, including beds, bedding, rocking chairs, and vanities. This will ensure that you can create a special space for your child without over spending.
Create Your Own Decor and Wall Art
One of the best ways to create a bright and inspiring nursery for your child is to install eye-catching wall art and fun nursery decorations in their space. Although you might not be able to afford the extravagant ornaments of home design magazines, you should consider DIY to make your baby nursery decorations that they'll love. The more vivid, the better for baby to see!
If you want to invest in child-friendly furniture without the high cost of buying new, consider purchasing pre-loved items? Not only is shopping second-hand much cheaper than buying from your local store, but it can also help you find one-of-a-kind gems that match exactly what you have in mind! You can buy pre-loved furniture from charity shops, antique and second-hand furniture stores, and even through buy-and-sell groups on social media like Facebook Marketplace.
Many families have a vast array of unused furniture stored in their attic and garage. Hoarded furniture comes in handy when you're looking to create a nursery for your newborn. You may discover that much of this old furniture can be adapted toward a new purpose in your nursery, which saves you money. Redo it in funky colors and add new nobs and hardware to give it a modern look.
When you're considering how to decorate your baby’s bedroom on a budget, you also need to think about saving money in the long term. For instance, buying long-lasting and multi-purpose furniture, such as loft and desk beds, allows your nursery to grow with your child and reduces the need to replace furniture as your child ages. You should also think about choosing furniture in durable materials that can withstand the chaos of childhood play. It may not save you money upfront, but in the long-term you'll be thankful for the wise purchase.
8 Fun and Easy Unique Plastic Easter Egg Crafts including Nesting Birds.
This post may contain affiliate links for your convenience.
Tweet! Tweet! Aren't these little Easter Chicks sweet? With buttons and cottonballs this cheery garland is perfect for a spring celebration. Kids can help make the chicks and stringing the buttons is perfect for fine motor skills. How about that basket of berries. So cute! Just grab a Sharpie and some felt. Easy Egg Decorating Kit
Photo by Doug Merriam for Parents.com Plastic egg garland.
Photo by Ed Judice for Parent.com Plastic Egg Strawberries.
Look closely, and you'll see tiny beads embedded on these plastic eggs with a glue gun. This gives me an idea. I'll be glue gunning eggs later this week! Glue Gun Sparkly Beaded Eggs (Perfect is Boring)
Glue gun beaded Easter egg craft by Perfectisboring.com
ADS DISCLOSURE: We've partnered with some wonderful advertisers who may sponsor blog posts or send us samples to test. Some companies pay us to review their products. *We also use affiliate links, if you make a purchase we get a tiny commission. Kids Creative Chaos participates in the Amazon LLC Associates Program*, an affiliate advertising program designed to provide a mean for blogs to earn advertising fees by linking to Amazon properties, including, but not limited to, amazon.com, endless.com, myhabit.com, smallparts.com, or amazonwireless.com. We also offer Tapinfluence, Google Adsense, SoFab, and Izea ads here. Thanks so much for helping us keep the lights on! :)
How to make Salt Dough Self-portraits as Ornaments
Did you ever wonder how to make salt dough? We made self portraits for a homeschool art project. I included how to make homemade clay and a few salt dough recipes. These mini-mes are a great companion project for a preschool or kindergarten learning body parts lesson. You can also make Christmas Tree Ornaments from Salt Dough. We played around with a variety of themes during our homeschool art lesson. Enjoy!
This post contains affiliate links for your convenience.*
Salt Dough Holiday Ornament Recipe.
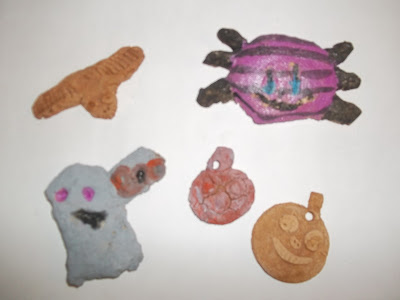
Make a Halloween Tree with Homemade Dough Ornaments.
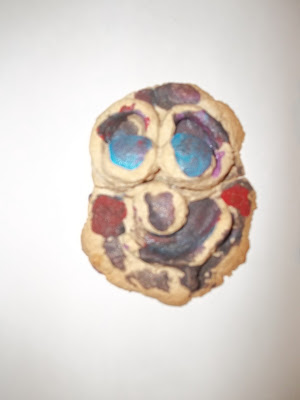
Self portraits from homemade clay and salt dough.
Make Christmas and Holiday ornaments by inserting straw to form a hole.
This recipe is for how to make claywithout cream of tar tar.
Salt Dough Recipe:
1 C. flour 1 C. salt 1/2 C. water Mix together and knead. When ready to cook, put on a baking sheet in oven at 100 degrees C/ 200 F for 2-3 hours. Cooking is not necessary, leave your creations in a safe place to dry. We left these in a table drawer and forgot about them.
We made these self-portraits about four years ago and forgot about them. They've sat in the end drawer of our dining room table ever since. They were never cooked nor painted.
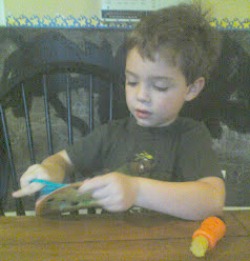
Jake was about four years old and he hadn't met his elementary art teacher yet, but he still had an aversion to art. It was a sensory issue. He didn't like getting his hands dirty. He also worried about getting things on his clothes. If either of these happened, he would get very upset. I suppose this is where my love of messy crafts was born.
I liked to be tidy as a small child too. I didn't play like the other kids on the playground, because I didn't want to ruin my leotards (today we call them tights) or get grass stains on my clothes. These things troubled me a great deal. So, I'd walk around the perimeter of the playground until the teacher blew the whistle. Little did I know, it was OCD. I've recovered, but some people don't appreciate it. The only way for me to stay sane is to embrace messy things.
Yep, I didn't want Jake to struggle with the same wacky demons, so I encouraged sensory play.
Even now, he wants to hurry and complete the project so he can wash his hands. If we are mixing dough, he can't let it dry. You know, that crumbly, crackly feeling on your hands? Mayhem and I like it. It's fun to let the dough dry and then scrape it off similar to letting school glue dry on your hands. I like seeing the fingerprints in the glue peelings.
Jake? No way. I think this has a lot to do with his hatred of art, and then the teacher came along and made art a boring chore.
He strives for self-inflicted perfection. He doesn't like the learning curve. He knows a lot. He is a gifted child. When he has to learn something new he is disappointed he didn't already know it. You can see the shame and the disappointment in his face.
Recently, he had to take a Scantron test online, the test was smart. The more correct answers, the harder the questions. We told him to guess, but he refused. He labored over each question and made a very educated guess. In the end, he scored above average, but the test was torture. He cried with each question for the first time aware he didn't have all the answers.
Jake beginning his journey in art.
If only he could realize art works the same way, but it's better because there are no real answers in art. Beauty is in the eye of the beholder. I am the beholder here. I like his salt dough self-portrait the wavy hair and round face remind me so much of my happy, bouncy, little four year old.
Next week's journey, Animal Printmaking, proved very difficult for a neat freak. Smudges are a perfectionist's nemesis. Start here for Jake's Journey in Art Recommended Reading: Air Dry Clay Projects
Cardboard Toilet Tubes turned Holiday Hats How many rolls of toilet paper do you go though each month? We've got to recycle that ca...
Follow us on Instagram
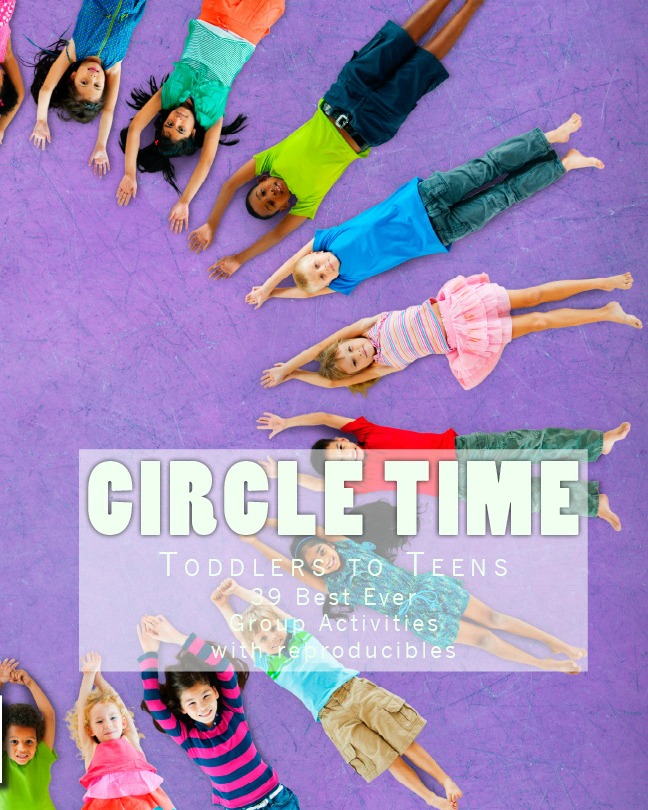
Get Circle Time Handbook
Can't remember all of the words to your favorite group game? Get the handbook with reproducible pages to copy and add to your clipboard. All of your favorite games right at your fingertips!


