Showing posts sorted by relevance for query DIY. Sort by date Show all posts

How to Make a Paper Valentine Treat Basket for Mom Gift as a Classroom Project.

Make a Paper Valentine Treat Basket (a great gift for Mom)


This paper basket craft is easy for kids and can be made for an Easter or Valentine's Day gift with a simple change of colors. Add a bunny or an egg for a fun, festive diy Easter Basket. Enjoy!


Post contains affiliate links.


How to make a valentine treat basket for Mom gift

Valentine Gift for Mom kids can make.


Follow the steps as pictured then add embellishments such as crepe paper, heart cut-outs, and glitter. Poke a hole in two opposite sides and insert two braided (twisted) pipe-cleaners forming a handle. Inside the basket, make a "t"with the pipe-cleaner to lock in place. Fill your paper Valentine treat basket with candy or trinkets when complete. It makes a great classroom project valentine for friends.


Use a paper plate as a pattern, trace onto construction paper, and fold on the lines shown.


Fold corners in , glue, and tape to secure.


Paper base should look like this when done folding.


Recommended Reading:

Valentine's Paper Doily Gift Basket

American Girl Paper Crafts

Construction Paper Quilt Squares


Pin it!

Paper Valentine Treat Basket


Easy Recycled Bunny Costume Ideas and Easter Bunny Jokes for Kids

Easy Recycled Bunny Costume Ideas: Bunny Jokes for Kids

Need a bunny costume? We made a Funny Bunny for 2009 from a recycled stuffed Easter bunny. Now, I'm getting the biggest stuffed bunny I can find and improving the design. Here's the old version to help spark your creativity. What ideas do you have for a homemade bunny costume?

Here's a silly bunny joke for Easter. Enjoy!

Post contains affiliate links.


Easy Recycled Bunny Costume Ideas and bunny jokes
Make your own diy Homemade Easter Bunny costume
 and tell some jokes to the kids.


Bunny Jokes for Kids:


So what do you call a bunny with fleas? 
"Bugs Bunny!"


What is important in an easy, cute recycled costume?

1.  Ease of construction.

2.  Crafty Cleverness.
3.  Cuteness Factor.
4.  Comfort
5.  Frugality

Simple, cheap costumes rent for $50 and sell for about $90.  We made this costume from an over-sized, stuffed bunny.

We took a creative trip to Goodwill, found some bunny p.j.s and a giant, floppy, stuffed bunny for $1.99.


Sadly, we cut off all of her appendages, removed the stuffing, cut out eye holes, then re-attached her eyes.


The ears are stuffed with a metal clothes hanger. My daughter loved wearing the stuffy's fuzzy feet and paws. I added a simple, black half-face mask for the interior structure.


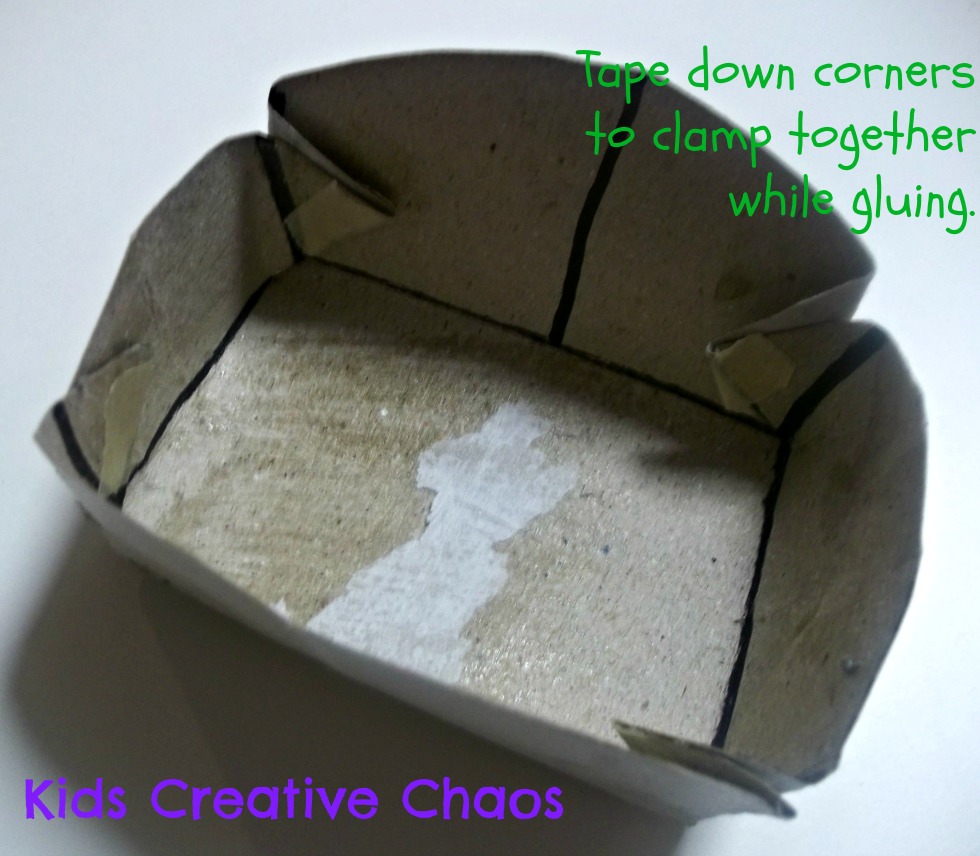
NO SEW - just tacky glue.


The stuffy's main body/belly became a tunic to hide the wearer's neck. We'd planned to attach it to the back to cover hair, but later decided she looked like a cute girl bunny with her hair spilling out. The stuffy's tail is hot-glued to the back of the p.j.s. Get Hoppin'!


Recommended Reading: 


Adult Deluxe Trix Bunny Rabbit Costume - Bunny Rabbit Costumes
Bunny Costume Ideas.


ADS DISCLOSURE: We've partnered with some wonderful advertisers who may sponsor blog posts or send us samples to test. Some companies pay us to review their products.

*We also use affiliate links, if you make a purchase we get a tiny commission. Kids Creative Chaos participates in the Amazon LLC Associates Program*, an affiliate advertising program designed to provide a mean for blogs to earn advertising fees by linking to Amazon properties, including, but not limited to, amazon.com, endless.com, myhabit.com, smallparts.com, or amazonwireless.com. We also offer Tapinfluence, Google Adsense, SoFab, and Izea ads here. Thanks so much for helping us keep the lights on! :)


Is there a Doctor in the House? Make a Doctor Costume for Halloween

DIY: Make a Doctor Costume for Halloween

Kids love to play dress up, here's a fun idea for a doctor Halloween costume. Or make it a nurse, a prince, a vampire, or a kitty...

Every free Friday in the summertime, you'll find me at yard sales on a quest for the perfect costumes. My mouth waters when I see outgrown, handmade Halloween costumes. I love it when I stumble upon an old football jersey or prom dress.

On the first week of November, I'm hitting clearance sales at Wal-mart and the party stores, looking for a great deal on a shiny, new costume to fill my trunk.

Kids love to dig through the trunk and try-on the clothes, transporting themselves into a fairy-tale world full of fun. I lug the trunk to drama clubs, preschool classes, and summer camps.

Anything can be a costume. A fuzzy, red towel hemmed at the end with a shiny, gold ribbon makes a robe fit for a King. An old, prom dress is the prefect princess dress.

I scour thrift stores for fun new finds. My kids love to dress like Daddy.  He wears navy pants and a periwinkle shirt as a mechanic. Occasionally he throws on a pair of overalls. Once, at a Salvation Army, I found a denim, Sean John jumpsuit. SCORE. My son was thrilled!  He tossed it over his navy dress pants and blue shirt and we headed to the shop to help Daddy at work.

Dress up is a fantastic activity to teach creativity and learn through role playing.  We've got some scrubs that make a great role-playing costume but they aren't so good for playing a doctor or surgeon in a production for the local retirement home.  It's cute watching the little one with their pants pulled up to their eyeballs and trying not to trip over the dress length shirt, but can we take him seriously as an actor?

A kid-size pair of soft, cotton scrubs makes the perfect costume for your little up and coming Oscar winner or the perfect gift for kiddos whose parents have careers in medicine.


Halloween Costume Ideas for Kids Doctor or Nurse: Kids Scrubs for Pretend Play and Dress Up.
Costumes: Kids Scrubs for Pretend Play and Dress Up.

Recommended Reading:

Make a Snowman Craft and Work Fine Motor Skills into your Lesson Plan

A Snowman that works Fine Motor Skills is the Perfect Winter Craft Activity for Preschoolers

This post is a special guest post written by Leanne from Sugar Aunts. This project focuses on fine motor skills for children ages 2-7 yrs. It is the perfect winter craft activity for preschoolers.

We love creative crafts that focus on Fine Motor Play.  A craft that pulls in developmental skills is much more than a fun activity.  While the kids are cutting, gluing, and creating, they are also working on so many skills essential to self-care, handwriting, and scissor skills!   
This Multi-Textural Fine Motor Snowman craft was a ton of fun to create and worked on many fine motor skills. The multiple textures added a sensorial bonus...and a great texture to our snowman!

Winter Craft Activity for Preschoolers: Make a Snowman Craft and Work Fine Motor Skills into your Lesson Plan

This Fine Motor Snowman craft was a big hit with my daughters.  We started with a snowman cut from white contact paper.  This was glued to a sheet of blue construction paper and then taped to the wall.  I wanted the task to be done on a vertical surface to further challenge the fine motor dexterity. Working on an inclined surface such as an easel or wall encourages a tripod grasp when manipulating small pieces. An extended wrist (wrist bent back in the direction of the back of the hand) and a tripod grasp is necessary for an appropriate grasp on writing utensils. 


Big Sister (age 6) is in kindergarten and developing her scissor skills.  I pulled out a variety of textured materials.  We had strips of thin Styrofoam, foam packaging sheets, and tissue paper.  Strips of the materials had marked lines for her to snip.  Cutting small snips along a line is a great way to work on scissor skills and line awareness with a new scissor user. 


Snipping these different textures with scissors really encourages line awareness.  A thick bulky material like the Styrofoam requires was easier to cut.  Cutting the foam was very easy for Big Sister. (She asked for more foam to snip once we were finished!) 


Tissue paper is a very thin and flimsy material and requires great scissor control.  This was a fun material to try and the short cuts were just right for Big Sister!


Once all of our materials were snipped into little squares, we sorted them by texture. This was a fun way to explore the differences.


Next, we stuck the different materials onto the contact paper snowman


This part of the craft was fun for Baby Girl (age 2).  She loved sticking the different materials onto the contact paper and worked for a LONG time to fill up the whole snowman. 


Our multi-textural snowman was a fun way to practice scissor skills and work on some fine motor areas while creating a winter craft for kids!

 
The Sugar Aunts are three sisters who blog about all things creative in motherhood. They love playful learning, creative kid's crafts, sensory and fine motor activities, kid's party themes, DIY, and so much more. Between the three Aunts, there are 6 cousins (with more on the way!) who are around each other so often, they are more like siblings than cousins! You can see the action at www.sugaraunts.com.

Recommended Reading:

Hibernation Station Companion Book for Winter Crafts

Drama Activities for Kids


Sign up for our free newsletter! Follow Me on Pinterest -->

Futuristic Activities for Kids: Fly to the Moon Lesson Plans and Companion Games

Activities for Outer Space Moon Lesson

Looking for new ideas for a children's Homeschool or VBS Futuristic Outer Space or Moon lesson for the kids? These futuristic activities for kids are fun and educational. We've included a few Outdoor games for P.E. activities too. Enjoy!


futuristic vbs for kid astronaut suit photo booth backdrop outerspace
Futuristic Space Astronaut Backdrop for Photo Booth Op.  
Outer Space theme VBS fun for school fundraiser too.


This post contains affiliate links.


3 FREE Disney Phineas Ferb Pumpkin Carving Stencil Printable Pages Activities for Kids

Disney Phineas and Ferb Activities and Pumpkin Carving for Kids 

Phineas and Ferb! We've got 3 cool Pumpkin Carving Template Patterns from Disney! You'll have a blast carving a Perry the Platypus pumpkin with this traceable pattern from Disney. Click the link below for a free Phineas and Ferb activity and coloring book. Enjoy!

Disney activities for kids from Phineas and Ferb:Pumpkin Carving Patterns
Perry the Platypus coloring activities for kids.

Click to highlight the images below to find and print Disney Phineas, Ferb, and Perry the Platypus Pumpkin Carving Stencil Template Patterns! These are the perfect patterns for little Disney fans to use for a DIY Disney Pumpkin or print and use as a coloring sheet!


Free Ferb Pumpkin Carving Template Coloring Page Stencil Pattern
Ferb Pumpkin Carving Template.


Free Perry the Platypus Pumpkin Carving Template Coloring Page Pattern
Perry the Platypus pumpkin stencil.


Phineas pumpkin pattern template stencil
Phineas pumpkin pattern template stencil.


Recommended Reading:


Free Pumpkin Carving Online Game


How to Make a Perry the Platypus Costume

Phineas and Ferb Laughapalooza Joke Book *


Make a Phineas Mask for Halloween

Spooktacular Joke Book (Phineas and Ferb) *


 *I receive tickets to the show for sharing these goodies with you. We do not share your personal information with others. Third parties may collect information through cookies when you click into their sites. The Walt Disney Company is neither a sponsor nor an endorser of this giveaway.


Valentine's Activities that Incorporate Sensory Play

Valentine's Day Activities that are perfect for the classroom

The Sugar Aunts are back with this fun classroom Valentine activity that includes sensory play. Enjoy!

Valentine's Day activities are so much fun!  This party activity is perfect for classroom parties or even a themed play date. We loved the sensory aspect of it and played for a long time!  

Incorporating sensory play into learning and play activities is a great way to explore textures, scents, and so much more.  The learning that comes from sensory play is vast!  For children, sensory play builds language, self-esteem,  and independence...all as they learn through the five senses.

Our classroom Valentine's Day activity does just that, with a little fine motor thrown in!


Valentine's Day Activities and Games can incorporate sensory play.
Sensory play activity for Valentine's Day.


We started with a bin of water and a half cup of pomegranate scented bath salts.  Any scent would do for this activity. We loved the pink color of these salts and the smell was divine!


Mix the bath salts in the water until all of the salt dissolves.  Depending on the amount of water you have, you may need more or less salt.  Add a little at a time until all of the salt is dissolved.


Next, I drew a heart shaped bulls eye on our chalkboard easel.  You could also do this activity on a white board.  I added some small numbers for keeping score. 


Sensory play activity for Valentine's Day.

I added some hearts cut from foam sheets to the scented water and set out a pair of kitchen tongs.  This activity alone was enough to inspire sensory play and exploration!  It was fun to just play in the sweet smelling water and grab the hearts with the tongs.

Grabbing the hearts with the tongs required fine motor coordination (especially to use the tongs correctly and not with two hands!)  Little Guy, age 4, was able to do this, but tended to switch over to using two hands on the tongs.  What a great pre-scissor skill this was! 

Eye-hand coordination was needed to grab the hearts with the tongs as they swished around in the water.  As we did, we were enjoying the scent of pomegranate!


After they caught a heart in the tongs, they could apply them to the bulls-eye.  Little Guy closed his eyes and tried to get the heart into the middle.  Baby Girl (age 2) liked to just play around in the water and stick the hearts up on the chalk board.  This was a good age-appropriate modification for her!

We had so much fun with our scented water bin, that we kept it out for a good portion of the day and enjoyed more sensory play!


The Sugar Aunts are three sisters who blog about all things creative in motherhood.  They love playful learning, creative kid's crafts, sensory and fine motor activities, kid's party themes, DIY, and so much more.  Between the three Aunts, there are 6 cousins (with more on the way!) who are around each other so often, they are more like siblings than cousins! You can see the action at www.sugaraunts.com.


Recommended Reading:

Kids Creative Chaos Cooks: Kitchen Kids Series: Holiday Recipes*

Printable Clipart Hearts for Valentine's Day Cards


ADS DISCLOSURE: We've partnered with some wonderful advertisers who may sponsor blog posts or send us samples to test. Some companies pay us to review their products.

*We also use affiliate links, if you make a purchase we get a tiny commission. Kids Creative Chaos participates in the Amazon LLC Associates Program*, an affiliate advertising program designed to provide a mean for blogs to earn advertising fees by linking to Amazon properties, including, but not limited to, amazon.com, endless.com, myhabit.com, smallparts.com, or amazonwireless.com. We also offer Tapinfluence, Google Adsense, SoFab, and Izea ads here. Thanks so much for helping us keep the lights on! :)


How to Make Snow Cones or Sno Cones or Ice Cones or Shaved Ice Slushy Slush Puppy

Make a Snow Cone with Shaved Ice


So how do you make an Ice Cone? I mean it's just ice and syrup, right? Isn't a slushy the same thing?  What is a Sno-cone; is it really made out of snow?  Well, we made one from real snow.  It's springtime in Indiana, so anything goes.  Here's a list of everything you never wanted to know about the tasty shaved ice treat.


How to make a rainbow slush for a kids party Pinterest
Rainbow Slushy Popsicle Ice.

Wikipedia defines snow cones as a North American variation of shaved ice commonly served in paper cups. Shaved ice is finely crushed ice. Hawaiian's call it Shave Ice. Baltimorians call them Snowballs.


Slushies are all about freezing water. Snow is frozen water, right?


Homemade Snow Cones from Snow how do you make syrup?
Authentic Snow Cones.
We cheated. We scooped up some Indiana snow and added the Hawaiian Punch syrup we found on clearance at Walmart. They put it on clearance when snow is in season, go figure. This was the easiest snow cone recipe ever. Start with clean snow. 

Mayhem leaves out collecting bowls whenever they are predicting snow. Was it good? Um... yes. It is softer than shaved ice, and oh so perfect for a snow cone. Just like the real thing, if you live in Baltimore.


Snow cone syrup: Get this, the first flavor of syrup for shaved ice was EGG CUSTARD. Apparently, during the American Industrial Revolution  New York ice houses started selling ice to Florida. When the truck passed through Baltimore, kids started asking for free samples. Each time the truck came through they got their wish. The mothers decided to flavor the ice. Since eggs, butter, and sugar were readily on hand, they made egg custard flavor shaved ice. Of course they did. Yep, Baltimorians invented this tasty treat. Later during the Great Depression, it was an inexpensive snack earning the Baltimore Snowball the name "Hard Times Sundae".


The Hawaiian's added a scoop of ice cream at the bottom of a cup and poured a little milk on top. Thank Hawaii for the rainbow colors too. Thank India for Salt and Pepper flavored shaved ice popsicles known as Kala Khatta. Hmm... I'll just stick to the colored, sugary syrup.


When I was a kid, growing up in Indiana the Slush Puppie was the cat's meow. What a treat to get a $1.00 from Grandpa and head into the corner store for a Slush Puppie.


Slush Puppie Snow Cones Sno Cones Shaved Ice Shaved Recipes
Slush Puppies.

Snow Cone Syrup Recipes (How to Make)


You need Sugar, lots of it, for a healthier alternative you could try Clear Corn Syrup or Light Maple Syrup. That's funny right there. For a healthy alternative how about ice and food coloring.


2 C. Sugar, 1 packet Kool-aid Drink Mix, 1 C. Water


Stir sugar and water together in a saucepan (or substitute one of the syrups above). Bring to a boil. Boil for 1 minute. Remove from heat. Stir in Kool-aid. Cool and store in a recycled glass bottle. Wait for a snow storm or use one of those nifty ice shaving contraptions or use the crushed ice from your fridge dispenser. Now pour the syrup over the ice. Tada! You should start your own snow cone biz 'cause you are officially a pro.


Recommended Reading:


Snowmen at Night*


Kids Creative Chaos Cooks: Kitchen Kids Series: Holiday Recipes*


Jake's Art - Homeschool Weaving Lesson - Make your own Loom - DIY Arts and Crafts

How to make a loom for weaving scrap fiber: A Homeschool Art Lesson

Jake's Journey in Art goes under the sea in this DIY weaving Homeschool Art Lesson we learned to Renew. Enjoy!


How to weave for elementary make your own loom
Our loom has both warp and weft framework to better illustrate 
the concept to young children.

To weave a textile, threads (or scrap fabric) are woven on a frame called a loom. The first vertical threads on the loom are called warp threads. Threads that are woven horizontally in and out of the warp threads are called weft threads.


Cut notches in the cardboard frame to keep yarn in place.

Recycle a piece of cardboard from a cereal box or a foam tray to make your loom. You might also like Native American Paper Bag Dress

Cut small notches into the top and bottom of your cardboard(ours are about 1/2", but 1" works well). Make them about 1/2" inch apart. Alex Toys has a great PDF on weaving here.


Spongebob Fabric for Toddler bed tent.

Warp your loom with yarn or string by taking the thread and taping one end to the back middle of your board.  Now, starting with your first notch on the left, begin wrapping through each top and bottom notch without skipping a notch until you get to the right side of the board.  Only the warp frame is required.

Now your are ready to weave your weft. Cut or tear scraps of fabric into strips. Your strips of fabric should be about 1" thick and at least 12"  long. You will need about 20 strips. 


The cat enjoyed the tearing of fabric strips so much 
he needed a nap after playing with them.

For extra ease for smaller children, we added a weft frame as well. Now the scraps of fabric can be pulled through the little squares for guidance. Pull your scrap fabric under the first warp, over the next, and so on. The yarn guide will help younger children see any mistakes made.

When you have completed your weaving tie off all scraps in groups of two at the edges of your cardboard loom, then you can cut your your thread/yarn framework.


How to make a loom - Elementary Weaving Lesson Scrap Fibers Make your own
Spongebob has his eye on you.

This is an easy way to get littles started in weaving. It is also helpful to cut a piece of cardboard about 1" by 3" with a notch in the end. Attach your scrap fabric by inserting it in the notch and use as a tool to weave the fabric through the loom, this is called a shuttle.


Alex Toys Native American Bead Loom Kit for weaving bracelets.

Once you advance your skills, you can weave many beautiful projects. Alex Toys has a Native American Loom for weaving bracelets.  It is a professional quality loom that makes incredibly authentic bracelets.  We are working on our patterns and will share them soon.


Kid's room cartoon character theme (that way we don't have to worry about matching or new fads).Check out the automobile sun visor we used as a headboard. 
It is simply nailed to the wall.

Jake loved the idea of using his toddler tent cover as scrap fabric for this project. We renewed an item that was dear to his heart. It had been ripped from rowdy play and was no good as a tent, but we saved it anyway in hopes to repair it or transform it into a pillow or some other creative endeavor. The SpongeBob fabric was the perfect accent for his room. 


Yep, we need a hanging stick, but the kids love it.  
Use favorite t-shirts, pillow cases, or doll clothes for your scrap fiber.

To display your beautiful work of art weave a "weft" stick horizontally through the top row and hang on a wall.  Jake loved his creation and couldn't wait for the stick. He wanted to see how it looked right away, so we hung it by a nail. A little droopy, yes, but he loves it.

Did he love the process?  Not so much.  Much patience is a necessary requirement of weaving. So, Mommy made the loom, got it started and Jake weaved the inner pieces to gain an understanding of the process.  Mommy tied and cut it off making sure Jake watched and understood. This is somewhat time consuming, but the end results are worth it.


Mayhem saw the weaving on his wall and wanted it for her room. Score! This project journey ended on a very happy note.   


Recommended Reading:


Learning How to Weave*

Party Time: SpongeBob SquarePants*


ADS DISCLOSURE: We've partnered with some wonderful advertisers who may sponsor blog posts or send us samples to test. Some companies pay us to review their products.

*We also use affiliate links, if you make a purchase we get a tiny commission. Kids Creative Chaos participates in the Amazon LLC Associates Program*, an affiliate advertising program designed to provide a mean for blogs to earn advertising fees by linking to Amazon properties, including, but not limited to, amazon.com, endless.com, myhabit.com, smallparts.com, or amazonwireless.com. We also offer Tapinfluence, Google Adsense, SoFab, and Izea ads here. Thanks so much for helping us keep the lights on! :)