Carrots. Bunnies eat them. They are rumored good for eyesight. What else are carrots good for? Here are some simple, easy, snack carrot recipes your kids will enjoy- just in time for Easter.
Yummy, Easy Carrot Recipes: No Bunnies Allowed.
Carrots are good in lots of recipes, not just carrot cake. We found Carrot Pancakes from Iowa Girl Eats blog, adorable Bird's Nest Carrot Cupcakes from How Sweet Treats blog, and an Apple Carrot Smoothie from Akers of Love blog. Click the links below to visit their pages.
So how do you make an Ice Cone? I mean it's just ice and syrup, right? Isn't a slushy the same thing? What is a Sno-cone; is it really made out of snow? Well, we made one from real snow. It's springtime in Indiana, so anything goes. Here's a list of everything you never wanted to know about the tasty shaved ice treat.
Wikipedia defines snow cones as a North American variation of shaved ice commonly served in paper cups. Shaved ice is finely crushed ice. Hawaiian's call it Shave Ice. Baltimorians call them Snowballs.
Slushies are all about freezing water. Snow is frozen water, right?
Authentic Snow Cones.
We cheated. We scooped up some Indiana snow and added the Hawaiian Punch syrup we found on clearance at Walmart. They put it on clearance when snow is in season, go figure. This was the easiest snow cone recipe ever. Start with clean snow.
Mayhem leaves out collecting bowls whenever they are predicting snow. Was it good? Um... yes. It is softer than shaved ice, and oh so perfect for a snow cone. Just like the real thing, if you live in Baltimore. Snow cone syrup: Get this, the first flavor of syrup for shaved ice was EGG CUSTARD. Apparently, during the American Industrial Revolution New York ice houses started selling ice to Florida. When the truck passed through Baltimore, kids started asking for free samples. Each time the truck came through they got their wish. The mothers decided to flavor the ice. Since eggs, butter, and sugar were readily on hand, they made egg custard flavor shaved ice. Of course they did. Yep, Baltimorians invented this tasty treat. Later during the Great Depression, it was an inexpensive snack earning the Baltimore Snowball the name "Hard Times Sundae".
The Hawaiian's added a scoop of ice cream at the bottom of a cup and poured a little milk on top. Thank Hawaii for the rainbow colors too. Thank India for Salt and Pepper flavored shaved ice popsicles known as Kala Khatta. Hmm... I'll just stick to the colored, sugary syrup.
When I was a kid, growing up in Indiana the Slush Puppie was the cat's meow. What a treat to get a $1.00 from Grandpa and head into the corner store for a Slush Puppie.
Slush Puppies.
Snow Cone Syrup Recipes (How to Make)
You need Sugar, lots of it, for a healthier alternative you could try Clear Corn Syrup or Light Maple Syrup. That's funny right there. For a healthy alternative how about ice and food coloring.
2 C. Sugar, 1 packet Kool-aid Drink Mix, 1 C. Water
Stir sugar and water together in a saucepan (or substitute one of the syrups above). Bring to a boil. Boil for 1 minute. Remove from heat. Stir in Kool-aid. Cool and store in a recycled glass bottle. Wait for a snow storm or use one of those nifty ice shaving contraptions or use the crushed ice from your fridge dispenser. Now pour the syrup over the ice. Tada! You should start your own snow cone biz 'cause you are officially a pro.
This is a sponsored conversation written by me on behalf of Lipton. The opinions and text are all mine.
Refreshing iced tea is the perfect accompaniment to a meaningful mealtime with family and friends. Bring your family together to make a fun meal and take a break from the hustle and bustle the holidays. Slow down, and laugh together over a bottle of Lipton Peach Tea Flavored Iced Tea and these ravioli recipes with a creative twist. Enjoy!
Kids Can Cook this Easy Holiday Cranberry Muffin Recipe
Make mom breakfast in bed for the holidays or Mother's Day with our Kitchen KidsCranberry Muffin Recipe from "Kids Creative Chaos Cooks Cookbook" full of recipes to mix and make with minimal adult supervision.
Holiday Cranberry Muffin Recipe. Easy for kids to make.
You need:
English Muffins 1 Can of Jellied Cranberry Sauce Cinnamon Brown Sugar How to make: Toast Muffins in toaster or toaster oven. Open the cranberry sauce and slide it out of the can. Slice into thin circles. Place cranberry slices on muffins. Sprinkle with brown sugar and a dash of cinnamon. Place in toaster oven or on a cookie sheet in a warm oven at 375 degrees for 5 minutes. Serve warm. Recommended Reading:
Jake's journey in art focuses on REUSE. Make your own prints with foam trays in this fun Printmaking lesson. This homeschool art lesson requires only a few supplies making it perfect for homeschool. Enjoy!
Animal Prints with Foam Trays Piggy Art.
What fun! This is an incredibly easy way to teach the art of printmaking to young children. The assignment required choosing an animal to draw and first drawing it on paper by looking at the image upside down. If you draw an image upside down, you tend to focus less on the end product and more on each individual line.
The idea is to make drawing perfectly less overwhelming, when turned right side up, it magically becomes a great drawing!
Printmaking Lesson: Messy Craft with Paint and Prints.
Hmm... Great theory. Jake drew his pig by copying the image with the right-side up, then he proceeded to complain profusely about how everyone's drawings were better than his. It took a great deal of coaxing to get him to draw the picture upside down. He felt it was a waste of time and "stupid".
The battle ensued, he tried it, and the results were similar. That's good news and good news, I think. The good news is he tried it, saw it worked, and wasn't stupid, and the good news is he draws pretty good either way.
You will need: Foam Trays, Pencil, White Paper, and Acrylic Paint. First, draw a picture of an animal on a piece of paper. Remember, if you are looking at an image, turn it upside down and draw it upside down first. Now, turn your image around, and check out your handi-work. This is practice.
The next step is to "draw" the image onto a foam tray. Make sure to press down hard to make a deep indentation into the foam. Now, cut the edges off your foam tray so it is a flat surface. It needs to be completely flat to make the print. Lightly paint your foam image. You can use one color or several. Make a practice print on paper to remove some of the excess paint. Then, carefully place your foam tray paint side down onto a clean sheet of paper. Press firmly, but do not move the tray or the image will smear. With a finger or hand on each end of the tray, carefully lift it from the paper to reveal your beautiful print. Wipe the tray clean, and experiment with new colors.
Once they started making prints they didn't want to stop!
Tip: The best prints are the ones made as the paint is starting to wear off the tray. This is a great way to make holiday or birthday cards. You can also cut them out and frame them as Christmas gifts.
ADS DISCLOSURE: We've partnered with some wonderful advertisers who may sponsor blog posts or send us samples to test. Some companies pay us to review their products. *We also use affiliate links, if you make a purchase we get a tiny commission. Kids Creative Chaos participates in the Amazon LLC Associates Program*, an affiliate advertising program designed to provide a mean for blogs to earn advertising fees by linking to Amazon properties, including, but not limited to, amazon.com, endless.com, myhabit.com, smallparts.com, or amazonwireless.com. We also offer Tapinfluence, Google Adsense, SoFab, and Izea ads here. Thanks so much for helping us keep the lights on! :)
Recycle a paper cup, plastic spoon, holiday ornament or that jingle bell necklace into a fun, kid-crafted bell noisemaker for the year-end celebration.
Make a bell to ring in the New Year with a paper cup and ball ornament.
Paint a paper cup.
Paint the NEW YEAR on cup with glitter glue.
With scissors or a box cutter, slice a 1" slit in base of cup.
Cut a triangle pattern out around the top of the cup.
Bend the triangles out to make a star.
Wrap a sparkly pipe-cleaner around the spoon's handle (make a loop for hanging at top).
Insert spoon in slit on base of cup.
Tape may be necessary to keep spoon aligned.
Attach a short string to a mini-ornament or jingle bell and attach with tape.
Hang for display on mantle.
At midnight, grab those bells and make some noise!
ADS DISCLOSURE: We've partnered with some wonderful advertisers who may sponsor blog posts or send us samples to test. Some companies pay us to review their products. *We also use affiliate links, if you make a purchase we get a tiny commission. Kids Creative Chaos participates in the Amazon LLC Associates Program*, an affiliate advertising program designed to provide a mean for blogs to earn advertising fees by linking to Amazon properties, including, but not limited to, amazon.com, endless.com, myhabit.com, smallparts.com, or amazonwireless.com. We also offer Tapinfluence, Google Adsense, SoFab, and Izea ads here. Thanks so much for helping us keep the lights on! :)
When we leave summer behind and approach the colder months, kids want to stay inside. That means, it’s time to pull out the indoor activities to keep the kids entertained after school and on the weekends. Just because you’re stuck inside doesn’t mean the day has to be wasted! There are loads of great family-friendly activities to do indoors.
This post contains Amazon Affiliate Links.
Be sure to click through the links to find all the fun indoor kids activities we've discovered.
If you're looking for great ways to keep kids entertained when the weather’s got you stuck indoors, look no further! Some or these activities, you might do regularly, others you may never have tried before, but they’re all great ways to keep the kids entertained while encouraging them to learn new skills.
Baking
How can you not love an indoor activity where you and the kids get to eat a tasty treat at the end? When the weather isn't very nice, baking is a great way to bring the family together, and you can learn some amazing new skills while you’re at it.
Don’t worry if you’re not a great cook, the fun is in learning the new skill, and there are some great recipes for beginners out there. Even if you are a beginner, these recipes will have you baking up a storm!
Everyone wins when you get to do a fun family activity and eat some tasty baked goods at the end of the day.
Keep everyone entertained for hours on end with a few well-planned arts and crafts projects. These might take a little bit of pre-planning on your part, but they’re sure to give your family an amazing day of creating things with their hands and bonding with each other.
Any project with epoxy resin is bound to get the kids excited, and the results you can get with this product are awesome and perfect for a cold or rainy day.
In the modern world of ultra-realistic video games, the old-fashioned board game still has its place. In fact, the classics are often the best, and there’s no better time to pull out the board game collection that when it’s raining outside.
No matter how much technology moves on, the likes of Monopoly, Cluedo, Jenga, and Uno are always family favorites for a good reason. Once you get everyone together and involved in a game of Monopoly, you’ll find the time just flies by, and you won’t even remember that the weather is terrible outside. Make sure you’ve got a trustworthy banker, and you’ve got an afternoon of fun indoor activities for everyone.
As we approach Fall, the weather might not allow for as many outdoor activities as usual, but that doesn’t mean the fun has to end. There are lots of fun indoor activities that you can enjoy with your family on a rainy day. For more inspiration, check us out on Pinterest!
What looked like a boring weekend stuck inside, might just turn out to be a weekend full of joy and family fun. You can eat, drink, create, and play games with your family and friends while bringing everyone closer together. Just do a search in our blog for games, crafts, kids recipes, family field trip ideas, and fun indoor activities for kids. Stick with us, and you'll never run out of fun things to do!
No one was home, so I had a chance to get crafty and healthy with my cooking. I love when that happens. So, what's in the fridge? My best Sloppy Joe Recipe. Beware, it's sneaky. Enjoy!
This post contains affiliate links for your convenience.
Easter Peeps Dirt Dessert Place Setting Table Display
This post is sponsored by DollarTree.com.I received the products mentioned here for free from Dollar Tree. This post also contains affiliate links. I will be compensated if you make a purchase after clicking on the links.
Planning an Easter Dinner? We love all things Edible Art for Easter, especially when they serve double duty as a decorative place setting display for the table. These Peeps Dirt Dessert Cups will brighten up your Easter Holiday table. Everything you need is available at the Dollar Tree online where you can buy Easter decor in bulk. So, make a bunch of Easter Dirt Pudding Cups Party Favors for the entire family. Scroll down for more Easter Activities and Ideas to make your Easter holiday get together unforgettable. Enjoy!
How to make clay is simple: Here are some recipes.
We've been crafting with Air-Dry clay. We purchased a clay kit and then we also made our own clay at home. It can be used with a Potter's wheel or shaped into free forms for home school art projects. Enjoy!
Air dry clay pig and diy homemade clay recipes.
Attach pieces by adding a little water to each piece. This is Jake's Pig (From Jake's Journey in Art). He enjoyed playing with the clay just enough to complete the assignment.
Alextoys.com sells boxes of air dry clay refills perfect for your animal sculptures.
Clay is wonderful for Sensory play. In the homemade recipe below, just add some scented oils like vanilla or cinnamon. TOUCH, SMELL, TASTE (I don't recommend it), SEE- hmm... When it dries you can gently tap it onto the table for SOUND encompassing all senses or get CREATIVE and make a rattle/maraca or a base for a drum just stretch tissue paper over the top and attach with a large rubber band.
Mayhem made many animals and embellished each one.
The baubles in the photos above came with the air dry clay refill for the pottery wheel from Alex Toys.
How to make Homemade Clay Recipe:
Click here for how to make clay without cream of tar tar Easy/recommended for preschool and early elementary 1 cup flour 1 cup water 2 tsp cream of tartar ¼ cup salt 1 tbsp vegetable oil food coloring (optional)
Combine all ingredients in a medium-sized pot. Decide on a color for the clay. Cook over moderate heat, stirring constantly. The dough will eventually become difficult to stir, and it will stick to the spoon. At this point, dump the dough onto wax paper. Allow it to cool for at least 15 minutes, and then knead it until it is smooth. Store the dough in a plastic container or a plastic bag when not in use. Refrigerate the clay when not in use. Homemade Clay can be painted and it will last for years to come. Make cute Holiday Gifts: Think napkin rings, 3D wall hangings, necklace medallions, trivets, and pretty catch-all bowls.
Looking for Toddler or Preschooler Activities? Try this: Sensory Dough playtime Activities. Recommended Reading: Craft a Minecraft Marshmallow Pig
ADS DISCLOSURE: We've partnered with some wonderful advertisers who may sponsor blog posts or send us samples to test. Some companies pay us to review their products. *We also use affiliate links, if you make a purchase we get a tiny commission. Kids Creative Chaos participates in the Amazon LLC Associates Program*, an affiliate advertising program designed to provide a mean for blogs to earn advertising fees by linking to Amazon properties, including, but not limited to, amazon.com, endless.com, myhabit.com, smallparts.com, or amazonwireless.com. We also offer Tapinfluence, Google Adsense, SoFab, and Izea ads here. Thanks so much for helping us keep the lights on! :)
Now and again, I am asked to do book reviews. I accept but rarely offer a sidebar button, because I don't feel the book is in line with our message. The Kaleidoscope Kids by Terry P. O'Grady is an adorable story about ten little fairies who were born to teach colors, numbers, and shapes to children. The beautiful, colorful illustrations are done by Rick Barrett. (I love the quirky fairy illustrations so much; I want to see if Rick will illustrate something for me!)
The Kaleidoscope Kids is perfect for preschool curriculum, as well as, the perfect bedtime story. Terry O'Grady has four grown children, six grand children, and has worked with many youth organizations. The story is designed to teach children a creative way to learn colors, numbers, and shapes. Each fairy has their own unique color, number, and shape coordinated together to aid in the process of visual learning. This book should be added to the library of anyone with a child in preschool or early elementary school. Great News! We have been given a signed copy of the book for a giveaway. To enter for your chance to win follow our Pinterest Pin it to Win it! Online Scavenger Hunt for Preschool Curriculum and leave a comment on the purple pin to join and begin pinning. Winner will be announced December 3, 2012. Click to purchase the book on Amazon or Create Space or Kindle. *Tip: When you purchase through Create Space the author receives a larger royalty. Recommended Reading: Our own Children's Cookbook with easy holiday recipes and activities is available now. Easter Theme PE activities
This easy, edible craft is perfect for preschool birthday parties or as a New Year fun snack for preschoolers
The Bagel Breakfast is a somewhat healthy alternative to the cupcake with bagels, cream cheese, banana, and pineapple.
New Year's Eve ~ Bagel Surprise Treat for Kids.
You need: Bagels Bananas Can of Pineapple Strawberries Cream Cheese To make: Toast bagel. Spread Cream Cheese onto one bagel half. Place Pineapple ring on top of cream cheese. Cut Banana in half and insert in center of bagel/pineapple. (Add a dab of cream cheese banana's base to help it stand on end.) Slice Strawberry and insert the slice around banana.
Now you have a candle in a votive cup.
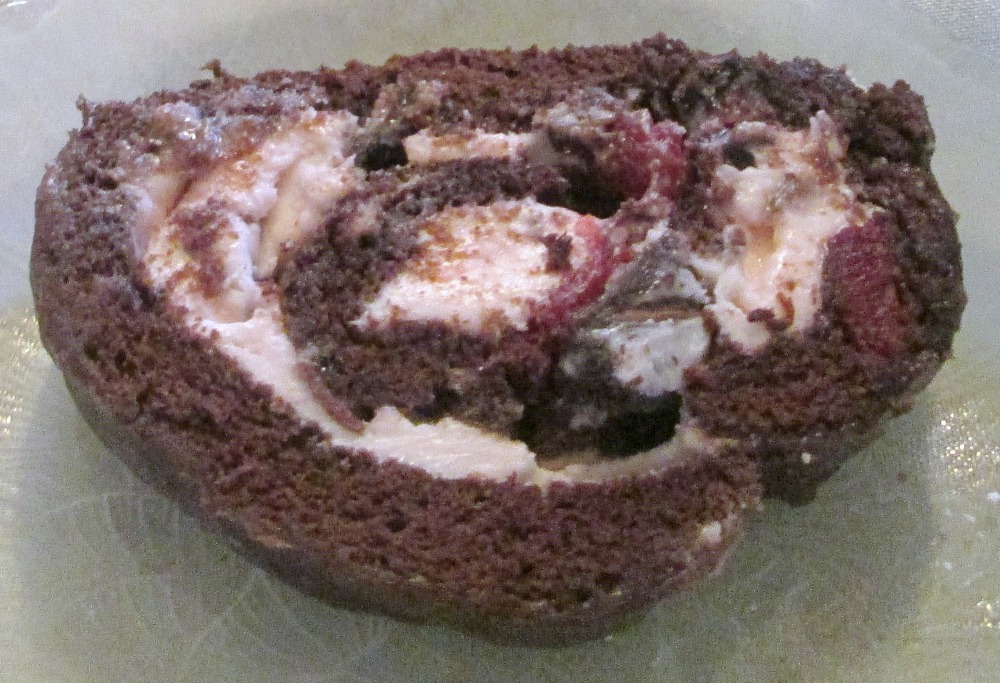
Ahh, Ye olde Yule Log. What's a Yule Log, you ask? Depends who you ask. Are you hungry or do you want to keep warm for the holidays? Find out the history of the Yule Log. Is it food - yes and also no! Apparently, the dessert cake, Chocolate Yule Log, was created after the one you place in your fireplace. This traditional Yule Log recipe is delicious, but it also serves as a great family tradition when you make it with your children. Watch the Yule Log video below while you bake. Enjoy!
How to Make a Yule Log
This spongy, oil-less Yule Log cake comes from Taste of Home as part of its Chocolate Cherry Cream-Filled Log Recipe. We made a few adjustments. Instead of the whipped cream filling, we used a Cherry Almond Buttercream with chopped Chocolate Covered Cherries folded in. Top your cake roll with chocolate ganache, melted milk chocolate chips, or just dust with some powdered sugar. We made our Yule Log festive by adding green paper leaves that adorn the cherries. You can also make the leaves with edible ganache.
Hallmark's Yule Log Video You Tube
Yule Log Cake:
Ingredients:
4 eggs, separated
1/3 c. plus 1/2 c. sugar, divided
1 t. vanilla extract
1/2 c. all-purpose flour
1/3 c. baking cocoa
1/4 t. baking powder
1/4 t. baking soda
1/4 t. salt
1/3 c. water
Confectioner's sugar
Directions:
1. Place egg whites in a small bowl and let stand for 30 minutes at room temperature. Line a greased 15 in. x 10 in. x 1 in. baking pan with waxed paper. Grease the paper and set aside. Preheat oven to 375 degrees F.
2. In a large bowl, beat egg yolks on high for 5 minutes or until thick and lemon-colored. Gradually beat in 1/3 c. sugar. Beat in vanilla.
3. Sift the flour, cocoa, baking powder, baking soda, and salt together twice. Gradually add to the yolk mixture alternately with 1/3 c. water. Beat well after each addition.
4. In a small bowl with clean beaters, beat egg whites on medium until soft peaks form. Gradually beat in 1/2 c. sugar, 1 T. at a time, on high speed until stiff peaks form. Carefully fold egg whites into batter. Spread evenly into prepared pan.
5. Bake at 375 degrees F for 12-15 minutes or until cake springs back when lightly touched. Cool for 5 minutes. Dust a kitchen towel completely with confectioner's sugar. Invert the cake onto the towel. Carefully peel off the waxed paper. Roll up the cake in the towel, starting with the short side. Cool completely on a wire rack.
6. Prepare Cherry Almond Buttercream.
7. Unroll cake. Spread filling evenly over the cake to within 1/2 in. of the edges. Roll the cake again, without the towel. Place seam side down on a serving platter. Top as desired. Slice off the uneven ends of the cake before serving.
Cherry Almond Buttercream with Chocolate Covered Cherries:
Ingredients:
3 c. Confectioner's sugar
1 stick butter, softened
3 t. almond extract
2 T. milk
2 T. maraschino cherry juice
6 chocolate covered cherries, coarsely chopped
Directions:
1. Beat butter until creamy.
2. Add confectioner's sugar and beat until combined. Add almond extract and cherry juice and beat until combined. Add milk, if necessary, for consistency. Beat until smooth.
3. Gently fold in chopped candy.
Edible art and crafts for Halloween, Thanksgiving, and Christmas for Kid's to make.
I am excited to announce our first Kitchen Kid's Series Cookbook is available for purchase. Starting today, you can purchase a print version at Createspace for under $3. Now available at Amazon.com, so be sure to include it in your wishlist.
Holiday Treats is full of simple mix and make recipes for Thanksgiving, Christmas, and New Year's Eve with easy to follow instructions for kids of all ages. We've also added a few games to keep the kiddos busy while Mama or Daddy cooks in the kitchen. The perfect gift for budding bakers. Do you remember your first cookbook? Tell us about your favorite holiday recipe in the comment section below. We love to hear from you.
Valentine's Day Activities that are perfect for the classroom
The Sugar Aunts are back with this fun classroom Valentine activity that includes sensory play. Enjoy!
Valentine's Day activities are so much fun! This party activity is perfect for classroom parties or even a themed play date. We loved the sensory aspect of it and played for a long time!
Incorporating sensory play into learning and play activities is a great way to explore textures, scents, and so much more. The learning that comes from sensory play is vast! For children, sensory play builds language, self-esteem, and independence...all as they learn through the five senses.
We started with a bin of water and a half cup of pomegranate scented bath salts. Any scent would do for this activity. We loved the pink color of these salts and the smell was divine! Mix the bath salts in the water until all of the salt dissolves. Depending on the amount of water you have, you may need more or less salt. Add a little at a time until all of the salt is dissolved.
Next, I drew a heart shaped bulls eye on our chalkboard easel. You could also do this activity on a white board. I added some small numbers for keeping score.
I added some hearts cut from foam sheets to the scented water and set out a pair of kitchen tongs. This activity alone was enough to inspire sensory play and exploration! It was fun to just play in the sweet smelling water and grab the hearts with the tongs.
Grabbing the hearts with the tongs required fine motor coordination (especially to use the tongs correctly and not with two hands!) Little Guy, age 4, was able to do this, but tended to switch over to using two hands on the tongs. What a great pre-scissor skill this was!
Eye-hand coordination was needed to grab the hearts with the tongs as they swished around in the water. As we did, we were enjoying the scent of pomegranate!
After they caught a heart in the tongs, they could apply them to the bulls-eye. Little Guy closed his eyes and tried to get the heart into the middle. Baby Girl (age 2) liked to just play around in the water and stick the hearts up on the chalk board. This was a good age-appropriate modification for her!
We had so much fun with our scented water bin, that we kept it out for a good portion of the day and enjoyed more sensory play!
The Sugar Aunts are three sisters who blog about all things creative in motherhood. They love playful learning, creative kid's crafts, sensory and fine motor activities, kid's party themes, DIY, and so much more. Between the three Aunts, there are 6 cousins (with more on the way!) who are around each other so often, they are more like siblings than cousins! You can see the action at www.sugaraunts.com. Recommended Reading:
ADS DISCLOSURE: We've partnered with some wonderful advertisers who may sponsor blog posts or send us samples to test. Some companies pay us to review their products. *We also use affiliate links, if you make a purchase we get a tiny commission. Kids Creative Chaos participates in the Amazon LLC Associates Program*, an affiliate advertising program designed to provide a mean for blogs to earn advertising fees by linking to Amazon properties, including, but not limited to, amazon.com, endless.com, myhabit.com, smallparts.com, or amazonwireless.com. We also offer Tapinfluence, Google Adsense, SoFab, and Izea ads here. Thanks so much for helping us keep the lights on! :)
Cardboard Toilet Tubes turned Holiday Hats How many rolls of toilet paper do you go though each month? We've got to recycle that ca...
Follow us on Instagram
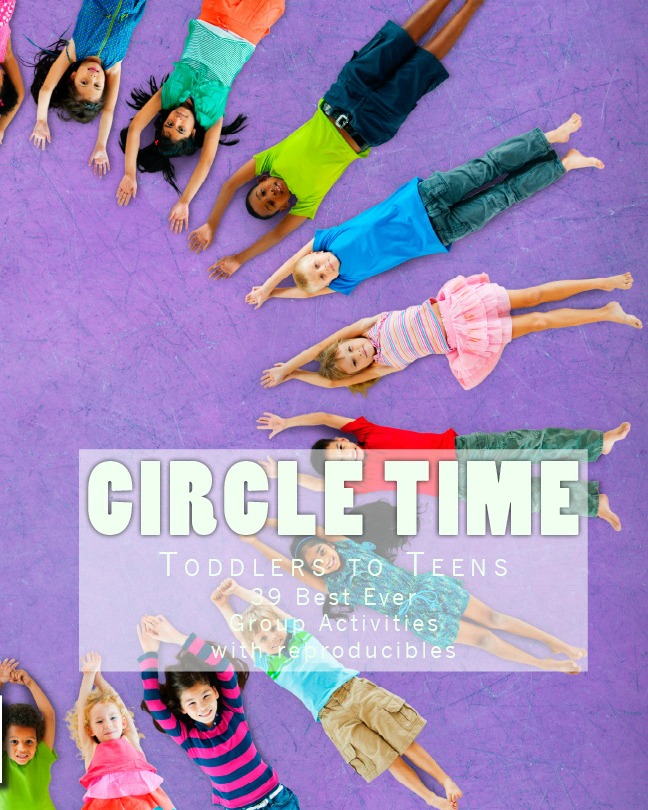
Get Circle Time Handbook
Can't remember all of the words to your favorite group game? Get the handbook with reproducible pages to copy and add to your clipboard. All of your favorite games right at your fingertips!


 and let stand for 30 minutes at room temperature. Line a greased 15 in. x 10 in. x 1 in. baking pan with
  . Grease the paper and set aside. Preheat oven to 375 degrees F.
 , starting with the short side. Cool completely on a wire rack.
 juice
juice and cherry juice and beat until combined. Add milk, if necessary, for consistency. Beat until smooth.


