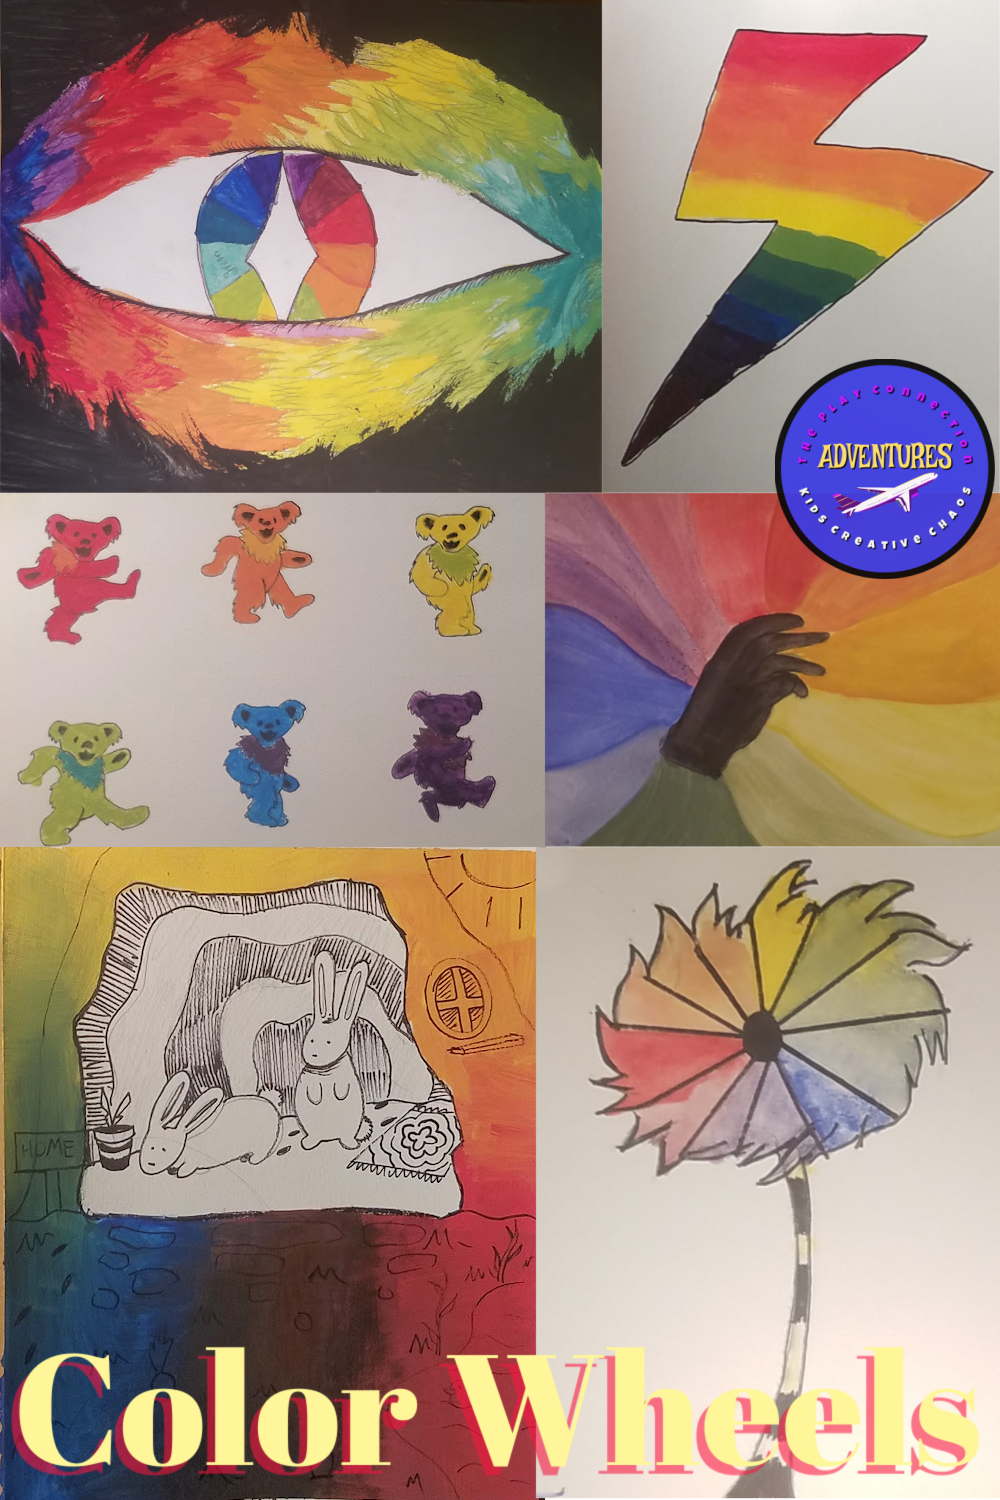
Let's face it, kids don't want to paint a boring color wheel. Change up your color wheel lesson for your intro or homeschool art class with these creative ideas for a color wheel! It's still a basic rainbow color wheel, but when you let students add their own flair, it becomes an art project that they are happy to display.
This post contains Amazon and other affiliate links.
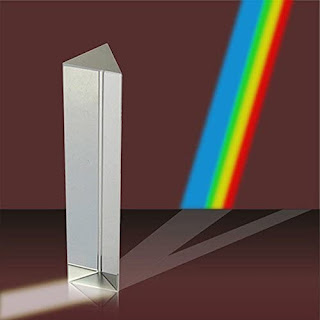
Simply show the students a basic color wheel or grab some prisms to teach the color order of the rainbow and let their imaginations run wild! You can use markers, tempera paint, or water colors. Water colors tend to blend easier for a gradual, visual color change. Use tempera for an exact mixing of primary, secondary, and tertiary colors. There's more to color than ROY G. BIV.
What order do the colors go on the wheel? It depends where you start. Think about a rainbow or use a prism to display the colors in their natural light spectrum order. Allow students to paint anything they want as long as they demonstrate an understanding of the rainbow color wheel order.
Henri Matisse was best known as an abstract artist. He aligned himself with a small group of artists known as Fauvists or Wild Beasts. Unlike other painters during this era, he painted with bold colors and took risks with his art. Matisse called his cut paper art posters, painting and drawing with scissors So, how do you paint like Henri Matisse? With paper cut-outs, of course.
This post contains Amazon and other affiliate links for your convenience.
The Cut Outs or Painting with Paper are part of the Matisse Jazz Series. Matisse created a few artists’ books, many were made in 1941 after he suffered with intestinal cancer. With this technique, he was able to stay in bed and still create art.
Henri Matisse Paper Cut Outs Video for Students.
The painting of the figure with stars around it is one of the most well-known in his Jazz series. The book is made up of circus and theater theme posters made with cut and pasted brightly colored papers that are printed using a stencil technique known as pochoir. Most of the images in the Jazz series are done in primary colors.
You may have seen a similar cut paper technique in a series of children's books painted and illustrated by Eric Carle. Carle was influenced by the works of Matisse and other abstract artists. Here's an art lesson on Eric Carle. You can also experiment with Eric Carle's technique of wet paper illustration with this lesson, how to paint like Eric Carle.
With his cut paper art, Matisse invented a new form of art, the cut-out. He called this new art form drawing with scissors. He cut out various geometric and organic shapes and arranged them on his gouache painted canvas to illustrate his books. He also hand wrote about each image in cursive rather than using a type setting. This style is similar to today's scrap booking. You can create your own book that has meaning to your life with this simple, inspired by Matisse, technique.
Paint Like Matisse
Supplies Needed:
Mixed Media Paper,18 x 24"
Tempera or Acrylic Paint in primary colors
Wide Paint Brush
Brightly Colored Copy Paper
Glue Stick
Subject Matter that is Meaningful
We decided to take inspiration from the Jazz poster's cover painting. Using the same primary color scheme, we added secondary colors in orange and violet. There are not lines or any drawing on the art work; everything is done in paper cut outs. Remember, it is abstract art! Use shapes and meaningful colors to represent your subject matter. Our paper painting represents a family pet. Our Cockatiel, Nebu, died at the age of twenty-three. Squinting your eyes while looking at a cockatiel will allow you to see his basic features, yellow spiked crest and orange cheek. The heart represents how close he was to our hearts, and the violet squiggles represent his wings in motion. They can also represent a flutter or the beating of his heart.
While you're planning your design think about the Elements of Art and the Principles of Design. How many can you use? Ours has color, line, shape, space, balance, movement, contrast, emphasis, and harmony. Do you see more? In the comments below, tell us what you see.
MATISSE ABSTRACT ART LESSON PLAN
Painting with Scissors and Paper Cut Outs: How to Paint Like Henri Matisse
Step one: Come up with a subject matter that means something to you.
Step two: Sketch it out in your sketch book.
Step three: Think about it in an abstract way.
Step four: Do a thumbnail sketch changing your drawing into basic shapes.
Step five: Paint your paper background in a primary color or black.
Step six: Cut out your shapes.
Step seven: Arrange your shapes on the paper. Think about the Principles of Design, especially balance and unity. Shapes should be abstract, and it shouldn't be immediately obvious what the picture represents (not realistic.) See our student examples below. No drawing! Remember, you are painting with paper.
Step eight: Paste them into position. Tip: Do not use school glue, it bubbles up. Glue sticks work best.
Step nine: That's it! It's that simple to paint like Henri Matisse!
These are student examples from the NCHS Intro to 2D Art class. You may not use these images or reproduce them anywhere else. They are for educational purposes only.
If you want to try this project with preschoolers or elementary students, you may also like to add some books to your Matisse art lesson plans. The books below make excellent companion books for a lesson on Henri Matisse's painting with scissors abstract poster series. Don't forget to read your students some Eric Carle books and remind them that he was influenced by Matisse.
COLOR THEORY COLOR SCHEME CUT PAPER LETTERS ART PROJECT
If you watch the popular NETFLIX series, Cobra Kai, you've probably noticed the t-shirts worn by the Anthony LaRusso character, played by Griffin Santopietro. In the series, Anthony is the son of Daniel and Amanda LaRusso, and the younger brother of Samantha LaRusso. He often wears cool printed tees, below the word LEGEND is printed in two tone letters across his shirt. The colorful block print letters inspired this letter color scheme art project perfect for a quick lesson on color theory.
This post contains Amazon and other affiliate links for your convenience.
The video below is an awesome companion video to use when teaching the history of graffiti art.
LEGEND Color Theory Letter Project
This letter color scheme project can be be simple or more complicated and adapted for all grade levels. For a simple project for elementary students, simply cut and paste the letters onto a 6" x 12" white, gray, or black poster board using contrasting colors from the basic color wheel. For our homeschool friends that means: Red/Green, Blue/Orange, and Purple/Yellow. Remind your students to eyeball the letters and center the word on the page before the final glue down.
For high school students in a basic art class, remind the students that contrasting colors are simply colors that are opposite each other on the color wheel. This will give more color options. For more advanced classes, have art students design their letters based on a color scheme: monochromatic, complementary, double complementary, split complementary, triadic, tetradic, analagous, intermediate primary, secondary, or tertiary. We used cut, brightly colored paper in anticipation of a color paper unit on Matisse, but you can also use acrylic paints.
What are the Color Schemes?
Monochromatic - One color. A monochromatic color scheme ranges between lighter (tints) and darker (shades) versions of the base color or hue.
Primary - The basic colors. Red, Yellow, and Blue. With crayons, pencils, and paint, these colors can be combined to create the secondary colors. (Don't let Google and Digital Art confuse you.)
Triadic - Primary and secondary color schemes are also triadic colors schemes. A triadic color scheme is made up of three colors evenly spaced on the color wheel. These colors form a triangle across the color wheel.
Tertiary - A primary color + a secondary color. Tertiary colors combine primary and secondary colors to create compound colors: blue-green, blue-violet, red-orange, red-violet, yellow-orange, and yellow-green.
Complementary - Two colors that are on opposite sides of the color wheel. The basics are Red/Green, Blue/Orange, and Purple/Yellow. However, you can pull-out a color wheel to find more variations such as, Yellow-Orange/Blue Violet.
Double Complementary or Tetradic - Using two sets of Complementary colors together. For example, red/green paired with yellow/purple. A double complementary color scheme forms a rectangle across the color wheel.
Split Complementary - A split complementary scheme uses three colors. Start with one color, find its complement and then use the two colors on either side of it. If you look at the color wheel above, blue, violet (purple,) and yellow-orange form a split complementary triangle. Yellow-Orange/Blue-Violet being the contrasting colors and blue and violet are the splits. If using Blue-Violet, the split complementary colors are Orange and Yellow. Get it? Got it. Good!
Analogous - Analogous colors are next to each other on the color wheel. Only use three to five colors for this color scheme. Analogous schemes can use warm colors, cool colors, or a combination of both depending on where you start. For art that pops stick to three analogous colors.
Intermediate - The tertiary colors are every other color on the color wheel. Tertiary colors combine primary and secondary colors to create compound colors: blue-green, blue-violet, red-orange, red-violet, yellow-orange, and yellow-green. This is also known as an intermediate color scheme.
Beginners will want to measure to choose letter size and then eyeball the position on the poster board before gluing it down. Divide 12" by the number of letters you choose to use. The answer will provide enough space for your letter and the space between each letter. For example, 12/6 = 2". Allow 1 1/2" for each letter and use the extra space to form a border and proper letter spacing.
More advanced students should use the ruler to lay out a grid on the poster board. Draw separate grid lines for the block letter, space between the letters, and a border around them. Showing the students how to layout and plan for the block letter spacing will prepare them for future work in sign painting, drafting, technical theatre, and architecture.
Draw a horizon line halfway down the middle of the paper at 3". This line serves as the dividing line for the color of the letters. Each letter will be two colors based on one of the color schemes listed above. for younger students, choose contrasting colors. Measure for at least a 1/4" border from the edges of the paper. The width of letters is determined by the number of letters used as mentioned above. If you cut the letters out from a block of paper, with an Xacto knife, you can use the paper as a template to paint letters for a future project.
Essential Crafting Skills That Every Child Should Learn
Art and crafting activities have positive mental and physical benefits. Studies show that when children work together on craft projects, they build language skills as they create together, and more easily understand the perspective of others. Crafting also helps cultivate a child’s sense of achievement, building confidence and self-esteem through creation and experimentation.
In addition to learning important skills, supporting your child with creative outlets for free expression is good for their overall well being and health. Crafting is a wonderful way to relieve stress and offer space to learn to experiment and create. With a few simple supplies and an open mind, children will have a lot of fun while learning to enjoy crafting, all while developing a wide range of important skills. Here are some recommendations for teaching essential crafting skills to your children.
Junk Modeling
Open-ended art projects encourage the development of critical thinking skills. As a child makes a mental plan for what they want to make, they are building visual-spatial skills and exercising both right and left brain function. Designing models and sculpture helps children learn to evaluate shapes. An assortment of containers, wires, plastic, and random bits of household junk can be transformed into robots, toys, or mobiles. Provide glue and tape to help secure the pieces together, and paint and decorations for embellishing the model.
Hand sewing tasks, like threading a needle or tying a knot, help improve hand-eye coordination and fine motor skills. As noted by the Philly Art Center, the small muscles in a child’s fingers, wrists, and hands are strengthened through arts and crafts activities, which helps to make learning to write easier. Older children may enjoy designing costumes or simple bags. Providing a sewing machine for children is a creative and fulfilling way to encourage artistic expression. Math skills, including spatial reasoning, measurement taking, and shapes are skills that can be learned through pattern making and design. Offer to host a fashion show for children to share and reflect on their creations.
Teaching crafting skills like cutting with scissors and drawing encourages the development of fine motor muscles. Suggest a collage theme and set a table with an assortment of papers, magazines, fabrics, leftover crafting supplies, and glue. Children will also learn about dimension and composition, gaining concentration skills as they assemble materials to create their art. Encourage children as they create unstructured work, focusing on the process and exploring the creation of art rather than the end product.
String Art
Children who engage with creative activities exercise and develop a creative mindset, learning there can be many ways to complete a task. With yarn, flat top nails or pins, and a bit of scrap wood or cardboard, kids will build skills like measuring and the steps involved in creating geometric and linear art. Patience and imagination will be stretched as they figure out how to transfer their ideas to the surface. Older children can be challenged to make elaborate templates or intricate designs with parabolic curves and repeating patterns. Dr. Kerry Freeman (Head of Art & Design Education, Northern Illinois University) adds that when kids engage in crafting and art for expression and are given the ability to take risks, they are developing lifelong innovation skills that will contribute to their success academically and as adults.
Learning essential crafting skills has so many benefits for your child, contributing to both their physical and emotional development as they grow. Plan to engage your child with age-appropriate creative activities every week. Enjoy spending family time together to teach these essential crafting skills to your child, it’s a wonderful opportunity to bond and create memories.
The prospect of becoming a first-time parent is an equally daunting and exciting journey. There are many things that need to be done in preparation for your baby’s arrival, and for first-time parents, the list can often seem never-ending and overwhelming. Wondering how do you plan a nursery? A key task within that list is decorating the nursery, and organizing a space for the newest member of the family. Although it’s a joyous project, there are various factors and small details that are required to create the perfect nursery for your baby. Here at We Buy Any Home we’ve composed a guide on how to renovate a nursery for first time parents, along with things to include and some helpful tips. This article is written by Holly Herbert.
This post contains Amazon affiliate links.
Planning a Nursery Step-by-Step Guide
Step 1- Make A Plan:
It’s no question that preparing for the arrival of the baby takes planning, and planning the nursery is no exception. Your nursery will serve as a multi-functional room, not only will it be the place where your baby will eventually sleep, but it's where you will dress them, change, teach and feed them. Ensuring you have an in-depth plan is a great way to make sure you have everything you need and no little detail is missing.
It’s vital that you ensure your future nursery is pristine before you begin to think about decorating. Babies are incredibly susceptible to germs that arise through dust, pet hair and mold, so it's important that you spend a good amount of time cleaning all surface areas. However, try to refrain from using harsh chemicals when cleaning as the fumes can linger in the air and be toxic if inhaled by your baby.
It’s important to consider the smaller factors about the room. Are there drafty windows? Is the main light overbearing? Do the door hinges creak? All these small maintenance checks need to be fixed prior to the arrival of your baby, as you want them to have the most comfortable time in their nursery.
Once you have decided where you are going to put the nursery, then it's time to get creative. If you're thinking about painting then your options are limitless. Traditional colors are usually pink and blue, however neutral color palettes are becoming increasingly popular for a minimalist feel to the room. If you're thinking of being extra creative then you may want to consider going with a theme or perhaps a mural wall. A side note- if you opt to paint the nursery, make sure you buy a non-toxic paint that won't flake.
Don’t forget to decorate the ceiling too. Babies spend a lot of time on their backs, so why not give them a feature to look at. Consider adding a ceiling mural or a soothing color to enhance your nursery.
Most nurseries are centered around a focal piece of furniture such as a crib, but there are other options to choose from. A painted dresser can work well, or a large window or alcove. A small checklist of essential nursery items includes:
A helpful tip is to ensure that everything is in reach of the changing table- including wipes, changing table covers, diaper disposal system, laundry hamper and a pacifier. This will allow you to reach for things with ease, avoid stress but more most importantly, keep your eye on your baby at all times.
As your baby grows, you will notice that they will begin to spend more time on the floor- therefore it's an important factor to consider before they get to that stage. If you’re opting to lay down a carpet, ensure it’s a shade that won't highlight stains and spills. Wooden floors are a popular choice, and you can put down a rug to add a pop of color and cushion any tumbles.
This is your baby’s first room, so don’t forget to make it feel like home. Including items of sentiment for example, family photos, generational gifts such as soft toys and blankets are a neat touch to completing your nursery.
Fun In The Sun - 6 Tips For Creating A Mud Kitchen For Your Kids
Kids love mud! And as dirty as they may get, it’s time to advocate messy play so they can learn new skills the fun way. The fastest and easiest way to encourage your kids to get outdoors is to build them a mud kitchen.They'll be tripping over each other to get outside
Building your own mud kitchen is a creative, cost-effective way of enabling messy play for your kids while saving money on an expensive play kitchen.
You can build your mud kitchen in your own way, and in the end, your kids will have the perfect environment in which to get their hands dirty anytime.
This post contains Amazon affiliate links for your convenience.
Photo: Jelleke Vanooteghem/Unsplash
Six tips to create your own mud kitchen
Use What You’ve Got
Poke around your garage and see what you can recycle to save money on your mud kitchen. You can use wood, recycled pallets, and old timber for the construction. Old cookware and bakeware, utensils, and decorations can also be used to finish out the kitchen,
Remember, the idea is to ignite your child’s imagination, so your DIY mud kitchen doesn’t need to resemble a brand-new toy kitchen set.
Stove Tops Add to The Fun
While it’s great to leave some things up to the imagination, it’s a good idea to make your play kitchen resemble a real kitchen by creating a stove top. You can paint the burners on a piece of timber or wood, and you can even add broken or thrifted appliances to your outdoor kitchen to enhance its appearance. You can also use good, old cardboard to create a play stove.
Bake Mud Cakes
The fun part of having a mud kitchen is that your kids get to play with mud and get as dirty as they want. All you need to make mud cakes is some sand or soil and water. You can use old cookware and bake ware to contain them and shape them like cakes and cupcakes.
Parents can get involved by showing kids how to create funky-shaped cookies with cookie cutters and molds or add colored pasta to the mud for added texture. This kind of sensory play is an important part of childhood development, but above all, it’s a whole lot of fun.
A mud kitchen is a fun way to teach your child table manners. Guide your preschoolers through setting a table and laying out the dishes. Show them the way to arrange cutlery and allow your children to bring some garden leaves to create napkins for a rustic table setting.
Add a Sink
Since you’ve introduced messy play to your preschoolers with colored pasta and mud cakes, it’s a good idea to take care of the cleanup. The most logical way to do this is to add a sink to your mud kitchen! To create your sink, use a silver or grey bucket and fill it with water or a big flower put with the bottom plugged works nicely too.
Add a hose in the bucket so that there’s an accessible faucet. This is a great way to teach children how to clean up after themselves. Add some dish washing liquid and a sponge so you can wash all the cookware the kids used before bringing it back into the house!
Every chef needs a chef’s hat and apron, so make sure to get these for your child. They will love it! Plus, the apron will offer some protection from mud splatter while playing. Rubber boots are a good idea too. Preschool age kids and toddlers love to wear galoshes!
Have fun with your kiddos and their mud kitchen. You may want to wear some rubber boots yourself! Encourage your children to enjoy free and imaginative play, and you can bet they’ll learn tons of kitchen tricks in the process. Pretend play is the best way to learn!
50+ Easy Circle Time Games for Three, Four, and Five Years Group Time for preschoolers often happens several times a day, you need fres...
Follow us on Instagram
Get Circle Time Handbook
Can't remember all of the words to your favorite group game? Get the handbook with reproducible pages to copy and add to your clipboard. All of your favorite games right at your fingertips!