Showing posts sorted by date for query Angie. Sort by relevance Show all posts

Book Review: My Big Bottom Blessing by Teasi Cannon

Angie's Corner                                               Book Review: Teasi (pronounced Tee See) Cannon has a master's degree in pastoral counseling from Liberty Theological Seminary and is a sought-after speaker who loves to help women remember who they are in Christ. "My Big Bottom Blessing" is available at Amazon.com and Barnes and Noble in paperback or for your Kindle or Nook.
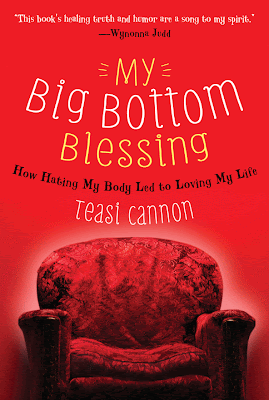
Book Review Teasi Cannon My Big Bottom Blessing
Book Review: My Big Bottom Blessing

My Big Bottom Blessing
How Hating My Body Led to Loving My Life

Published by Worthy Publishing~2012


I reviewed this book for Handlebar Marketing. Once I saw the title and what it was about I couldn't wait to read it. This was a very easy and thought provoking read. Ms. Cannon talks about her struggle with the self defeating thoughts she had dealing with her body image and weight while trying to live a Christian life.  It contaminated her everyday life because she chose to believe those thoughts. Then one day, while away at a Christian seminar with her husband, she was able to realize her actual true self worth and started fighting back at the self defeating thoughts, slowly diminishing them from her thought process.

While not everyone has to deal with weight issues, I feel a lot people have those same self defeating thoughts in their life about something; I know I do. This book asks the hard questions. At the end of each section is a questionnaire that gives you a process so you can start thinking more positively about yourself and start quieting those thoughts that can hold you back and contaminate your life. This will be a book I keep on hand for my daughter as she is reaching the age when she will start to compare herself to other girls and I want her to be able to accept what she looks like and how she is with a positive outlook instead of a negative one.

Futuristic Activities for Children: Kindergarten Field Trip to Outer Space

Take a Field Trip to Outer Space Futuristic Activities for Kids

From Angie's Corner: Field Trip to Challenger Learning Center to learn about Astronauts. This Futuristic Activity for Kids is perfect for a Homeschool Field Trip, it is located in Brownsburg, Indiana. Enjoy!

Futuristic Activities for Kids Challenger Learning Center Astronaut Lesson
Futuristic Activity for Elementary Children: 
How Astronauts sit during take off of Shuttle.
I was lucky enough to be able to go along with Bug's Kindergarten class to the Challenger Learning Center (part of our school district) for their yearly field trip. At this very special place, they have different "missions" for the kids.  It is a very hands on place and the children get to learn and do scientific tasks just like real Astronauts. Each area of this place is geared to be age appropriate.  


On this day, each parent was given a station to man, to guide, and help out when needed while the children read and followed the instruction for the tasks they needed to complete.  I personally got to man the Magnetic station and the Magnifying Glass and Mirror stations. 


The children learned how two magnets can either attract each other or push away from each other. With Magnifying Glasses, they were able to see how to read tiny print and with Mirrors they were able to see how, if placed properly, the mirrors would show the other side of a half word or shape. 

This was a fabulous place to discover. Everyone that worked there was excited to have the children learn about not only space and science, but also teamwork.


Recommended Reading:


Space Stations: Base Camps to the Stars*

Personal Space Camp Activity and Idea Book*


ADS DISCLOSURE: We've partnered with some wonderful advertisers who may sponsor blog posts or send us samples to test. Some companies pay us to review their products.

*We also use affiliate links, if you make a purchase we get a tiny commission. Kids Creative Chaos participates in the Amazon LLC Associates Program*, an affiliate advertising program designed to provide a mean for blogs to earn advertising fees by linking to Amazon properties, including, but not limited to, amazon.com, endless.com, myhabit.com, smallparts.com, or amazonwireless.com. We also offer Tapinfluence, Google Adsense, SoFab, and Izea ads here. Thanks so much for helping us keep the lights on! :)


Losing my first tooth!

Losing a Tooth


What do you about the Tooth Fairy? How much money do you give? Is there a different amount for losing the first tooth? Angie shares her experience in this post about, Losing My First Tooth. Enjoy! 

If you want to read our Tooth fairy series, scroll to the bottom.

Losing a tooth, teeth pictures
Finally lost my first tooth!
After a week's worth of trying, my Matt finally pulled his first tooth. Something he apparently felt he needed to do on his own, because he wouldn't let my husband or I try.  It had been loose for weeks and his adult tooth was already coming in behind it.  Just by chance, he got it out while we were at my parent's house for Easter Dinner with the family and his last day of Spring Break. So, it was able to go into his school journaling on Spring Break.


Proud moment.

The next day was the funniest though... after the Tooth Fairy came.  He was disappointed because rumor in Kindergarten is, you either get a two dollar bill or twenty (I want to meet this tooth fairy if that is the case) and all he got was one dollar. Then came this conversation with his sister.  

Matt:  "I wonder if mom and dad is the tooth fairy?"

Ally:  "No way! Trust me, I wake up anytime they come in my room and I don't hear anything when the tooth fairy comes." 

I heard this while eavesdropping from the other room. Panic quickly turned to relief and then a quiet, little laugh after he was quite happy with his older sister's response.  Now, he can't wait for another tooth to come out.


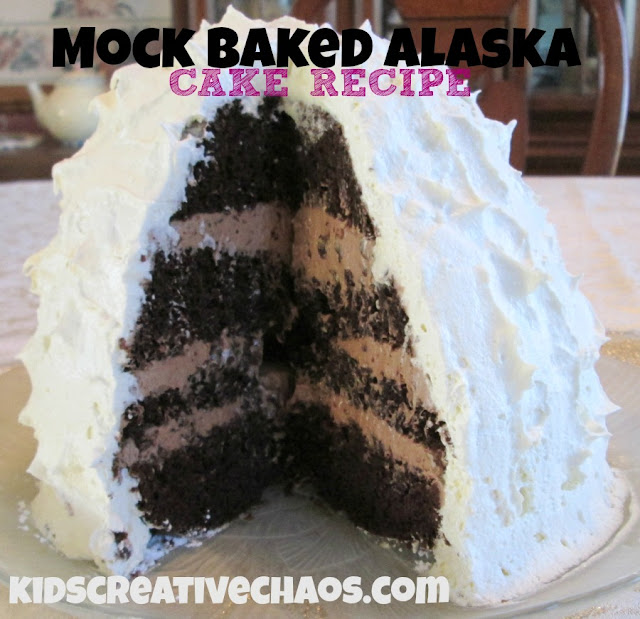
Mock Baked Alaska Cake Recipe

Baked Alaska Recipe with Optional Fillings

How do you make Baked Alaska Cake? What is Baked Alaska? Try this Mock Baked Alaska Cake Recipe adapted from Pampered ChefEnjoy!

This post contains Amazon Affiliate links.


Mock Baked Alaska Cake Recipe
Mock Baked Alaska Cake Recipe with optional fillings.

How to Make Baked Alaska Cake 


  • 1 package (18.25 oz) Devil's Food or Chocolate cake mix (plus ingredients to make cake)

  • 1 cup mini semi-sweet Chocolate Chips, divided

  • 1 package (8 oz) Neufachtel Cheese or Cream Cheese, softened

  • 1 cup powdered sugar

  • 1 container (16 oz) frozen whipped topping, thawed, divided.

Baked Alaska Recipe with Optional Fillings
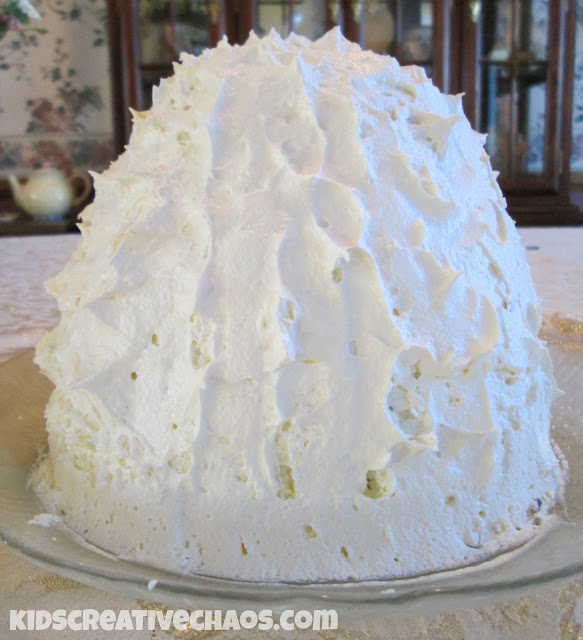
Baked Alaska Recipe with Optional Fillings.

Directions: 
Preheat oven to 325° F. Grease and flour Classic Batter Bowl.

Prepare cake mix according to package directions; pour into batter bowl. Bake 1 hour, 10 minutes to 1 hour, 15 minutes or until cake tester inserted in center comes out clean. 


Remove from oven to cooling rack; cool 15 minutes. Run spatula around outside of cake and gently turn out onto cooling rack, large end down.

Cool 3 hours. Using serrated bread knife, trim large end of cake to level. Place cake, large end down, onto cake plate. 


To slice cake into four equal layers, slice cake horizontally in half. Then, slice each half into two equal layers.

Chop 1/4 cup of the chocolate morsels using food chopper; set aside.  


Place remaining chocolate morsels in microwave, uncovered, on high 20-60 seconds or until melted and smooth, stirring after each 20-second interval. 

In clean Batter Bowl, whisk cream cheese until smooth using stainless steel whisk. Add powdered sugar; whisk until smooth. 

Stir in melted chocolate; mix well. Fold 2 cups of the whipped topping and chopped chocolate into cream cheese mixture using spatula. 

Using spreader or butter knife, spread bottom layer of cake with about half of the filling, forming a 3/4-inch layer.

Repeat with remaining layers and filling, ending with the top layer of cake. Spread any remaining filling over outside of cake to create a smooth surface. 


Frost cake with remaining whipped topping.

*To form decorative peaks, press spreader into topping and pull away. Repeat over entire surface of cake. For easier slicing, refrigerate cake at least 30 minutes.  


To easily cut cake into servings, cut cake into eight wedges from top to bottom using utility knife. 

Carefully insert spatula horizontally into each wedge, dividing into two equal portions. 

Options for Filling:

Red Kool-Aid Strawberry Splash: Omit chocolate morsels. Add 1/2 teaspoon unsweetened strawberry drink mix powder to cream cheese mixture. Stir 1/4 cup chopped strawberries into cream cheese mixture. Proceed as recipe directs. Use
 strawberry flavored whip cream or regular with red food coloring.

Christmas Green Mint Splash: Omit 1/2 cup melted chocolate. Add 1/4 teaspoon peppermint extract and 3-4 drops green food coloring, if desired, to cream cheese mixture. Proceed as recipe directs.


Recommended:


Pampered Chef: Kids in the Kitchen


Baked Alaska Recipes

Angie's Recipes


Meet our Mommy Bloggers

Welcome to Kid's Creative Chaos, a resource for Classroom curriculum, Mommy ideas, and Fun activities. We post crafts, activities, recipes, and our musings on life. We post the mishaps, the fails, and the messes. No Fancy Nancy here. Think of it as a Test Kitchen for Kiddie Crafts, Home Chefs, and Mommy Chaos. We want our readers to say, 'Hey, I can do that!' or 'That looks fun!' or  'Do you have any advice?'
If you are an aspiring writer or a novelist chat with us here or on Facebook or Blog Frog or join our group Historical Fiction Books to interact with fellow writers.

Meet our Mommy Bloggers:

Lora Langston, Marketing Director at The Play Connection, Inc. and Owner of Kids Creative Chaos blog.

Contact info: lora@theplayconnection.com


In the real world, Lora teaches art, sensory play, and drama classes to kids age 18 months to 18 years old at area parks, schools, and special events. The kids present programs to retirement villages and schools. She also writes YA Fiction. And, of course, Lora loves to CREATE.   Lora is now a full-time freelance blogger and social media marketing manager! A lot can happen in a year :)

In another life, Lora studied Architecture and Theatre at Ball State University where she also did the (Tri Sigma) sorority thing. Currently, she is a SAHM with two elementary age children, one  two indoor cat (s), one cockatiel, one box turtle, a tank load of two fish, and two inherited outdoor cats. 

Our Turtle got blessed at Church.

Recently, her family purchased a new home (she plans to name it Redbud Ranch) taken right out of the movie "Funny Farm" with Chevy Chase. Here, she will write from the window overlooking a Dogwood Tree, a row of Redbuds (her favorite tree), and a little pond full of fish while daydreaming of becoming an Andy Farmer-style, Martha Stewart. (Too young for the reference? Go watch the movie!) She also recommends the movie, "Stranger than Fiction", but only if you are a writing geek.

Angela Whitmire write recipes and Angie's Corner. She blogs about the active life of her outdoor and recreation loving family.


In the real world, Angie has two elementary age children, a couple of indoor cats, and keeps bunnies outdoors for 4H.

Tracey Thomas writes Tracey's Tempo. She blogs about her life with a large, blended-family, her passion for helping those in need through Santa's Elves of Indy, and fun activities for kids. Tracey has four children of her own and two step children.


In the real world, Tracey heads up Santa's Elves (a non-profit providing Christmas gifts to children in need), holds a Realtor's license, is an experienced photographer, and taxis her brood to sports and club activities.  http://www.santaselves.us/ In a past life, she headed up a Girl Scout Troop and ran an in-home Child-care. Tracey spends her spare time daydreaming of finding the time and resources for everything she needs to accomplish.


Life is crazy! Need some ideas to relax?  Grab a cup of coffee (okay, a soda) and stay awhile. We are always surfing for new crafty ideas that make life fun. And we love comments!  We'll check out your blog so be sure to leave a linky. Don't miss our updates be sure to subscribe to our posts on the right sidebar.


Follow Me on Pinterest

Microwave Strawberry Cheesecake Cake Recipe

Strawberry Cheesecake Recipe for Mircowave 

Angie's Corner: What could be better than a cake recipe you can microwave? Yes, please. This Strawberry Cheesecake CAKE recipe is microwavable. Enjoy!

Strawberry Cheesecake Recipe for Mircowave
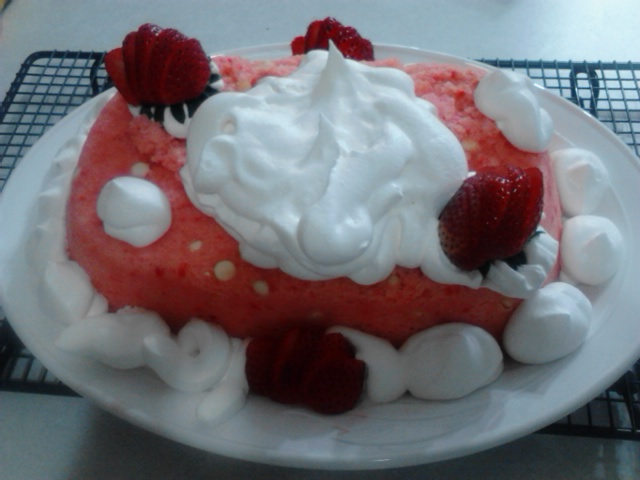
Mircowavable Strawberry Cheeesecake Cake Recipe with garnish.
Easy Strawberry Microwave Cheesecake Cake Recipe Pampered Chef
Microwave Strawberry Cheesecake 'Cake' Recipe.

Strawberry Cheesecake Microwave Cake Recipe

Ingredients:

1 strawberry cake mix (if you can't find strawberry- Pillsbury and Betty Crocker makes one you can use white, add red food color, (not much, like one drop) and add an extract tsp of strawberry extract.

The strawberry cake mix is prettier it has pink cake with red speckles, plus you're putting in the white chip is very pretty.


1 tsp. strawberry extract (only if you cannot find the strawberry cake mix)

½ cup white chocolate chips
1 (3 oz. box) cheesecake pudding mix
16 oz. sour cream
½ cup oil
3 eggs 

Garnish: whipped topping and fresh Strawberry Fans. 


  • 1. Spray your Stoneware Fluted Pan or Deep Covered Baker lightly and dust with flour (works best with Baker's Joy).
  • 2. Whisk eggs and pudding mix together in Classic Batter Bowl.
  • 3. Add remaining ingredients, blending well with Mix N' Scraper.
  • 4. Drop batter into Fluted pan and microwave on high 12-14 minutes. 
  • 1. (Watch your cake after 10 minutes if you microwave runs hot.) Works best if your have a turntable in your microwave. If not, rotate every 4-5 minutes. 
  • 5. Invert cakes immediately, but leave pan over the cake for 10 minutes. Cool. Garnish (Flour Sugar Shaker filled with powdered sugar, fresh strawberry fans made with your Egg Slicer Plus or Paring knife, fresh mints snipped with your Kitchen Shears) as desired.

How to Make Strawberry Fans:


To make the Strawberry fans gently slice a 3/4 of the way down and fan apart. Then with any leftover strawberries, put them in the Manual Food Processor and chop til desired sized and put in the center of cake, If using the fluted pan fill hole in center of cake first with leftover whipped topping before adding the strawberries

Recommended:

Fun Family Recipes


ADS DISCLOSURE: We've partnered with some wonderful advertisers who may sponsor blog posts or send us samples to test. Some companies pay us to review their products.

*We also use affiliate links, if you make a purchase we get a tiny commission. Kids Creative Chaos participates in the Amazon LLC Associates Program*, an affiliate advertising program designed to provide a mean for blogs to earn advertising fees by linking to Amazon properties, including, but not limited to, amazon.com, endless.com, myhabit.com, smallparts.com, or amazonwireless.com. We also offer Tapinfluence, Google Adsense, SoFab, and Izea ads here. Thanks so much for helping us keep the lights on! :)


A Day In Kokomo at the Glass Factory

Things to do In Indiana: Kokomo,  A One Tank Trip


We visited the Indiana Glass Factory in Kokomo, Indiana. If you're looking for things to do in Indiana, this is a great idea for a field trip or a one tank trip in Indiana. Homeschoolers will enjoy learning a new skill for a possible future trade or art project.

This post contains Amazon affiliate links.


Field Trip Idea: Things to do In Indiana: Kokomo, A One Tank Trip


A Day In Kokomo at the Glass Factory
Glass Factory.


Kokomo Opalescent Glass Main Office.

Things to do In Indiana: Kokomo,  A One Tank Trip
Beehive where they melt the glass.
Table where they roll glass to make panes.


Area where they roll and blow glass.
Sample of their panes of glass.

We got a guided tour of the glass factory. The kids saw it featured on a local news channel over Christmas break and really wanted to go. We all learned many things and we were all surprised to find out where the glass has been placed. One place is the Cinderella Castle at Disney. Apparently, the Kokomo Glass Factory produced all of the glass in the castle


Stained Glass at Cinderella's Castle in Disney World.


Stained Glass at Cinderella's Castle in Disney World.
Stained Glass at Cinderella's Castle in Disney World. 


The Kokomo Glass Factory has a beautiful shop where you can purchase hand blown hand blown glass items. Visit KOG.COM to see the shop (they ship) and if you live in the Indiana area, stop by and take  the tour. The Indiana Glass Factory makes a great family outing or field trip idea

Currently it runs Tues-Fri at 10 am and lasts about an hour. They even offer a class to make glass beads and accents. They also sell glass panes of different sizes and thicknesses if you need some for your home or craft projects.

This is truly a hidden jewel in Indiana.  We never knew about the glass factory until we saw it on the news. The kids loved the tour (which was a surprise) and apparently it was the highlight of everything we had planned over break. 


~ Angie


Recommended:

Things to do in Indiana

Books about Hand Blown Glass

More Posts by Angie

Thing to do in Kokomo

Get a Glass Craft for Kids


Moroccan Food Acorn Squash Fall Recipe

This Acorn Squash Recipe with Moroccan Spice give your taste buds a kick. 

Angie shares her favorite spicy recipe. Moroccan Food Rocks. After you use your squash for a fun, Fall Thanksgiving Craft, make this recipe in the kitchen with your kids 


Moroccan Food Acorn Squash Recipe
Angie's Recipes at Kids Creative Chaos.
"I made this the other night; 
it has just the right mix of sweet and savory. It is delish!"

Moroccan Spiced Acorn Squash Recipe


2 medium acorn squash (I used 3)
11/2 tbsp olive oil, divided
1 tbsp packed brown sugar
¾ tsp salt, divided
½ tsp black pepper
2/3 Cup uncooked wild rice blend
1 medium onion, finely chopped
2 tbsp Moroccan Rub
1 1/3 Cup water
1/3 Cup Golden Raisins
1 Medium red apple such as fuji (I used Jonagold's)
1 can 15oz. Garbanzo beans (Chickpeas) Drained and rinsed
2/3 C. slivered almonds, toasted and divded
1/3 cup snipped fresh chives
Additional snipped chives (optional)

Preheat oven 450.  Cut squash in half crosswise.  Remove and throw away seeds.  Place squash on Medium sheet pan or Large Bar Pan.  Using basting brush, brush squash with ½ tbsp of oil; sprinkle with brown sugar, ½ tsp of salt and pepper.  Bake 32-38 min or until golden brown.  Remove from oven and put on cooling rack.


Meanwhile, heat remaining 1 tbsp oil in 10in skillet over medium heat 1-3 min or until shimmering.  Add rice blend, onion and rub; cook and stir 1-2 min or until onion is tender.  Add water and raisins; cook covered, 12-15 min or until rice is tender, stirring occasionally.


Dice apple, zest lemon to measure 1 tsp.  Add apple, lemon zest, chickpeas, ½ cup almonds, chives and remaining ¼ tsp salt to skillet.  Cook covered, 1-2 min or until heated thru.  Spoon rice mixture evenly into squash halves.  Garnish with remaining 2 tbsp almonds and additional snipped chives, if desired.


Cook's Tip: To form flat base, trim ½ in off top and bottom of the squash.


Recommended Reading:

Kids travel journal: my trip to morocco*

Morocco Recipes* 


Bowling with Pro Bowlers: Osku Palmerma = Perfect way to start Spring Break

Angie's Corner
PBA Pro-Am Osku Palmermaa
With  Pro Bowler Osku Palmermaa
Last Friday, my 9 yr old daughter, got to bowl in a tournament for a chance to win scholarship money with Pro Bowlers that were in town for a PBA tournament. She just got a new heavier ball. So, after school Thursday, I took the kids to the local bowling alley so my daughter could get the feel of her new ball.  My son got to bowl without bumpers to get ready for next fall.

kids with Pro Bowler Ryan Schafer
Angie's kids with Pro Bowler Ryan Schafer
Pro Bowler Dick Allen
With  favorite Pro Bowler Dick Allen

For being nervous she started out great! She bowled a 156 but dropped in scores a bit as she bowled her next two games. In all, she got to bowl with 6 Pro Bowlers.

She quickly developed a crush on the 1st Pro Bowler and at the end left there in awe. The last Pro Bowler complimented her and as he tried to get her dad to meet someone about a camp, her coach (from youth league and who she bowled with) quickly stepped in to hear about it.

It was a great night for everyone; the Pro Bowlers had a great time with the kids, the kids got to meet and see Pro Bowlers. I was disappointed I didn't get to see my bowling crush, but I got to see a few bowlers I grew up watching. We will be doing this again next year if the opportunity presents itself. :)

How to Make Pumpkin Pie Pancakes Vegan Recipe

Ever wonder how to make Pumpkin Pie or how to make Pancakes from scratch? This vegan recipe from Angie does both!


Pumpkin pie pancakes these are breakfast this week. I got this vegan recipe from a friend- not sure where she found it, but when I saw it I knew I had to make these because they sounded so good.


How to Make Pumpkin Pie Pancakes Vegan Recipe
                 How to Make Pumpkin Pie Pancakes Vegan Recipe.


Vegan Pumpkin Pie Pancakes

1 cup whole wheat flour
1/3 C flaxseed
1/2 tsp salt
2 tsp baking powder
1 tsp cin + spice blend or pumpkin pie spice
1 tsp cinnamon
Mix together
1 cup canned pumpkin
1/2 cup unsweetened apple sauce
1 cup coconut milk or soy milk till consistency of pancake batter.

Mix wet, pour into dry, only mix till combined.

Toast chopped walnuts in your microwave, 1 min at a time until toasted in small microwave cooker.

Using large stainless steel scoop, scoop onto hot double burner griddle. Sprinkle w/toasted walnuts. Flip when bubbly.

Serve with vegan butter and pure maple syrup or try this vegan butter cream frosting.

Introducing Angie's Blog Posts

Today ~ I'd like to introduce Angie as a contributor to Kid's Creative Chaos.  She has been posting recipes for several weeks now and I felt it was time to bring her in as a true blogger. I thought it might be fun to bring a new perspective on living life in true mommy chaos. Don't fret, she'll still post those yummy recipes on Tuesdays, but on Thursdays she'll share some of the fun activities she and her family do together. Angie's kids are into sports and lots of recreational fun.


'Day in the life with two spirited kids'
by Angie of Kids Creative Chaos (the mind behind Angie's Recipes)

Follow Me on Pinterest


Yes, normally on Tuesday's and Thursday's I put up recipes but I was asked if I would like to post what we do with our kids on Thursday's to switch it up.  I have never actually done a blog of any sort before so please bare with me as I stumble through this. :-)

I will just do a quick introduction of my family today, only because the only things we have done together as a family of late is homework, and I don't think my kids would appreciate me taking their picture during full on "Homework Meltdown". lol.

I am a stay at home with 2 very spirited kids, a daughter 9 soon to be 10 (but thinks she is going on 16 sometimes. lol) and a son that just turned 6 (with the personality and charm that could make him sly like a fox as he gets older. lol).  But, both are extremely sensitive and caring kids who make sure they don't purposely hurt the feelings of others.

Right now, we haven't gone and done much together, well because up until recently it has been cold and we tend to go into "hibernation" of sorts over the winter.  My kids do bowl on a Saturday Youth League so that is where you will find us on Saturday mornings.  My daughter does tournaments where she can earn College scholarships and my son is in a different league for younger kids, but next year he moves up to his sister's league where he can start bowling tournaments. Bowling ends the beginning of May, and then my daughter starts up fast pitch softball and my son wants to attempt football.

As a family we like to camp, attempt gardening, (we start out great and by late summer it all goes down hill) and visit places- even if they are quick, weekend getaways. Spring Break is coming and I have a couple of places I would like to take the kids. Crossing my fingers they will get along and have a good time- periodically our outings end up with one or both kids going into a meltdown over something and ends with my husband or I mad and disappointed the trip didn't go the way we had envisioned it would when we planned it.

Stay tuned as we share our camping, 4-H, and sports activities with you each Thursday.

Skillet Harvest Vegetarian Pasta Recipe

Easy Vegetarian Pasta Recipes to Make in a Skillet


Angie's, Harvest Vegetarian Pasta Recipe, is a delicious vegetarian dish you cook in a skillet. Her family didn't even notice it was missing meat. Enjoy!


Easy Vegetarian Pasta Recipes to Make in a Skillet
            Vegetarian Skillet Pasta Recipe.


Harvest Vegetarian Pasta Recipe

1 lg onion
8oz white mushrooms
1/2 tbsp olive oil

1 15oz solid pack pumpkin
4C low sodium vegetable broth
3/4 C dry white wine such as a Chardonnay (or just sub it for additional vegetable broth)
1/2 C water
5 garlic cloves, pressed
3 tbsp Moroccan Rub
1/4 tsp salt
1 14.5oz pkg of multigrain penne pasta
1/4 C. shelled pistachios
1/2 C. heavy whipping cream
1oz Parmesan cheese
coarsely ground black pepper and chopped fresh parsley (optional)

Thinly slice onion using Simple Slicer on #2 setting, cut onion slices in half.  Slice mushrooms using Egg Slicer Plus. Heat oil in 12in skillet over medium high heat 1-3 min or until shimmering.  Add onion and mushrooms.  Cook and stir 2-3 min or until onion is translucent.  Meanwhile, combine pumpkin, broth, wine and water in bowl; whisk well.

Add garlic pressed, rub and salt to skillet; cook 10-20 sec. or until fragrant.  Stir in pumpkin mixture.  Bring to a simmer; stir in pasta.  Reduce heat to medium; cover and cook 9-11 min or until pasta is tender, stirring occasionally.

Meanwhile, coarsely chop pistachios using Food Chopper. Turn off burner; stir in cream.  Grate cheese over pasta; sprinkle with pistachios.  Garnish with black pepper and parsley if desired.


Recommended Reading:


Fresh and Fast Vegetarian: Recipes That Make a Meal

Vegetarian Lasagna Recipe


-->

Hawaiian Luau Pizza Recipe

Make a Hawaiian Pizza for a Luau

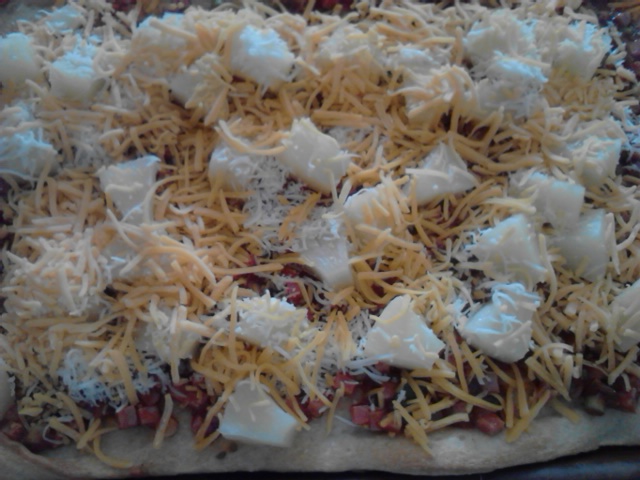
Having a Hawaiian theme party? Try this Hawaiian Luau Pizza Recipe by Angie. It is easy to make, and more for grownups than the kiddos. Enjoy!

How to Make a Hawaiian Luau Pizza Recipe
Make a Hawaiian Pizza for your next Luau.

Please excuse the huge chunks of pineapple, I bought the chunked pineapple and in the middle of the evening chaos around my house, I forgot to chop it up a little bit so decided to just go with it so the kids could start eating dinner before they started to complain and want to snack me out of house and home. lol.

Hawaiian Luau Pizza Recipe

1 pkg refrigerated thin crust pizza dough
1 12 oz piece deli ham (I just buy a package of diced ham)
2 green onions with tops, divided
1 large jalapeno pepper (I seed and remove ribs from mine to cut down on heat)
3/4 C ketchup
1 Tbsp Smoky Applewood Rub
1 garlic clove pressed
8 slices cheddar cheese (I just use shredded cheese)
3/4 C canned pineapple tidbits, drained


  • Preheat oven to 425.  
  • Lightly brush Large Bar Pan with canola oil. Unroll dough in bottom of pan, gently stretching and pressing dough to cover bottom of pan. 
  • Bake 12-14 min or until deep golden brown.
  • Meanwhile dice ham into 1/2 in pieces (if you chose not to buy already diced ham), thinly slice green onions; set aside the tops, finely chop the jalapeno using Food Chopper.  
  • Combine ham, onion bottoms, jalapeno, ketchup, rub and pressed garlic in Classic Batter Bowl and mix well.  Stack cheese slices; cut in half diagonally for a total of 16 slices( unless using shredded cheese) using pizza cutter.
  • Remove pan from oven to cooling rack.  Evenly top crust with ham mixture, pineapple and cheese.  Bake 5-6 min or until cheese is melted.  Remove pan from oven to cooling rack and cut pizza into 16 slices and sprinkle with green onion tops.

My family loves this pizza, and what sets it off is the BBQ sauce flavor that ketchup and rub combined make.  The first time I made this my kids ate almost the entire pan!


Recommended:

Chocolate Fruit Pizza

Hawaiian Party Parasols*


PB and J Brownie: Peanut Butter Recipes

How to Make PB and J Brownies Recipe

Do your kids love PB and J? How about Brownies? This peanut butter recipe by Angie combines the two for a yummy sensation. Read on to learn how to make peanut butter and jelly brownies. Enjoy!

Peanut Butter and Jelly Brownies PB & J Recipe
How to make Peanut Butter Jelly Brownies.

Peanut Butter Jelly Brownies Recipe

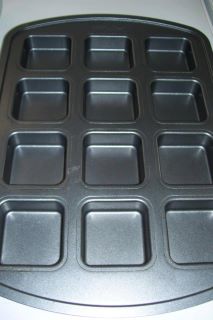
With this pan you can make 12 individual brownies or in this case brownie sandwiches, which kids and adults alike are sure to enjoy!

Non stick cooking spray with flour
1 C. semi sweet chocolate chips
1 box (10.25 oz) brownie mix
1/2 C. flour
2 eggs
1/2 C canola oil
1/4 C water
1/2 C powdered sugar
1/3 C creamy peanut butter
1/4 C butter softened
1/4 C. seedless raspberry jam (or any jam of your choice)
2 Tbsp dry roasted peanuts

Preheat oven 325.  Spray Brownie Pan with non stick spray.  Line cooling rack with parchment paper.  Place 1/2 C. chocolate chips in small microwavable bowl; microwave uncovered on high for 1 min or until mostly melted, stirring every 20 sec..  Combine brownie mix, flour, eggs, oil, water and melted chocolate in Classic Batter Bowl; whisk til smooth.  Using Large Scoop, divide batter evenly into wells of pan.  Bake 14-17 min. or until wooden pick inserted into centers comes out clean.

Meanwhile, for filling, combine powdered sugar, peanut butter and butter in Manual Food Processor; cover and pump handle until smooth, scraping down sides as necessary.  Spoon filling into resealable plastic bag; secure and set aside.

Spoon jam into Decorator Bottle ( or resealable plastic bag)fitted with round tip.  Chop nuts using Food Chopper.  Place remaining 1/2 C. chocolate chips in small microwavable bowl and microwave, uncovered, on high for 1 min or until mostly melted, stirring every 20 sec..  Spoon melted chocolate in small resealable plastic bag, secure and set aside.

Remove pan from oven. Invert parchment lined cooling rack over pan; flip over and remove pan.  Slice brownies horizontally in half using bread knife.  Place brownie bottoms onto serving platter.  Distribute filling evenly over brownie bottoms.  Top with jam and brownie tops.  Drizzle chocolate over sandwiches; top with peanuts.